EasyManua.ls Logo

Metra Electronics 99-7343 User Manual

Default Icon
16 pages
To Next Page IconTo Next Page
Page #1 background imageLoading...
Page #1 background image
METRA. THE WORLD’S BEST KITS.™
© COPYRIGHT 2004-2011 METRA ELECTRONICS CORPORATION
APPLICATIONS
1-800-221-0932
metraonline.com
INSTALLATION INSTRUCTIONS FOR PART 99-7343
2011 Hyundai Sonata
(For models equipped without Nav and with auto climate controls)
99-7343
•ISODINheadunitprovisionwithpocket
•DDINheadunitprovisions
•Paintedblackandsilvertomatchfactorydash
WIRING & ANTENNA CONNECTIONS(SoldSeparately)
Wire harness:
•70-73042010Kia/HyundaiHarness
•70-73052010Kia/HyundaiAmpBypassHarness
Antennaadapter:
•NotRequired
PanelRemovalTool•PhillipsScrewdriver•SocketWrench
C
A
G HF
B D E
•A)RadioHousing•B)(2)A/CVentTrimPanels
•C)DDINBrackets•D)DisplayBrackets
•E)Pocket•F)(12)1/2”Phillipsscrews
•G)(2)#8X1/4”PanHeadscrews
•H)(4)#8X3/8”TrussHeadscrews
TOOLS REQUIRED
KIT FEATURES
KIT COMPONENTS
Question and Answer IconNeed help?

Do you have a question about the Metra Electronics 99-7343 and is the answer not in the manual?

Metra Electronics 99-7343 Specifications

General IconGeneral
ManufacturerMetra Electronics
Part Number99-7343
Product TypeDash Kit
ColorBlack
MaterialPlastic
ISO DDIN radio provisionYes
Painted scratch-resistant matte blackYes
Wiring HarnessNot included
Antenna AdapterNot included
Installation TypeDash Mount

Summary

Kit Features and Components

Kit Features Overview

Highlights key features like ISO DIN provision, DDIN provision, and factory dash color match.

Kit Components List

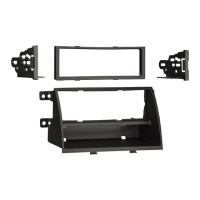
Details the included parts: radio housing, trim panels, brackets, pocket, and various screws.

Wiring and Tools

Wiring and Antenna Connections

Specifies required wire harnesses and notes antenna adapter is not needed for this kit.

Required Tools for Installation

Lists essential tools including panel removal tool, Phillips screwdriver, and socket wrench.

Dash Disassembly Procedure

Removing Trim Panels and Radio

Instructions for unclipping trim panels, removing radio trim panel, and unscrewing the radio.

Removing Climate Controls and Vents

Steps to remove hazard switch, air bag light assembly, climate control, and A/C vents.

Kit Assembly Procedure

Assembling A/C Vents and Trim

Snapping A/C vents into trim panels and attaching panels and climate controls to the housing.

Mounting Hazard Switch and Display

Securing the hazard switch and attaching display brackets to the display unit.

Head Unit Installation Options

ISO DIN Head Unit Provision

Steps for installing an ISO DIN unit, connecting harness, and mounting into the sub dash.

Double DIN Head Unit Provision

Steps for installing a Double DIN unit, connecting harness, and mounting into the sub dash.

Related product manuals