5
EN
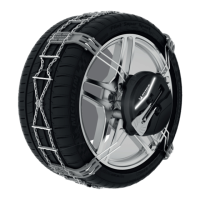
FITTING INSTRUCTIONS
After removing the chains from the case, check that the tensioning handle is in the «OPEN» position.
1. Fit the chain onto the wheel as shown by pushing it as far as possible against the sidewall of the tyre.
2. Separate the universal nut (shown in blue in the diagram) from the fitting wrench by pressing the metal
latch (shown in green in the diagram).
3. Fit the universal nut onto one of the wheel nuts. Align the 6 sides of the universal nut with the 6 sides of
the wheel nut.
IMPORTANT: do not fix the universal nut onto a lock nut or a wheel nut cap
4. Tighten the universal nut securely using the built-in hexagonal wrench.
IMPORTANT: Do not use a torque wrench or a cordless screwdriver.
5. Press the metal latch and push the fitting wrench onto the universal nut as far as possible until the latch
returns to the raised position. You will hear a «CLICK» when the metal tab returns to its initial position.
IMPORTANT: Position the fitting wrench as shown in the drawing, so that the tensioning
cable is in the centre of the wheel.
6. Lift the tensioning handle to the «ADJUST» position.
7. Adjust the serrated knob until the cable is tight.
8. Move the tensioning handle to the «LOCKED» position. If excessive force is required to lock it, this means
that the cable is too tight. Loosen it using the serrated knob to adjust the cable tension.
9. Move the vehicle slowly to turn the wheels 1/2 turn (the tyres must not slip). Finish positioning the tread
surface on top of the tyre and around the wheel.
Repeat operations 6. - 8. to readjust the cable if necessary.
ATTENTION: For optimum use, some tyre sizes require the circumference of the chain to be adapted. This
is achieved by adding tensioning staples if the chain is too slack (if you can pass your hand between the
tyre and the tread band) or by removing tensioning staples if the chain is a little too taut and cannot be
assembled.
AUTOMATIC FITTING :
When next used on the same tyres, you should not need to adjust the tension, the chain will position itself on
the wheel automatically when you drive. You may proceed by skip ping from fitting instructions step 5. to step 9.
10. Move the tensioning handle to the locked position, the chain is then fitted correctly. After a short distance
(approximately 50 - 100 metres) stop the vehicle to verify that the cable is tight and that the chain is
correctly in position on the tyre. If the chain is too slack (you can pass your hand between the tyre and the
tread band), add an extra tensioning staple.
The fitting is complete... You may now drive in complete safety. Maximum speed 50 kph.
IMPORTANT: Before parking the vehicle for any prolonged periods, remove the chains so
that they do not freeze onto the tyres, which would make them harder to remove.