14 ACDC200LCD
Earth Clamp Connection
Connect the earth clamp cable to the positive terminal on the front of the machine,
and the clamp to the work piece. Clear any dirt, rust, scale, oil or paint on the earth
clamp. Make certain you have a good solid ground connection. Make sure the earth
clamp touches the metal.
Gas Installation
WARNING
!!
Shielding gas cylinders and high pressure cylinders can explode
if damaged, so treat them carefully.
• Never expose cylinders to high heat, sparks, open ames,
mechanical shocks or arcs.
• Do not touch cylinder with TIG torch.
• Do not weld on the cylinder.
• Always secure cylinder upright to a cart or stationary object.
• Keep cylinders away from welding or electrical circuits.
• Use the proper regulators, gas hose and ttings for
the specic application.
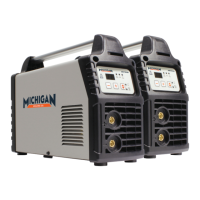
The gas hose
The gas hose, regulator and gas cylinder connection is shown below. Attach one end
of the gas hose to the gas solenoid valve (gas inlet) located on the back panel of the
welder. Attach the other end to the gas regulator which is attached to the shielding
gas cylinder. See illustration below:
1 Cylinder valve: Controls GAS
CYLINDER gas ow.
2 Cylinder pressure gauge
3 Gas ow gauge, see set up charts
for recommended settings
4 Regulator
5 Adjustment knob controls gas
pressure to the welder.
6 Gas hose
7 Gas cylinder
NOTE: Slowly open the cylinder valve by turning it counter-clockwise until the
cylinder pressure gauge registers on the rst gauge of the regulator. Turn the
adjustment knob clockwise (right) slowly to increase gas ow (check the set up
guide on the machine for guidelines on gas ow. To reduce the gas ow, turn the
adjustment counter-clockwise (left). The gas valve is located on the back panel of the
welder and activated by the trigger. Gas ow should be heard when the trigger is
activated. Avoid unnecessary gas loss by closing the tank valve when
nished welding.