4
• The artery mark on the
cuff (ca. 3 cm long bar) must lie over
the artery which runs down the inner side of the arm.
• Support your arm so it is relaxed.
• Ensure that the cuff is at the same height as your heart.
4. Taking a Blood Pressure Measurement
1. Select standard (single measurement) or MAM mode
(automatic double measurement): see details in chapter «2.».
2.
Press the ON/OFF button 1 to start the measurement.
3.
The cuff will now pump up automatically. Relax, do not move
and do
not tense your arm muscles until the measurement
result is displayed. Breathe normally and do not talk.
4. The cuff fit check AR on the display indicates that the cuff is
perfectly placed. If the icon AR-A appears, the cuff is fitted
suboptimally, but it is still ok to measure.
5. When the correct pressure is reached, the pumping stops and the
pressure falls gradually. If the required pressure was not reached,
the device will automatically pump some more air into the cuff.
6. During the measurement, the pulse indicator BM flashes in the
display.
7. The result, comprising the systolic AL and the diastolic AM blood
pressure and the pulse rate AN is displayed. Note also the
explanations on further display symbols in this booklet.
8. When the device has finished measuring, remove the cuff.
9. Switch off the device. (The monitor does switch off automatically
after approx. 1 min.).
F
You can stop the measurement at any time by pressing the
ON/OFF button (e.g. if you feel uneasy or an unpleasant
pressure
sensation).
This monitor is specially tested for use in pregnancy and
pre-eclampsia. When you detect unusual high readings in
pregnancy, you should measure after a short while again
(eg. 1 hour). If the reading is still too high, consult your
doctor or gynecologist.
In pregnancy the AFIB symbol can be ignored.
Manual inflation
In case of high systolic blood pressure (e.g. above 135 mmHg)
,
it can be an advantage to set the pressure individually. Press the ON/
OFF button after the monitor has been pumped up to a level of
approx. 30 mmHg (shown on the display). Keep the button pressed
until the pressure is about 40 mmHg above the expected systolic
value – then release the button.
How not to store a reading
As soon as the reading is displayed press and hold the ON/OFF
button 1 until «M» AP is flashing. Confirm to delete the reading by
pressing the MAM button 4.
«CL» is displayed when the reading is deleted from the
memory successfully.
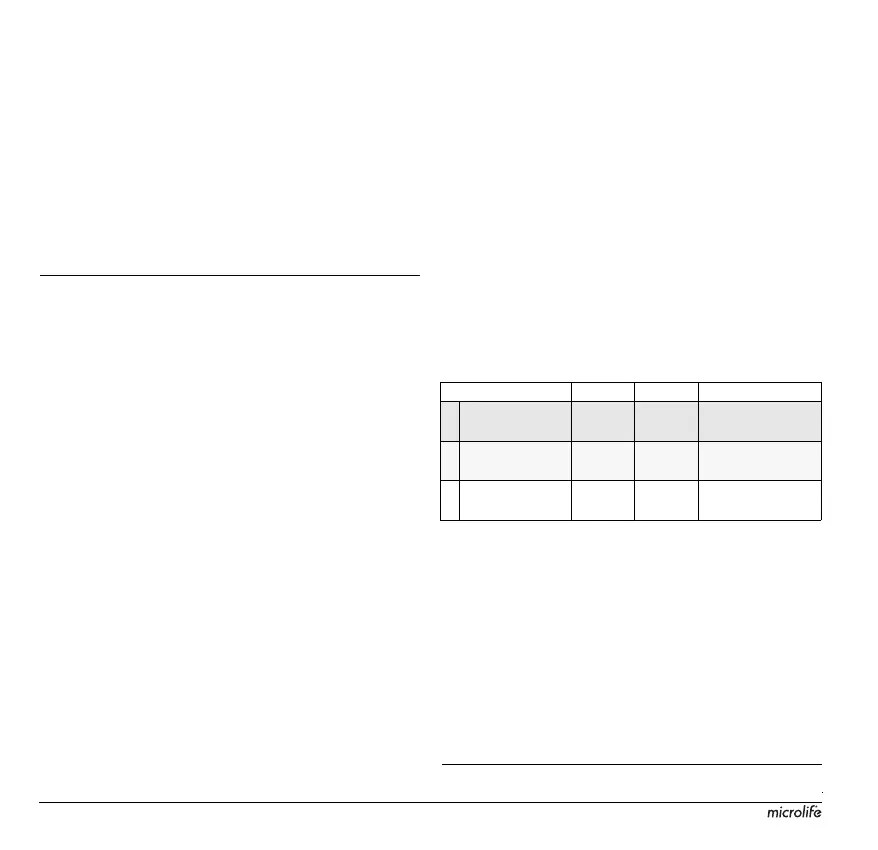
How do I evaluate my blood pressure?
The triangle on the left-hand edge of the display
BL
points at the
range within which the measured blood pressure value lies. The
value is either within the optimum (green), elevated (yellow) or high
(red) range. The classification corresponds to the following ranges
defined by international guidelines (
ESH, ESC, JSH
). Data in mmHg.
The higher value is the one that determines the evaluation.
Example: a blood pressure value of 140/80 mmHg or a value of
130/90 mmHg indicates «blood pressure too high».
Appearance of the Pulse Arrhythmia (PAD)
The pulse arrhythmia indicator BT is displayed, when pulse
irregularities occurred during the measurement. If the symbol
appears, it is recommended to select MAM mode and repeat
measurement to double confirm the blood pressure reading: see
details in chapter <<2>>.
F
When Atrial Fibrillation (AF) is detected, the PAD is also
indicated because AF is one type of pulse irregularities.
5. Data Memory
This device automatically stores the last 99 measurement values
Range Systolic Diastolic Recommendation
1. blood pressure
too high
≥135 ≥85 Seek medical
advice
2. blood pressure
elevated
130 - 134 80 - 84 Self-check
3. blood pressure
normal
<130 <80 Self-check
Always ensure that the correct cuff size is used (marking on the cuff).
• Fit the cuff closely, but not too tight.
• Make sure that the cuff is positioned 2 cm above the elbow.
patients first visit in order to determine which arm to measure in the
future. The arm with the higher blood pressure should be measured.
Remove close-fitting garments from the upper arm. To avoid
constriction, shirt sleeves should not be rolled up - they do not
interfere with the cuff if they are laid flat.
 Loading...