Con guring input Channels and Groups
To access ASSIGN mode, rst make sure the SETUP, SD-REC, MIX A and MIX B buttons are not illuminated.
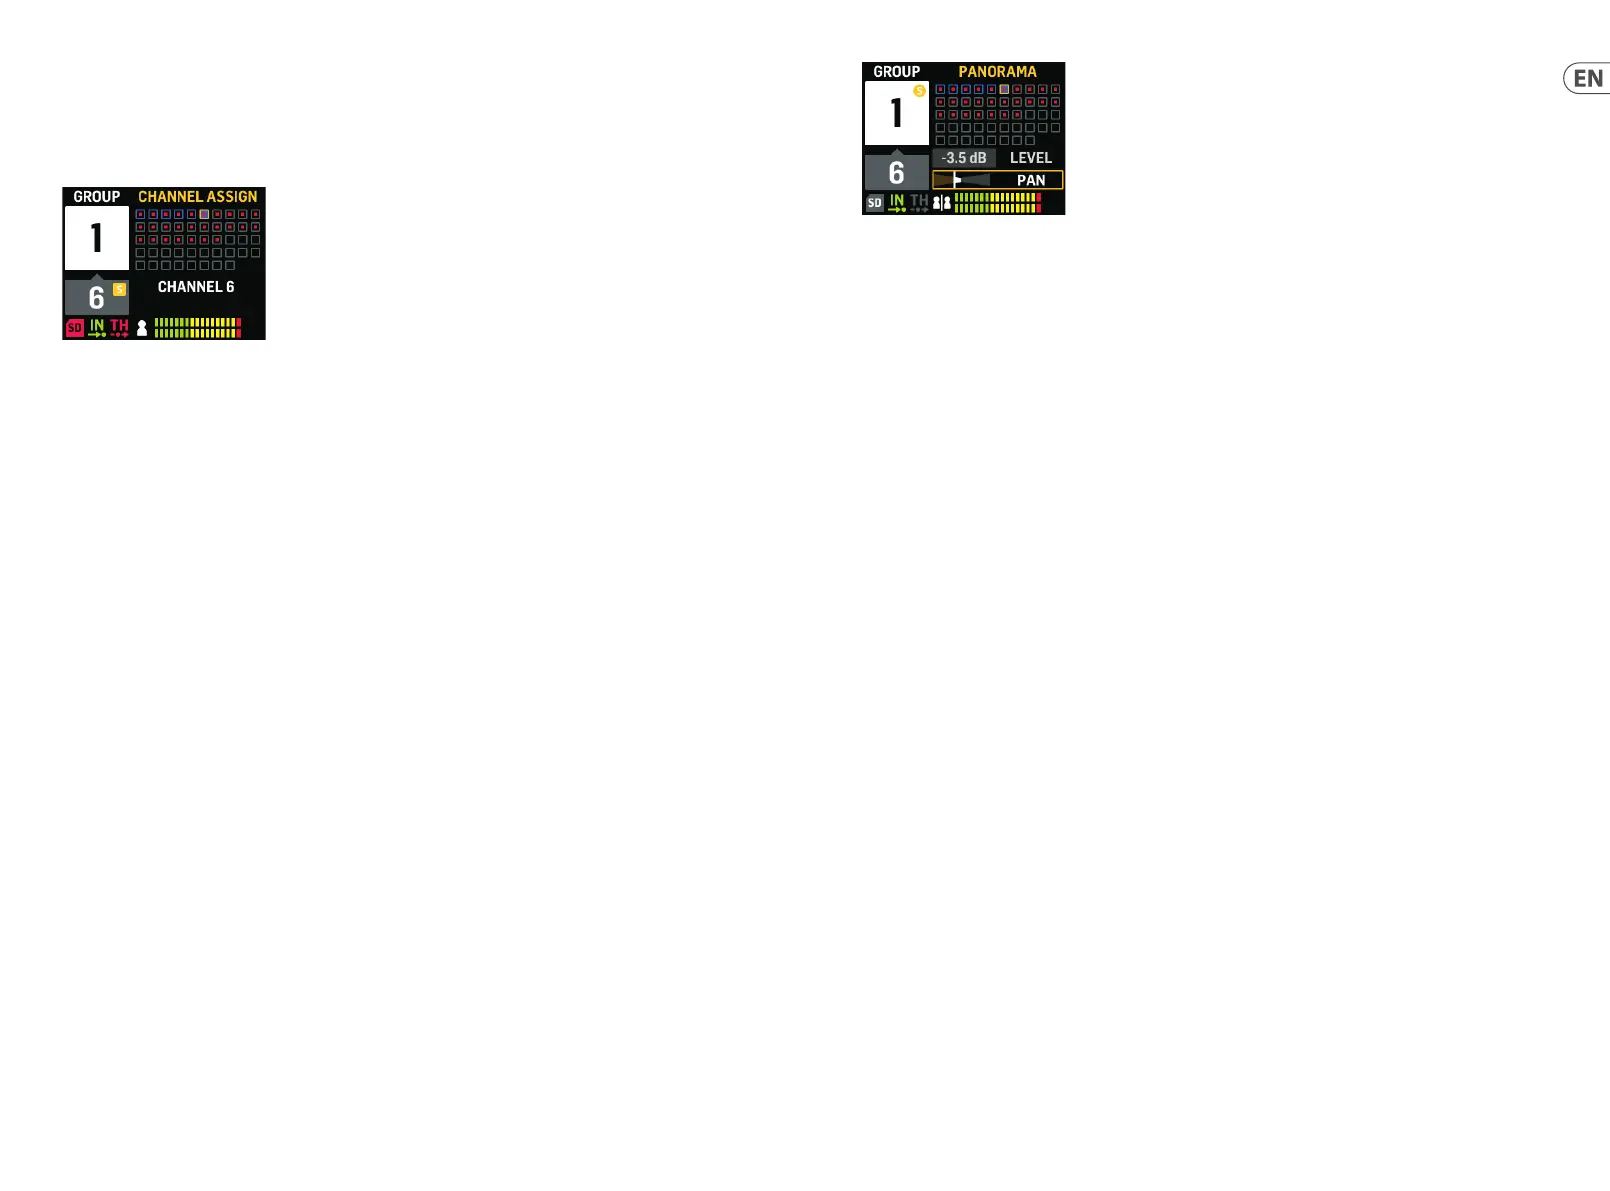
In ASSIGN mode, the GROUP/CHANNEL ASSIGN screen will show the 48 available AES50 channels as a series of
boxes with
varying colors. The Group number and channel number will appear on the left side of the screen.
In the GROUP/CHANNEL ASSIGN screen, you can judge the assignment status of an individual channel by the following color
cues:
• Amber frame – channel is selected
• Blue frame – channel is assigned to the currently-active Group
• Flashing – an audio signal is present in the channel
To assign /unassign a channel to a Group
1. Press the INPUT CHANNEL/ASSIGN button to enter the GROUP/CHANNEL ASSIGN screen.
2. Choose a Group by pressing one of the GROUPS 1-12 buttons along the lower edge of the DP48 top panel.
Channels assigned to the currently-selected Group will
appear blue.
NOTE: For easy channel identi cation, soloed audio from the selected AES50 channel will replace the MIX A/B audio.
3. Rotate the SELECT/EDIT push encoder to scroll to the desired channel. When the desired channel is ready for
se
lection, the channel’s box will change color from a gray to an amber frame.
4. Press the SELECT/EDIT push encoder to assign/unassign the selected channel to the current Group. The selected
channel’s box will change color to a blue
ll with an amber frame to indicate the channel has successfully been
assigned to the current Group.
*The incoming AES50 datastream may also include channel name and colour-coding information, depending on the
AES50 source.
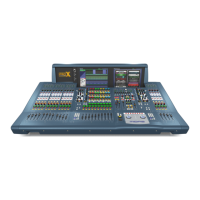
Setting the input channel levels and panorama
The top-level MIX A/MIX B METERS screen only displays level settings for Groups.
Levels and panning for individual channels can only be adjusted and set individually within Groups. Once channel levels
and panning are set within a Group, you can then ba
lance levels and panning between entire Groups in the MIX A/MIX B
METERS screen.
GROUP/CHANNEL ASSIGN screen
To edit levels and panning wi thin a Group
1. Before editing channel levels and panning, make sure your overall Mix Volume and Group levels are loud enough
that you can hear audio from the input channels.
2. Press the INPUT CHANNEL/EDIT button to enter the INPUT CHANNEL screen.
3. Choose a
speci c Group by pressing one of the GROUPS 1-12 buttons. The selected Group is automatically soloed
and will replace the MIX A/MIX B audio.
4. Channels assigned to the currently-selected Group will appear as blue boxes. If no blue boxes are
visible, then the
selected Group is still empty.
5. Use the REVERB(<< ) and PAN(>> ) buttons to select an input channel within the group. The selected channel will
appear as an amber box with a blue ll.
6. Rotate the SELE
CT/EDIT push encoder to adjust the currently-active Level or Pan parameter. Push the encoder to
select between LEVEL and PAN.
7. Repeat steps 5-6 until the mix for Members in this Group is set, then consider moving on by pressing another
Group button.
8. When
done, pressing the EDIT button again will bring you back to the selected Group processing page,
and Group Solo will be switched o automatically.
9. You can then take the following actions:
adjust that Group's mix level in relation to the other Groups by turning the respective GROUP LEVEL control
make adjustments to that Group’s processing, i.e., Compressor, Reverb Send or Equaliser.
press that Group's button again to go back to the metering overview (idle) screen
To set Group levels in your nal mix
To begin creating your nal mix, you will be directly setting levels for entire Groups of channels by using the
GROUP LEVEL knob.
1. Select a Group for level setting by pressing one of the GROUPS 1-12 buttons. The system will take you to
that
Group’s GROUP/LEVEL screen.
2. Rotate the GROUP LEVEL knob to adjust the Group’s overall level by .5 dB increments. The left GROUP LEVEL knob
will control LEVEL A going to MIX A, while the right GROUP LEVEL knob
controls the LEVEL B for MIX B.
3. Select another Group for level adjustment by pressing one of the GROUPS 1-12 buttons.
4. Repeat steps 1-3 until satisfactory levels have been set for all Groups.
5. To exit, de-select the currently-active Group by pressing that
Group’s GROUPS 1-12 button.
NOTE: At any time, you may adjust a Group’s level by selecting that Group’s GROUPS 1-12 button and then rotating the
GROUP LEVEL knob for the currently-active mix.
INPUT CHANNEL EDIT screen
20 21Quick Start GuideDP48