EasyManua.ls Logo

Midwest Skudo - User Manual

Midwest Skudo
2 pages
Print Icon
To Next Page IconTo Next Page
Loading...
This carrier is intended for well-trained pets. Supervision required. Remove collar, tags and leads from pet before
placing it in the carrier to prevent possible entanglement. Contains small parts. Keep out of reach of children.
Approved for use on most major airlines. It is recommended that you check with the airline for specifications prior
to booking.
Unwrap and remove all parts from packaging. Keep all packaging material until the product is assembled. In case of
return or exchange, failure to return product in similar condition as received could result in limited reimbursement.
Please save sales receipt as proof of purchase for warranty purposes. To protect the finish of your travel carrier
use only mild, non-abrasive cleaners and water. Any course scrubbing or abrasive materials could damage
the plastic.
IMPORTANT INFORMATION
PARTS IDENTIFICATION
A
B
C
D
E
Assembly Instructions for Models 1427TSG, 1432TSG, 1436TSG
A Carrier Bottom (1)
B Carrier Top (1)
C Door with Spring Loaded Latch (1)
D Assembly Buckles with Yellow
Buckle Hinges (Pre-assembled): 5
with the 27” and 32” carriers; 9 with
the 36” carrier.
E Storage Compartment Lid(s): 2 come
pre-attached on the 32” and 36”
carriers; 1 comes unattached on the
27” carrier
F Locking Door Hinges (2 Left, 2 Right)
NOTE: Optional rolling casters sold
separately.
Skudo Travel Carrier Large INST (146)
To use the pull handle, release the locks
near the carrying handles and swing the
pull handle up and over to the front of the
carrier.
- Come Visit Our Website
Crates Pet Beds
Crate Casters Ex Pens Kennels . . .
For a Complete Listing of Products
F
DISASSEMBLING THE CARRIER:
Release the Assembly Buckles
by pushing the yellow buttons to
allow Buckles to disengage. As you
lift up on the Carrier Top, remove
the Door and completely remove
the Carrier Top. The Door and
Carrier Top can be nested inside
the Carrier Bottom for storage.
1
Question and Answer IconNeed help?

Do you have a question about the Midwest Skudo and is the answer not in the manual?

Summary

Disassembling the Carrier

Important Information

Parts Identification

Carrier Bottom

The base part of the carrier where the pet rests.

Carrier Top

The upper section of the carrier that encloses the pet.

Door with Spring Loaded Latch

The front door with a mechanism for secure closure.

Assembly Buckles

Connectors used to secure the top and bottom halves of the carrier.

Storage Compartment Lid

Lids for small compartments on the carrier for storing items.

Locking Door Hinges

Hinges that attach the door to the carrier frame.

Assembly Instructions

Attaching Locking Door Hinges

Procedure for attaching door hinges to the carrier halves.

Attaching Storage Compartment Lid

Step for attaching the storage lid on specific carrier models.

Attaching Assembly Buckles

Guidance on connecting the carrier halves using buckles.

Securing Carrier Top and Door

Steps to place and secure the carrier top and attach the door.

Operating the Door

Instructions on how to open and lock the carrier door.

Carrier Door Options

Alternative ways to attach or orient the carrier door.

Attaching Optional Casters

Instructions for attaching separately sold rolling casters.

Overview

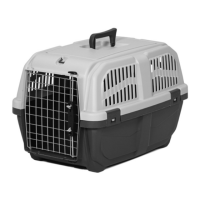
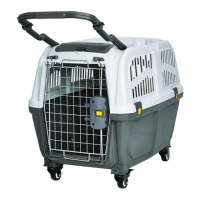
The Skudo Travel Carrier is a pet carrier designed for the safe and comfortable transport of well-trained pets. It is available in three models: 1427TSG, 1432TSG, and 1436TSG, which likely correspond to different sizes. The carrier is approved for use on most major airlines, though it is recommended to check with the specific airline for their specifications prior to booking.

Function Description:

The primary function of the Skudo Travel Carrier is to provide a secure and comfortable enclosure for pets during travel. It features a robust design with a carrier bottom and top, a door with a spring-loaded latch, and assembly buckles to secure the two halves. The carrier is designed for easy assembly and disassembly, allowing for compact storage when not in use. It also offers flexibility in door installation, allowing for right-to-left or left-to-right opening, or complete removal to create an open, den-like environment for the pet. Optional rolling casters can be attached for easier maneuverability.

Important Technical Specifications:

  • Models: 1427TSG, 1432TSG, 1436TSG.
  • Components:
    • Carrier Bottom (1)
    • Carrier Top (1)
    • Door with Spring Loaded Latch (1)
    • Assembly Buckles with Yellow Buckle Hinges (Pre-assembled): 5 for 27" and 32" carriers; 9 for 36" carrier.
    • Storage Compartment Lid(s): 2 for 32" and 36" carriers; 1 for 27" carrier.
    • Locking Door Hinges (2 Left, 2 Right).
  • Material: Plastic.
  • Airline Approval: Approved for use on most major airlines (verification with airline recommended).
  • Tie-down Locations: Multiple tie-down locations in the corners for use with plastic ties, recommended for air travel.
  • Optional Accessories: Rolling casters (sold separately).

Usage Features:

  • Assembly:
    1. Attach the Locking Door Hinges to both the Carrier Bottom and Carrier Top as shown in the instructions. Care should be taken to attach them correctly as removal can be difficult.
    2. Attach the Storage Compartment Lid. For the 27" carrier, it comes unattached, while for the 32" and 36" carriers, they are pre-attached.
    3. Set the Carrier Bottom on a flat surface and attach the Assembly Buckles. The Yellow Buckle Hinges snap into place in the provided spaces. Keeping the Assembly Buckle and Yellow Buckle Hinge in a "V" formation facilitates attachment.
    4. Place the Carrier Top on the Carrier Bottom. Before locking the buckles, attach the door by inserting the bottom door prong into the hole on the left side of the Carrier Bottom. Lift the Carrier Top to insert the top door prong into the Carrier Top. Lower the Carrier Top onto the Carrier Bottom and secure them by locking the Assembly Buckles.
  • Door Operation: To open the door, squeeze the tabs to disengage the spring-loaded prongs, then swing the door open. Push the orange tab to lock the door.
  • Door Options:
    • Removal: The door can be removed by twisting the Locking Door Hinges forward, creating an open, den-like environment for the pet.
    • Left-to-Right Opening: The door can be installed with the locking mechanism on the left, allowing it to open left-to-right. To do this, twist the Locking Door Hinges toward you, re-install the door with the locking mechanism on the left, then twist the Locking Door Hinges inward toward the center of the carrier to secure it in the locked position.
  • Pull Handle: To use the pull handle, release the locks near the carrying handles and swing the pull handle up and over to the front of the carrier.
  • Disassembly for Storage:
    1. Release the Assembly Buckles by pushing the yellow buttons to disengage them.
    2. Lift up on the Carrier Top, remove the Door, and completely remove the Carrier Top.
    3. The Door and Carrier Top can be nested inside the Carrier Bottom for compact storage.
  • Caster Attachment (Optional): Turn the carrier upside down and push the tabs on the carrier feet to release the caster mounts. Slide the casters into the caster mounts, then re-attach the caster mounts to the Carrier Bottom.
  • Safety Precautions:
    • Supervision is required when pets are in the carrier.
    • Remove collar, tags, and leads from the pet before placing it in the carrier to prevent entanglement.
    • The carrier contains small parts; keep out of reach of children.
    • For air travel, it is recommended to use plastic ties in the multiple tie-down locations in the corners for added security.

Maintenance Features:

  • Cleaning: To protect the finish of the travel carrier, use only mild, non-abrasive cleaners and water. Course scrubbing or abrasive materials could damage the plastic.
  • Packaging Retention: Keep all packaging material until the product is assembled. In case of return or exchange, failure to return the product in similar condition as received could result in limited reimbursement.
  • Proof of Purchase: Save the sales receipt as proof of purchase for warranty purposes.

Midwest Skudo Specifications

General IconGeneral
BrandMidwest
ModelSkudo
CategoryPet Care Product
LanguageEnglish

Related product manuals