Do you have a question about the Milton Roy LMI P1 and is the answer not in the manual?
Provides essential safety and handling precautions for operating and maintaining the metering pump.
Step-by-step instructions for priming the pump, including speed and stroke knob settings.
Explains how to adjust output based on speed and stroke settings using the identification plate information.
Procedures for volumetric calibration, including external mode and adjusting stroke length for desired output.
Detailed guide for replacing wear parts like the diaphragm, including specific settings and warnings.
Common issues like pump not priming, losing prime, leakage, low output, and failure to run, with solutions.
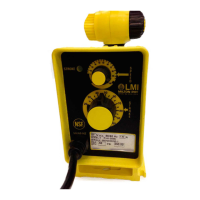
Visual representation of the LMI pump series P1 components with numbered parts.
The MILTON ROY LMI Electronic Dosing Pump is a device designed for the precise dosing of liquid products across various applications. This manual provides comprehensive instructions for its installation, operation, and maintenance, ensuring optimal performance and longevity.
The LMI Electronic Dosing Pump is primarily used for metering liquids, offering controlled and adjustable output. It consists of two main parts: the drive assembly and the liquid handling assembly. The pump's output can be adjusted through stroke control, which modifies the percentage of maximum diaphragm travel, and speed adjustment, which controls the percentage of maximum strokes per minute. Certain models (B7 and C7 Series) also feature pressure control adjustment, allowing for the regulation of the pump's pressure capability and power consumption, thereby reducing heat, pipe shock, and pulsation.
Accessories like the 4-Function valve, 3-Function valve, and Bleed/4-Function valve enhance the pump's versatility. The 4-Function valve provides anti-syphon capabilities to prevent siphoning when pumping downhill or into a vacuum, back pressure to prevent over-pumping in low-pressure systems, manual priming for pressurized lines, and line depressurization to drain the discharge line back to the supply tank. The 3-Function valve offers manual priming, automatic pressure relief, and manual line depressurization. The Bleed/4-Function valve combines anti-syphon, back pressure, continuous bleed (for degassing or entrapped vapors, ideal for low vapor pressure solutions), and line depressurization functions. A foot valve, available on some models, facilitates priming and maintains prime in suction lift applications, with a strainer to prevent sediment and valve clogging. An injection check valve prevents backflow from the treated line.
The pump's performance varies by model, with specific outputs, pressures, and stroke capacities. For instance, the P12x model has a maximum output of 0.75 l/h and a maximum pressure of 10.3 bar, while the P18x offers a maximum output of 12 l/h and a maximum pressure of 1.5 bar. Stroke capacity ranges from 0.07 ml to 2.00 ml depending on the model. Stroke frequency is adjustable from 1 to 100 strokes per minute across all P1x models. Diaphragm sizes vary from 0.5 inches to 1.8 inches. Recommended minimum stroke length is between 20% and 30%. Peak power consumption ranges from 75W to 150W, with average power between 11Wh and 22Wh.
Electrical specifications include voltage ratings of 115V or 230V for most models, with some (J54D, J55D, J56D) operating on 12VDC. The EPU (Electronic Pulser Unit) resistance chart provides specific coil resistance values at 20°C (68°F) for different pump series and voltages, crucial for troubleshooting EPU failures. For example, Ax4, Ax5, Ax6, Px4, Px5, Px6, Px8, H9 series at 115V have a coil resistance of 76-87 ohms, while at 230V, it's 307-353 ohms.
The LMI Electronic Dosing Pump is designed for ease of installation and operation. It can be mounted in two ways: flooded suction, where the pump is at the base of the storage tank (recommended for low outputs, gasifying, and high viscosity solutions), or suction lift, where the pump is mounted above the solution tank (for suction lifts less than 1.5m). Tank mount and shelf mount options are also available. Proper tubing connections are critical, with specific recommendations for tubing size, material (avoid clear vinyl tubing on the discharge side), and secure attachment. All fittings should be hand-tightened to prevent damage and ensure proper sealing.
Priming the pump is a key start-up procedure. Pumps are pre-primed with water from the factory. For initial start-up or after long storage, the pump head should be refilled with a compatible solution. During priming, the speed knob should be set to 80% and the stroke knob to 100%. If equipped with a pressure control knob, it should be turned fully clockwise. Calibration is essential to adjust speed and stroke for the desired output, involving measuring the volume pumped over a set number of strokes. For pumps with external control devices (like flowmeters or 4-20mA signals), volumetric calibration in external mode focuses on calibrating the output per stroke. Pressure control adjustment, for B7-C7 series, involves turning the knob clockwise until the unit stalls, then slowly counter-clockwise to find the optimum setting.
Routine maintenance is crucial for the pump's optimal performance and longevity. This includes regular replacement of elastomeric parts, typically at least once a year, depending on the application. The manual provides detailed instructions for diaphragm replacement, which involves depressurizing the pump, flushing the head assembly, dismantling the liquid end, unscrewing the diaphragm, cleaning, reinstalling, and properly positioning the new diaphragm. After replacement, the pump head screws should be tightened in a crisscross pattern to specific torque values. It is recommended to recheck and tighten the screws after one week of operation.
Instructions for ball, seal ring, and injection check valve spring replacement are also provided, emphasizing careful dismantling and noting the orientation of each item. Troubleshooting guides cover common issues such as the pump not priming (e.g., incorrect output dial settings, high suction lift, air leaks), pump losing prime (e.g., dry solution container, clogged foot valve strainer), leakage at tubing (e.g., worn tubing ends, loose fittings), low output or failure to pump against pressure (e.g., exceeded pressure rating, ruptured diaphragm), and failure to run (e.g., EPU or pulser failure). The EPU resistance chart is a valuable tool for diagnosing EPU failures by measuring resistance across the EPU wires. Electrical safety precautions, such as disconnecting power before maintenance and using earth leakage circuit breakers, are highlighted. The pump's noise level is less than 65 dB (A).
| Brand | Milton Roy |
|---|---|
| Model | LMI P1 |
| Category | Water Pump |
| Language | English |