Do you have a question about the Mini 0826 and is the answer not in the manual?
Guidelines to prevent damage and ensure safe operation, covering exposure, disassembly, and cleaning.
Specifies the recommended temperature range for camcorder operation to prevent damage.
Details the necessary specifications for a PC to be compatible with the dash camera software.
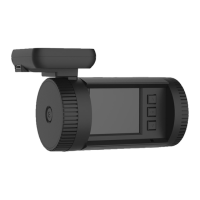
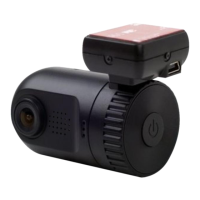
An overview of the camera's physical layout and the meaning of its various icons.
Instructions on how to insert a TF card and recommendations for card specifications.
Methods for powering the dash camera on, either via the power button or car charger.
Steps for capturing still images and navigating through recorded pictures.
Guidance on essential pre-use configurations like date, time, and language.
Configuration options for loop recording, video resolution, EV, white balance, and ADAS.
Configuration options including Flicker, Lens, White Balance, ADAS, TV type, and AUTO power off.
Settings for displaying date/time information and enabling motion detection.
Options for screen timeout, video camera modes, and G-sensor precision.
Settings for Wide Dynamic Range, High Dynamic Range, and USB connection mode.
Options for selecting the device language and restoring factory default settings.
Instructions for formatting storage media and setting the speed unit for GPS.
Configuration for time/date stamps and enabling/disabling the GPS tracking feature.
Procedure for connecting the GPS module and understanding signal indication.
Steps to access and manage recorded video files on the LCD screen.
Instructions for connecting the dash camera to a computer using a USB cable.
Guidance on connecting the camera to TVs for viewing videos and pictures.
Details on the primary mode for recording videos and capturing pictures.
Explanation of various icons used in record mode, including video, battery, and GPS status.
Introduction to the mode used for displaying saved video files.
Steps to protect video files from accidental deletion or modification.
Instructions for connecting the camera to a PC via USB to access files as a removable disk.
Comprehensive technical details of the dash camera, including sensor, chip, lens, and memory.
Solutions for problems like sudden power off, image saving errors, and button malfunctions.
List of items included with the dash camera package and methods for applying film.
The Mini 0826 Super HD 1296P Dash Camera is a compact camcorder designed for in-car video recording, utilizing an Ambarella A7 processor. It captures video and still images, offering various resolutions and frame rates, including Super HD 1296P. The camera is equipped with a 135-degree wide-angle lens and features a 1.5-inch TFT display for viewing and configuration.
The primary function of the Mini 0826 is to record video while driving, serving as a dash camera for security and incident documentation. It supports loop recording, which automatically overwrites older files when the memory card is full, ensuring continuous recording. Users can choose between different loop recording durations (1, 3, or 5 minutes) or disable it entirely. When loop recording is off, the device will not record automatically, and files are not recycled; recording stops when the card is full.
The camera also allows for taking still pictures. This can be done while recording or in standby mode by long-pressing the "OK" button.
An optional GPS tracker box (which also serves as a bracket) enables GPS functionality. When connected, the device can track location, and this information can be stamped onto recorded videos or pictures. The GPS signal indicator will appear on the display once a satellite connection is established. Speed units can be set to Km/h or Mph.
The device includes ADAS (Advanced Driver-Assistance Systems) features such as LDWS (Land Departure Warning System), FCW (Forward Collision Warning), and FCMD (Forward Car Motion Detection), which enhance driving safety.
For data management, the camera supports an external TF card (up to 64GB) and may include an optional built-in 8GB memory for internal storage. A unique copy function allows users to transfer video clips between external and internal storage, providing a backup. This is particularly useful for preserving evidence before handing over a memory card.
The camera can be connected to a PC via USB for mass storage access, allowing users to transfer files. It also supports connection to a standard TV via AV-OUT (with customized cables) and to an HDTV via HDMI for high-resolution video and picture display.
To begin using the camera, a TF card must be inserted. It is recommended to use a high-speed TFHC card (Class 6 is ideal, Class 10 up to 48MB/s is acceptable). For 64GB cards, formatting to Fat32 is required before use.
The camera can be powered on by pressing the Power button or by connecting it to a car charger, which will automatically turn it on when the car starts.
Before initial use, essential settings such as Date and Time, Language, and Beep Tone should be configured. These settings are accessed by long-pressing the "UP" button (Menu) and navigating with the "UP" and "DOWN" buttons.
Video resolution options are extensive, ranging from 2560x1080 30P (21:9) to 1280x720 30P (16:9), with some models offering 1296x1080 60P. HDR (High Dynamic Range) is also available for improved video quality in varying light conditions.
Other adjustable settings include EV (Exposure Value) compensation, Flicker frequency (50/60Hz), White Balance (Auto, Sunny, Incandescent, Fluorescent, Cloudy), TV type (NTSC/PAL), AUTO power off duration, Date time display options, Motion detect (on/off), Power off screen duration, Video camera mode (Video + audio / video), G-sensor precision (2G to 4.5G or CLOSE), WDR/HDR, and USB Mode (Mass storage).
The "Stamp" function allows users to imprint date, time, car information, or a 9-character driver number/license plate onto the video. Note that space limitations may prevent displaying all information simultaneously (e.g., driver number cannot show if date time and car are selected, and GPS information cannot show if date time and driver number are selected).
Reviewing recorded files is done by long-pressing the "DOWN" button to enter Movie reviewing mode. From there, users can navigate through videos and pictures, delete files, protect files, or copy them. Protected files are marked with a specific icon and cannot be deleted or overwritten during loop recording, except for the last cycle recorded file if loop recording is enabled. During recording, pressing the "DOWN" button can also save and lock the current file, preventing accidental deletion.
The device includes a built-in microphone/speaker for audio recording and playback.
To ensure optimal performance and longevity, several precautions are outlined. The camera should not be exposed to dusty, dirty, or sandy environments, extreme temperatures (hot or cold), or direct sunlight for prolonged periods, especially in a closed car. Violent vibrations should also be avoided.
Users are advised not to attempt to disassemble or repair the camera themselves to prevent electric shock and internal damage. Dropping or punching the camera can also damage internal components.
For cleaning, only a slightly damp soft cloth should be used; harsh chemicals, cleaning solutions, or high-concentration detergents are not recommended.
If the camera or its accessories malfunction, they should be sent to a professional service center for maintenance.
Regular formatting of the micro SD card is recommended to prevent storage problems. This function is available in the settings menu.
The manual also provides troubleshooting tips for common issues, such as the camera turning off unexpectedly (check Auto Off Function and battery level), captured images not saving (ensure power is not off before saving), and memory card issues (unlock or format the card, backing up files first). If all buttons become unresponsive, a long press of the power button can resolve the issue.
The manual includes instructions for applying the included film and 3M sticker to the car windshield for mounting. The film helps in easy removal of the bracket without leaving residue.
| Sensor | OmniVision OV4689 |
|---|---|
| Lens | 6-element glass lens |
| Video Format | MOV |
| Video Codec | H.264 |
| G-Sensor | Yes |
| Loop Recording | Yes |
| Parking Mode | Yes |
| Night Vision | Yes |
| Motion Detection | Yes |
| Storage | MicroSD |
| Lens Angle | 135 degrees |
| Display | 1.5 inch LCD |