minnkota.johnsonoutdoors.com | 13 ©2023 Johnson Outdoors Marine Electronics, Inc.
INSTALLING THE GAS SPRING
ITEM(S) NEEDED
#10 x 2
2
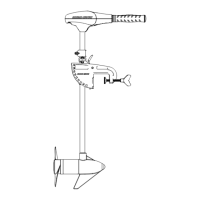
a. Use the Pull Grip and Cable to disengage the Latch
Bar on the Mount.
b. With the help of a second person, loosen the Depth
Collar and position the motor halfway between the
stowed and deployed position so that the Lower Unit
rests on the Motor Ramp.
Installing the Gas Spring
1
c. The Gas Spring is located inside the Outer Arm.
Once the motor is correctly positioned, the Gas
Spring can be secured in place.
d. There is a loose Bracket on the end of the Gas Spring
with holes and recessed Nylock Nuts. Align the
Bracket with the holes in the Outer Arm, which
should be below the Shaft. Adjust the motor as
needed to align the Bracket with the holes in the
Outer Arm.
e. Take two Pan Head Phillips Machine Screws
(Item #10) and install them through the holes in the
Outer Arm and into the Bracket at the end of the Gas
Spring using a #3 Screwdriver. Tighten to 35 in-lbs.
Pull Grip Pull Grip
and Cableand Cable
Pull Grip Pull Grip
and Cableand Cable
Motor Motor
RampRamp
Depth CollarDepth Collar
Lower Lower
UnitUnit
MountMount
ShaftShaft
HolesHoles
Gas Gas
SpringSpring
Gas Gas
SpringSpring
Pan Head Pan Head
Phillips Phillips
Machine Machine
ScrewsScrews
Outer ArmOuter Arm
BracketBracket
BracketBracket
1a
1b
2d
2e
NOTICE: If mounting both a Humminbird MEGA 360
Imaging® and MEGA Live TargetLock™ to your motor, a
dierent lift-assist gas spring is needed to accommodate
the additional weight. The cylinder provided from
the factory with your mount is not enough to lift both
accessories together. Visit
minnkota.johnsonoutdoors.com
to view gas spring and motor compatibility.
 Loading...