Your product has the benet of our manufacturer’s 10 year
guarantee (5 years for any commercial installations) which starts
from the date of purchase. Note! Wastes, upstand kits and riser
kits are guaranteed for 1 year only. For terms and conditions refer
to the back cover of this guide.
1192074-W2-D
Installation and User Guide
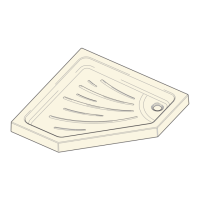
MIRA FLIGHT SHOWER TRAY
Upstand Trays
GUARANTEE
INSTALLATION
Stud partition wall preparation.
1
2
± 0 mm
2
Place the shower tray on a at surface and using a spirit level
check that it is straight and at and that the shower cubicle will
sit on its surface correctly when tted.
± 0 mm
3
Place the shower tray on a at surface and using a spirit level
check that it is straight and at and that the shower cubicle
will sit on its surface correctly when tted.
Fit the waste, as per the instructions supplied with the waste.
Note! Do Not Use silicone sealant.
3
Apply silicone sealant in accordance with the manufacturer’s
instructions to seal the shower tray to the wall.
4
Tile the walls down on top of shower tray.
Apply silicone sealant in accordance with the manufacturer’s
instructions to seal the shower tray to the tiled wall surface.
24 hours
5
GENERAL INFORMATION
1. Read all of these instructions and retain this guide for later use.
2. Pass on this guide in the event of change of ownership of the
installation site.
3. Follow all warnings, cautions and instructions contained in this
guide.
4. Warning! Two-person lift.
5. Before installation, carefully remove all of the protective lm from
the tray for inspection.
6. Carefully unpack and check the tray for colour, size, atness,
general acceptability and compatibility with the shower enclosure
and other bathroom furniture.
7. Check for transit damage.
8. Report any faults immediately to your supplier. No claims will be
considered after installation.
9. Fitting this product is acceptance of quality.
10.Caution! Additional protective coverings such as a dust sheet
should be used to protect the tray from damage from falling objects
during installation.
Notication to designers, installers and users:
The majority of all shower trays will show an increase in the potential for
slipping, when the surface is wet. This is particularly the case when soap,
shampoo, bath oil etc. are used. The Construction Products Directive
(89/106/EEC)”.
Domestic
ü
Heavy Commercial
û
Light Commercial
ü
Healthcare
ü
RECOMMENDED USAGE
Carefully cover the waste to prevent any dirt and debris from
entering while preparing a bed of sand and cement or silicon
sealant for shower tray.
Ensure oor/substrate is level, solid and with no movement.
Ensure oor/substrate is dry, clean and dust/debris free.
Ensure oor/substrate is suitably primed.
It is recommended to use a 5:1 ratio of sand and cement, ensuring
adequate mortar distribution under the tray with a minimum 10mm
thickness.
Alternatively, if this is not practical, a suitable construction adhesive
may be used but this MUST be suitable for the substrate being
adhered to (check construction adhesive label for suitability prior
to use).
The construction adhesive should be applied to all contact points
underneath the tray. The tray should then be pushed down onto
the substrate until it is level in all planes.
Important! Kohler Mira are not liable for the performance of 3rd
party adhesives and materials.
5:1
OR
Non Upstand Trays
Carefully cover the waste to prevent any dirt and debris from
entering while preparing a bed of sand and cement or silicon
sealant for shower tray.
Ensure oor/substrate is level, solid and with no movement.
Ensure oor/substrate is dry, clean and dust/debris free.
Ensure oor/substrate is suitably primed.
It is recommended to use a 5:1 ratio of sand and cement, ensuring
adequate mortar distribution under the tray with a minimum 10mm
thickness.
Alternatively, if this is not practical, a suitable construction adhesive
may be used but this MUST be suitable for the substrate being
adhered to (check construction adhesive label for suitability prior
to use).
The construction adhesive should be applied to all contact points
underneath the tray. The tray should then be pushed down onto
the substrate until it is level in all planes.
Important! Kohler Mira are not liable for the performance of 3rd
party adhesives and materials.
5:1
OR
Note! Where the shower tray comes into contact with the wall,
apply a liberal amount of silicone sealant before installation.
This will help secure the shower tray in position and reduce any
rubbing of the surfaces.
1
INSTALLATION
Stud partition wall preparation.
5 mm
115 mm
115 mm
5 mm
Note! Where the shower tray comes into contact with the wall or
plaster board surface, apply a liberal amount of silicone sealant
before installation. This will help secure the shower tray in
position and reduce any rubbing of the surfaces.
11.We recommend this tray is tted as part of a fully enclosed cubical.
If this tray is tted as a walk-in installation, it is expected that an
amount of water will spill onto the open area of the oor. We
would therefore advise xing a threshold strip to minimize this.
Note! Where the shower tray comes into contact with the wall
or plaster board surface, apply a liberal amount of silicone
sealant before installation. This will help secure the shower tray
in position and reduce any rubbing of the surfaces.
12.Hand tighten the waste to ensure a correct seal. Excessive
overtightening can lead to damage. Caution! DO NOT stand
on waste outlet as damage may occur.
13.Once the waste pipe has been connected pour water into the
tray to check the tray and pipe connection for correct drainage
prior to nal x and tiling.
14.Excessive ow rates may lead to overowing and leaking.
Flow rate into the tray must not exceed more than 25 litres per
minute. We recommend a drainage test is carried out to ensure
the waste is adequate for the ow delivered.
15.All legs supplied must be tted. Make sure that all locking nuts
are secured.
16.If you wish to raise the shower tray and not use the legs
provided, please contact us for installation advice.
17.The shower tray should be positioned so that the waste is easily
accessible for maintenance.
18.Water Spray may extend beyond the entrance of walk-in
enclosures and we recommend tiling of the adjacent area.