Do you have a question about the Mircom TX3-120U-C and is the answer not in the manual?
Overview of Mircom's TX3 series telephone access systems, including capabilities and networking options.
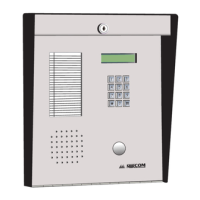
Detailed list of features and functionalities of the TX3 series access systems.
Description of different enclosure series (Universal, Slim-Line, Continental) for Lobby Control Units.
List of accessories available for the Lobby Control Units, such as trim rings, modules, and cameras.
Mounting requirements based on the 2010 ADA Standards for Accessible Design.
Information on the manual, warranty, and contact details for support.
Procedure for grounding the system to reduce electrical shock risk.
Instructions for installing Universal, Slim-Line, and Continental enclosures.
Guidance on installing the TH-102 heater for low-temperature operation.
Overview of the TX3 system, networking, ADC/NSL capabilities, and connection types.
Illustrates the simplest configuration for a single Lobby Control Unit.
Details dual entry applications with Lobby Control Units sharing a phone line.
Describes configurations with multiple Lobby Control Units and phone lines.
Shows configurations connecting multiple Lobby Control Units to a single phone line.
Explains networking options like RS-485 and Ethernet TCP/IP for TX3 devices.
Provides typical wiring arrangements and transformer requirements for Lobby Control Units.
General layout and components of the Lobby Control Unit main controller board.
Detailed description of connectors located on the bottom of the controller board.
Detailed description of connectors located on the top of the controller board.
Information about the Modem Module for POTS lines and its connection.
Details the IP Module for Ethernet TCP/IP network connectivity.
Explains the RS-485 Add-on Module for converting signals to USB.
Describes the Wiegand Output Module for sending data to third-party systems.
Information on the Guard Phone Module for NSL systems.
Instructions for using the auxiliary guard phone for calls and door unlocking.
Configuration of unit ID addresses for RS-485 network using DIP switches.
Steps for configuring the system via PC using Mircom TX3 Configuration Software.
Methods for updating the panel firmware using the Configurator software.
Final steps and verification before starting system configuration.
Details on mounting NSL Relay cabinets and their enclosure sizes.
Functions of NSL Relay Control Unit and Expanders, and components of the TX3-NSL-8M.
Wiring and connector details for the TX3-NSL-8M Main Controller Board.
Step-by-step guide to update firmware for the TX3-NSL-8M.
Process for integrating other controllers like Card Access and Elevator Restriction Units.
Instructions for installing the TX3-P300-HA card reader.
Specifications for power transformers, door strikes, and their voltage/current ratings.
Details on relay contact ratings, telephone line types, and postal lock features.
Lists compatible modems and specifies the operating temperature range and heater requirement.
How residents using NSL systems grant access, handle calls, and use keyless entry.
How residents using ADC systems grant access and use keyless entry.
Critical warnings, safety information, and potential system failures for users.
Details on where to find Mircom product warranty terms and conditions.
Product model, compliance with FCC/IC regulations, and registration numbers.
Notices regarding telephone service changes, connection requirements, and FCC rules.
Guidance on handling equipment failure, repairs, and contacting Mircom.
| Brand | Mircom |
|---|---|
| Model | TX3-120U-C |
| Category | Intercom System |
| Language | English |