4-6
Chapter 4 Fuel and exhaust systems
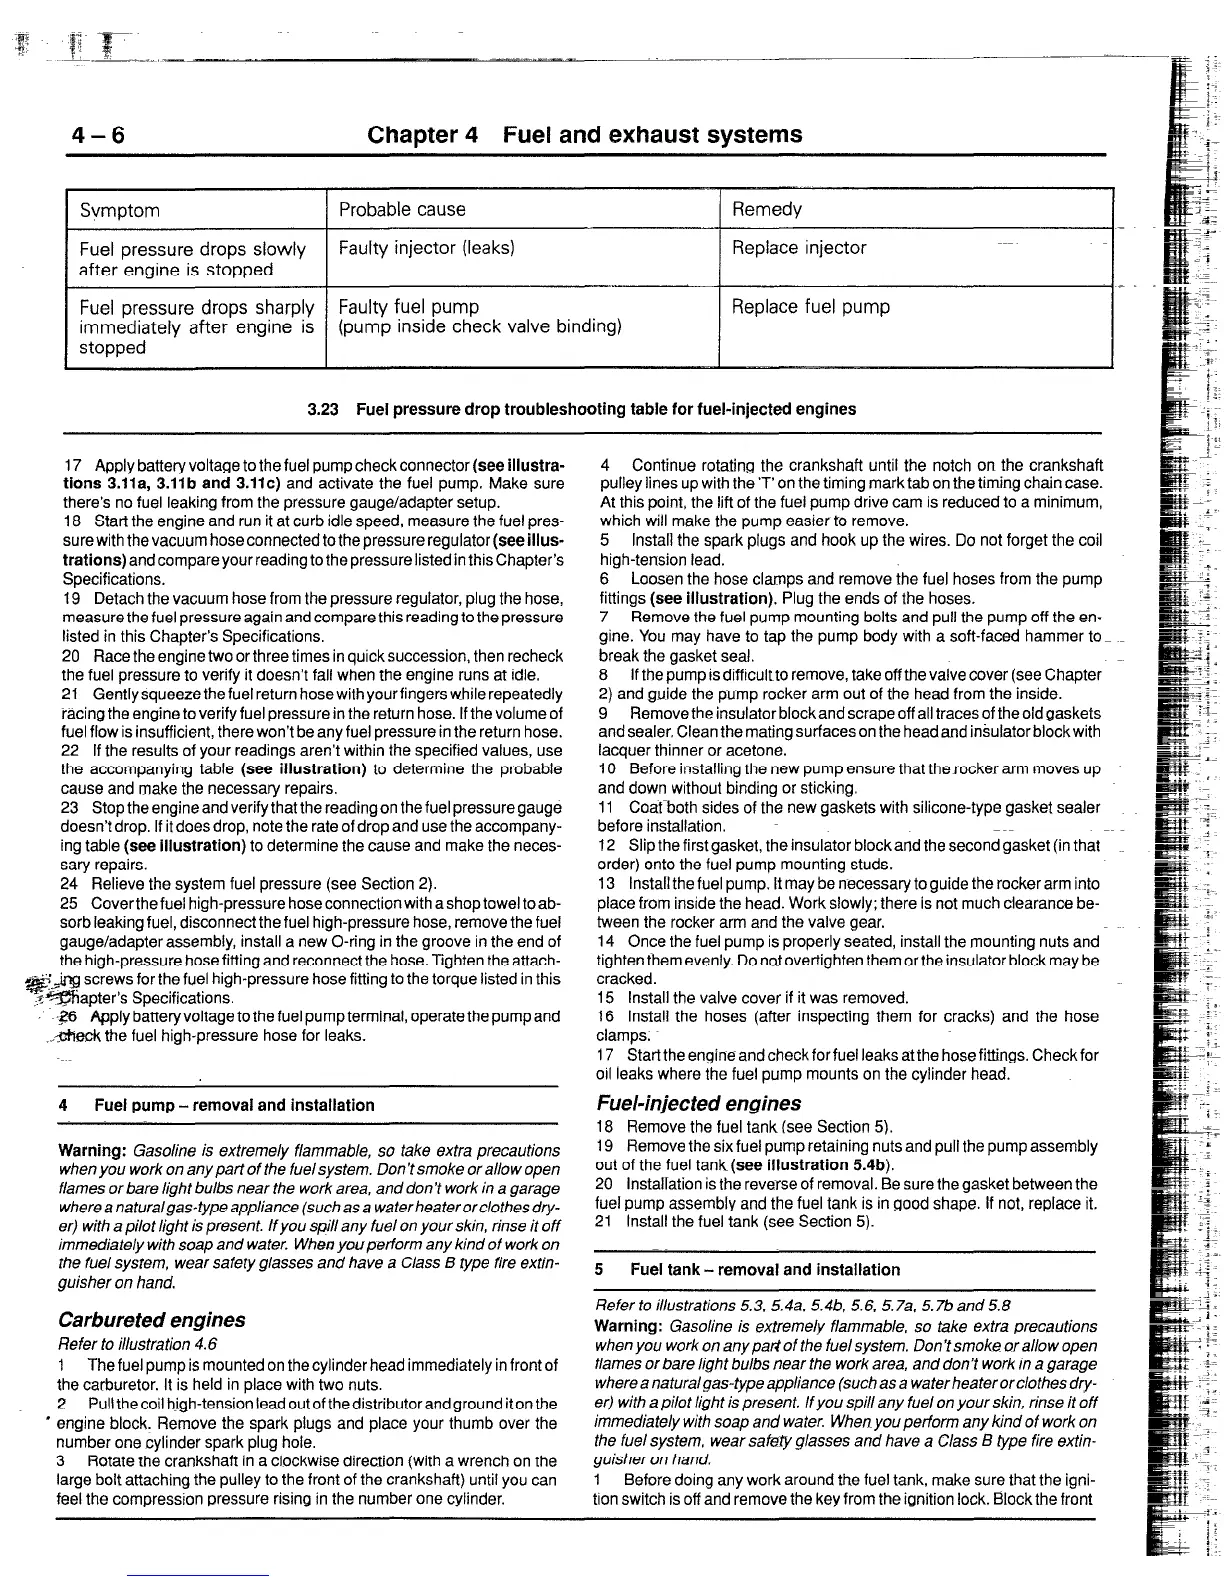
Fuel pressure drops slowly
Faulty injector (leaks) Replace injector
after engine is stopped
Fuel pressure drops sharply Faulty fuel pump
Replace fuel pump
immediately after engine is (pump inside check valve binding)
stopped
3.23 Fuel pressure drop troubleshooting table for fuel-injected engines
17 Apply battery voltage to the fuel pump check connector (see illustra-
tions 3.11a, 3.11b and 3.11~) and activate the fuel pump. Make sure
there’s no fuel leaking from the pressure gauge/adapter setup.
18 Start the engine and run it at curb idle speed, measure the fuel pres-
sure with the vacuum hose connected to the pressure regulator (see illus-
trations) and compare your reading to the pressure listed in this Chapter’s
Specifications.
19 Detach the vacuum hose from the pressure regulator, plug the hose,
measure the fuel pressure again and compare this reading to the pressure
listed in this Chapter’s Specifications.
20 Race the engine two or three times in quick succession, then recheck
the fuel pressure to verify it doesn’t fall when the engine runs at idle.
21 Gentlysqueezethefuelreturn hosewithyourfingerswhilerepeatedly
racing the engine to verify fuel pressure in the return hose. If the volume of
fuel flow is insufficient, there won’t be any fuel pressure in the return hose.
22 If the results of your readings aren’t within the specified values, use
the accompanying table (see illustration) to determine the probable
cause and make the necessary repairs.
23 Stop the engine and verify that the reading on the fuel pressure gauge
doesn’t drop. If it does drop, note the rate of drop and use the accompany-
ing table (see illustration) to determine the cause and make the neces-
sary repairs.
24 Relieve the system fuel pressure (see Section 2).
25 Coverthefuel high-pressure hoseconnection with ashoptowel toab-
sorb leaking fuel, disconnect the fuel high-pressure hose, remove the fuel
gauge/adapter assembly, install a new O-ring in the groove in the end of
the high-pressure hose fitting and reconnect the hose. Tighten the attach-
~@$J?JJ screws for the fuel high-pressure hose fitting to the torque listed in this
,.+$%apter’s Specifications.
-$X5 Apply battery voltage to the fuel pump terminal, operate the pump and
.,.+feck the fuel high-pressure hose for leaks.
4 Fuel pump - removal and installation
Warning: Gasoline is extremely flammable, so take extra precautions
when you work on any part of the fuel system. Don’t smoke or allow open
flames or bare light bulbs near the work area, and don’t work in a garage
wherea naturalgas-typeappliance (suchasa waterheaterorclothesdry-
er) with a pilot light is present. If you spill any fuel on your skin, rinse it off
immediately with soap and water. When youperform any kind of work on
the fuel system, wear safety g/asses and have a Class B type fire extin-
guisher on hand.
Carbureted engines
Refer to illustration 4.6
1 The fuel pump is mounted on the cylinder head immediately in front of
the carburetor. It is held in place with two nuts.
2 Pull the coil high-tension lead out of the distributor and ground iton the
’ engine block. Remove the spark plugs and place your thumb over the
number one cylinder spark plug hole.
3 Rotate the crankshaft in a clockwise direction (with a wrench on the
large bolt attaching the pulley to the front of the crankshaft) until you can
feel the compression pressure rising in the number one cylinder.
4 Continue rotating the crankshaft until the notch on the crankshaft
pulley lines up with the ‘T’on the timing mark tab on the timing chain case.
At this point, the lift of the fuel pump drive cam is reduced to a minimum,
which will make the pump easier to remove.
5 Install the spark plugs and hook up the wires. Do not forget the coil
high-tension lead.
6 Loosen the hose clamps and remove the fuel hoses from the pump
fittings (see illustration). Plug the ends of the hoses.
7 Remove the fuel pump mounting bolts and pull the pump off the en-
gine. You may have to tap the pump body with a soft-faced hammer to
break the gasket seal.
8 If the pump is difficultto remove, take off the valve cover (see Chapter
2) and guide the pump rocker arm out of the head from the inside.
9 Remove the insulator block and scrape off all traces of the old gaskets
and sealer. Clean the mating surfaces on the head and inSulator blockwith
lacquer thinner or acetone.
IO Before installing the new pump ensure that therocker arm moves up
and down without binding or sticking.
11 Coat-both sides of the new gaskets with silicone-type gasket sealer
before installation.
12 Slip the first gasket, the insulator block and the second gasket (in that
order) onto the fuel pump mounting studs.
13 Install the fuel pump. It may be necessary to guide the rocker arm into
place from inside the head. Work slowly; there is not much clearance be-
tween the rocker arm and the valve gear.
14 Once the fuel pump is properly seated, install the mounting nuts and
tighten them evenly. Do notovertighten them or the insulator block may be
cracked.
15 Install the valve cover if it was removed.
16 Install the hoses (after inspecting them for cracks) and the hose
clamps.
17 Start the engine and check for fuel leaks at the hose fittings. Check for
oil leaks where the fuel pump mounts on the cylinder head.
Fuel-injected engines
18 Remove the fuel tank (see Section 5).
19 Remove the six fuel
pump retaining nuts
and pull the pump assembly
out of the fuel tank(see illustration 5.4b).
20 Installation is the reverse of removal. Be sure the gasket between the
fuel pump assembly and the fuel tank is in good shape. If not, replace it.
21 Install the fuel tank (see Section 5).
5 Fuel tank - removal and installation
Refertoillustrations5.3.5.4a.5.4b,5.6. 5.7a. 5.7band5.8
Warning: Gasoline is extremely flammable. so take extra precautions
when you work on any part of the fuel system. Don’t smoke or allow open
flames or bare light bulbs near the work area, and don’t work in a garage
where a naturalgas-type appliance (such as a water heater or clothes dry-
er) with a pilot light is present. If you spill any fuel on your skin, rinse it off
immediately with soap and water. When you perform any kind of work on
the fuel system, wear safzty glasses and have a C/ass B type fire extin-
guisher on hand.
1 Before doing any work around the fuel tank, make sure that the igni-
tion switch is off and remove the key from the ignition lock. Block the front
 Loading...


