ChaMer 9 Brakes
,
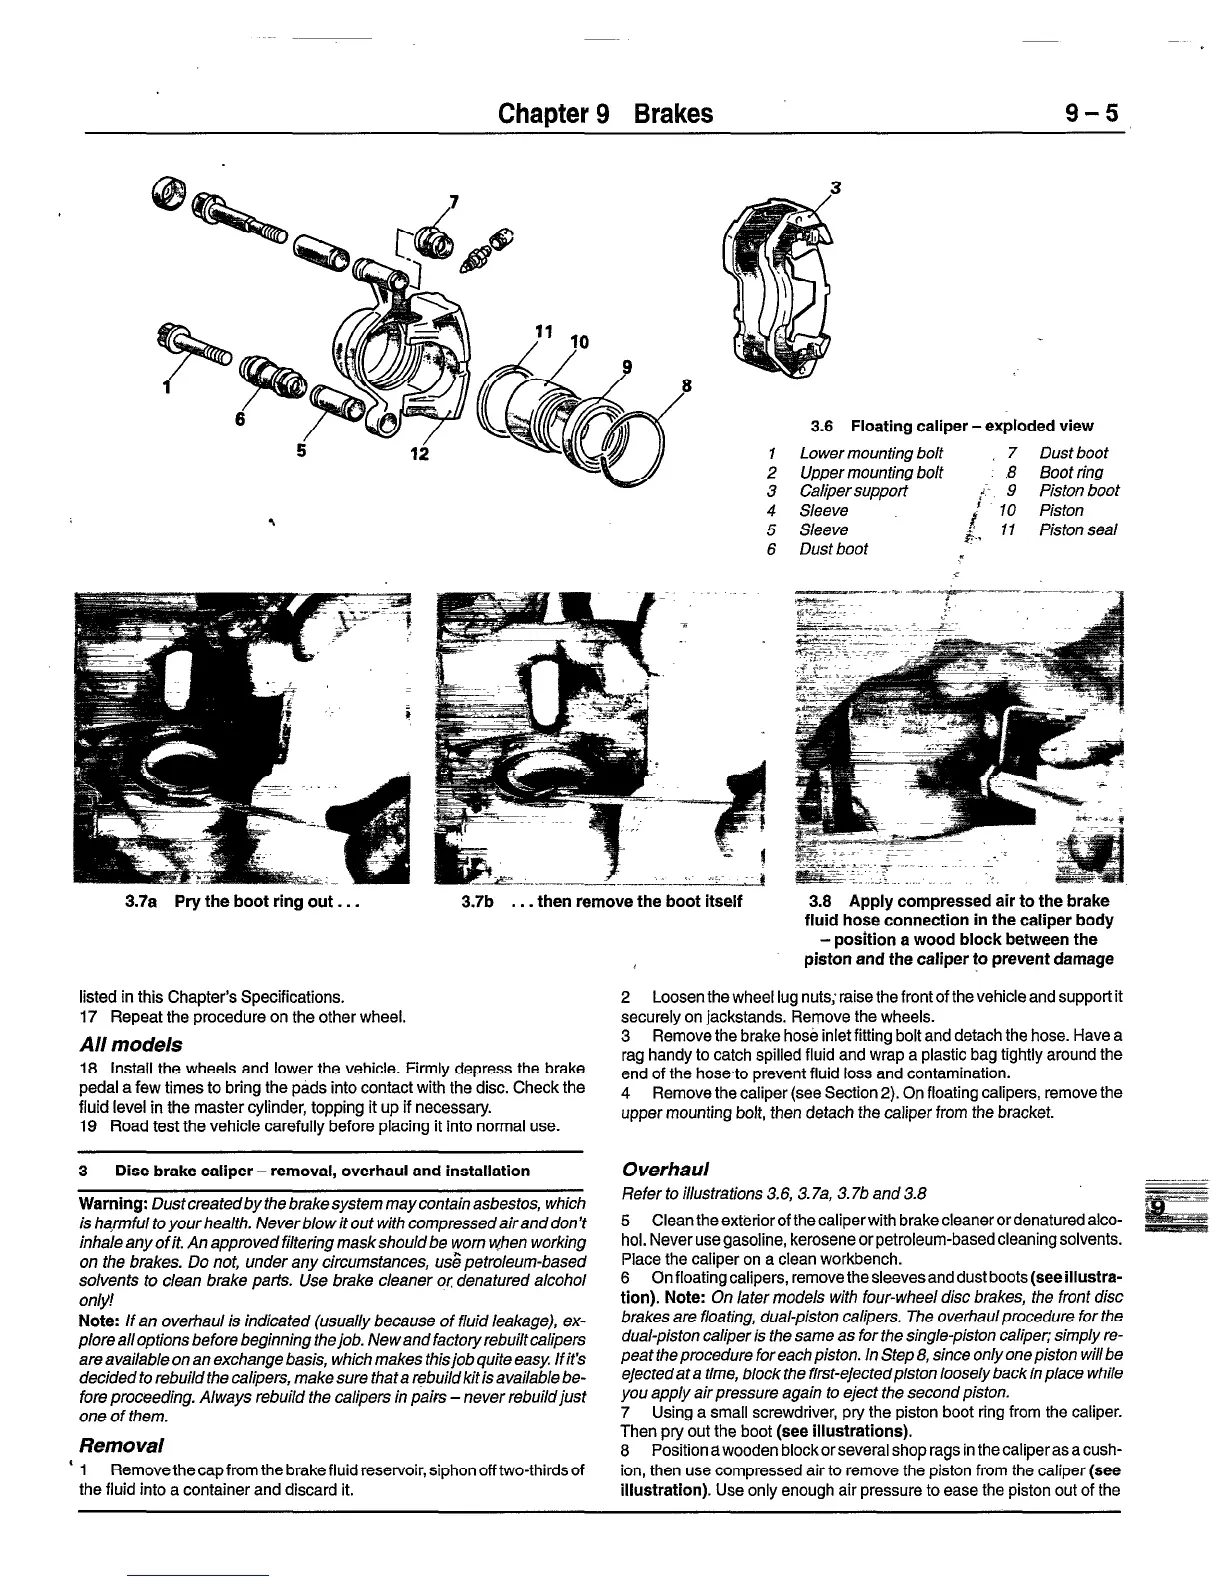
3.7a Pry the boot ring out. . .
3.7b . . . then remove the boot itself
listed in this Chapter’s Specifications.
17 Repeat the procedure on the other wheel.
All models
18 Install the wheels and lower the vehicle. Firmly depress the brake
pedal a few times to bring the pads into contact with the disc. Check the
fluid level in the master cylinder, topping it up if necessary.
19 Road test the vehicle carefully before placing it into normal use.
3 Disc brake caliper - removal, overhaul and installation
Warning: Dustcreatedbythe brakesystem maycontainasbestos, which
is harmful to your health. Never blow it out with compressed air and don’t
inhale any of it. An approved filtering mask should be worn when working
on the brakes. Do not, under any circumstances, us6 petroleum-based
solvents to clean brake parts. Use brake cleaner or denatured alcohol
only!
Note: If an overhaul is indicated (usually because of fluid leakage), ex-
plore al/options before beginning the job. Newandfactoryrebuiltcalipers
are available on an exchange basis, which makes thisjob quite easy If it’s
decided to rebuild the calipers, make sure that a rebuild kit is available be-
fore proceeding. Always rebuild the calipers in pairs -never rebuild just
one of them.
Removal
‘ 1 Removethecapfrom the brake fluid reservoir, siphon off two-thirds of
the fluid into a container and discard it.
3.6 Floating caliper-exploded view
Lower mounting bolt 7 Dust boot
Upper mounting bolt .’ .8 Boot ring
Caliper support i- 9 Piston boot
Sleeve 10 Piston
Sleeve
Dust boot
k I1 Piston seal
.-
3.8 Apply compressed air to the brake
fluid hose connection in the caliper body
- position a wood block between the
piston and the caliper to prevent damage
2 Loosen the wheel lug nuts;raise the front of the vehicle and support it
securely on jackstands. Remove the wheels.
3 Remove the brake hose inlet fitting bolt and detach the hose. Have a
rag handy to catch spilled fluid and wrap a plastic bag tightly around the
end of the hoseto prevent fluid loss and contamination.
4 Remove the caliper (see Section 2). On floating calipers, remove the
upper mounting bolt, then detach the caliper from the bracket.
Overhaul
Refer to illustrations 3.6, 3.7a, 3.76 and 3.8
5 Clean the exterior of the caliper with brake cleaner or denatured alco-
hol. Never use gasoline, kerosene or petroleum-based cleaning solvents.
Place the caliper on a clean workbench.
6 On floating calipers, remove the sleevesand dust boots (seeillustra-
tion). Note: On later models with four-wheel disc brakes, the front disc
brakes are floating, dual-piston calipers. The overhaul procedure for the
dual-piston caliper is the same as for the single-piston caliper; simply re-
peat the procedure for each piston. in Step 8, since only one piston will be
ejected at a time, block the first-ejected piston loosely back in place while
you apply air pressure again to eject the second piston.
7 Using a small screwdriver, pry the piston boot ring from the caliper.
Then pry out the boot (see illustrations).
8 Position a wooden blockorseveral shop rags in the caliper as a cush-
ion, then use compressed air to remove the piston from the caliper (see
illustration). Use only enough air pressure to ease the piston out of the
 Loading...


