Chapter 1 Tune-up and routine maintenance
8.7~ Regardless of the type of tool used on the battery posts, a
clean, shiny surface should be the result
10.5 Depress the tab (arrow) and pull the blade assembly off
the wiper arm
charge. A fully charged battery should read 12.6 volts or higher.
17 Further information on the battery and jump starting can be found in
Chapter 5 and at the front of this manual.
9 Cooling system check
Refer to illustration 9.4
1 Many major engine failures can be attributed to a faulty cooling sys-
tem. If the vehicle is equipped with an automatic transmission, the cooling
system also cools the transmission fluid, prolonging transmission life.
2 The cooling system should be checked with the engine cold. Do this
before the vehicle is driven for the day or after it has been shut off for at
least three hours.
3 Remove the radiator cap by turning it counterclockwise until it reach-
esastop. If you hear a hissing sound (indicating there’sstill pressure in the
system), wait until it stops. Now press down on the cap with the palm of
your hand and continue turning until it can be removed. Thoroughly clean
the cap, inside and out, with clean water. Also clean the filler neck on the
radiator. All traces of corrosion should be removed. The coolant inside the
radiator should be relatively transparent. If it’s rust colored, the system
should be drained and refilled (Section 40). If the coolant level is not up to
the top, add additional antifreeze/coolant mixture (see Section 4).
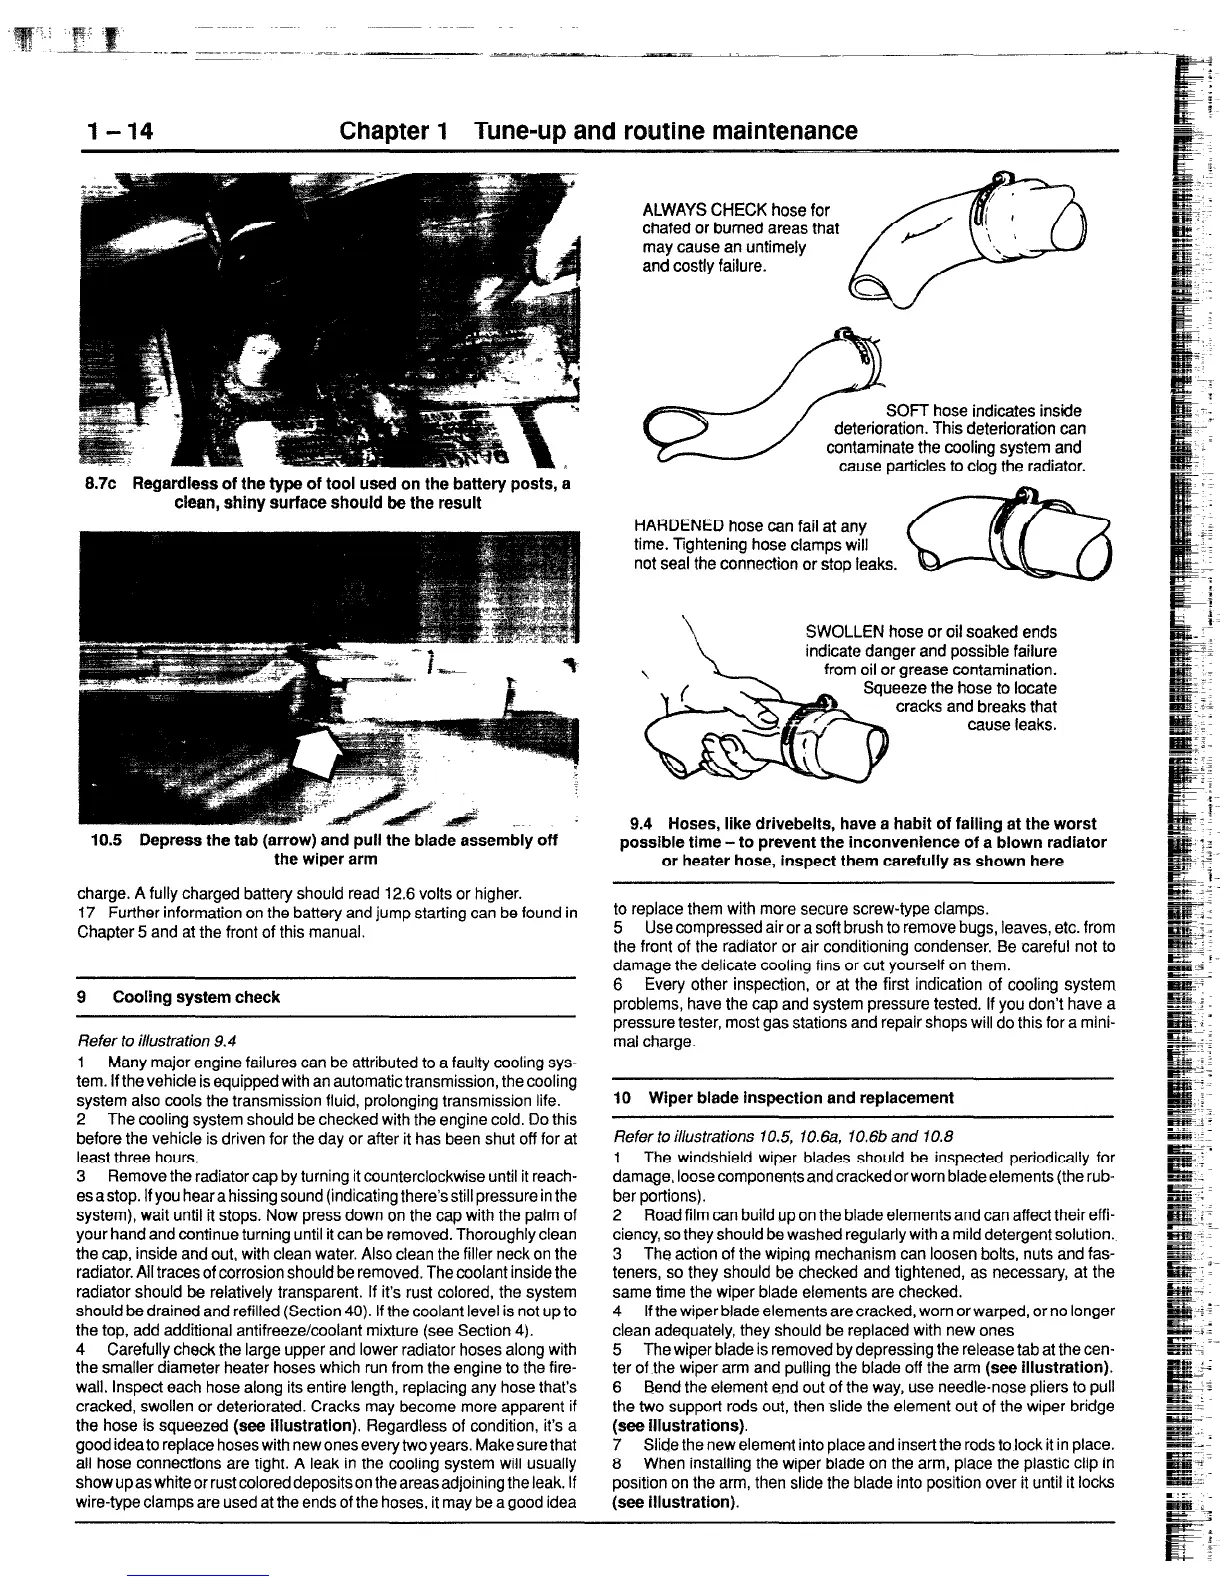
4 Carefully check the large upper and lower radiator hoses along with
the smaller diameter heater hoses which run from the engine to the fire-
wall. Inspect each hose along its entire length, replacing any hose that’s
cracked, swollen or deteriorated. Cracks may become more apparent if
the hose is squeezed (see illustration). Regardless of condition, it’s a
good idea to replace hoses with new ones every two years. Make sure that
all hose connections are tight. A leak in the cooling system will usually
show up as white or rust colored deposits on the areas adjoining the leak. If
wire-type clamps are used at the ends of the hoses, it may be a good idea
ALWAYS CHECK hose for
chafed or burned areas that
may cause an untimely
and costly failure.
SOFT hose indicates inside
deterioration. This deterioration can
contaminate the cooling system and
cause particles to clog the radiator.
HARDENED hose can fail at any
time. Tightening hose clamps will
not seal the connection or stop leaks.
9.4 Hoses, like drlvebeits, have a habit of failing at the worst
possible time-to prevent the inconvenience of a blown radiator
or heater hose, inspect them carefully as shown here
to replace them with more secure screw-type clamps.
5 Use compressed air or a soft brush to remove bugs, leaves, etc. from
the front of the radiator or air conditioning condenser. Be careful not to
damage the delicate cooling fins or cut yourself on them.
6 Every other inspection, or at the first indication of cooling system
problems, have the cap and system pressure tested. If you don’t have a
pressure tester, most gas stations and repair shops will do this for a mini-
mal charge.
10 Wiper blade inspection and replacement
Refer to illustrations 10.5, 10.6a,
10.6b and 10.8
1 The windshield wiper blades should be inspected periodically for
damage, loose componentsand cracked or worn blade elements (the rub-
ber portions).
2 Road film can build up on the blade elements and can affect their effi-
ciency, so they should be washed regularly with a mild detergent solution.
3 The action of the wiping mechanism can loosen bolts, nuts and fas-
teners, so they should be checked and tightened, as necessary, at the
same time the wiper blade elements are checked.
4 If the wiper blade elements are cracked, worn or warped, or no longer
clean adequately, they should be replaced with new ones
5 The wiper blade is removed by depressing the release tab at the cen-
ter of the wiper arm and pulling the blade off the arm (see illustration).
6 Bend the element end out of the way, use needle-nose pliers to pull
the two support rods out, then slide the element out of the wiper bridge
(see illustrations).
7 Slide the new element into place and insert the rods to lock it in place.
8 When installing the wiper blade on the arm, place the plastic clip in
position on the arm, then slide the blade into position over it until it locks
(see illustration).
 Loading...


