MELSEC System Q
Programmable Controllers
Installation Manual for Analog-Digital
Converter Modules
Art-no.: 212582 ENG, Version A, 11072008
Safety Information
For qualified staff only
This manual is only intended for use by properly trained and qualified elec
-
trical technicians who are fully acquainted with automation technology
safety standards. All work with the hardware described, including system
design, installation, setup, maintenance, service and testing, may only be
performed by trained electrical technicians with approved qualifications
who are fully acquainted with the applicable automation technology safety
standards and regulations.
Proper use of equipment
The programmable controllers (PLC) of the MELSEC System Q are only
intended for the specific applications explicitly described in this manual or
the manuals listed below. Please take care to observe all the installation
and operating parameters specified in the manual. All products are
designed, manufactured, tested and documented in agreement with the
safety regulations. Any modification of the hardware or software or
disregarding of the safety warnings given in this manual or printed on the
product can cause injury to persons or damage to equipment or other prop-
erty. Only accessories and peripherals specifically approved by
MITSUBISHI ELECTRIC may be used. Any other use or application of the
products is deemed to be improper.
Relevant safety regulations
All safety and accident prevention regulations relevant to your specific
application must be observed in the system design, installation, setup,
maintenance, servicing and testing of these products.
In this manual special warnings that are important for the proper and safe
use of the products are clearly identified as follows:
Further Information
The following manuals contain further information about the modules:
쎲
Hardware manuals for the MELSEC System Q
쎲
Manuals for the modules described in this installation manual
These manuals are available free of charge through the internet
(www.mitsubishi-automation.com).
If you have any questions concerning the installation, configuration or
operation of the equipment described in this manual, please contact your
relevant sales office or department.
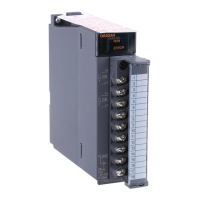
Overview
Names and Functions of Parts
Dimensions
* The connector will increase this dimension by 47 mm.
Installation and Wiring
Tighen the screws of the module using torque within the following ranges.
Loose screws may cause short circuits, mechanical failures or malfunc
-
tion.
Mounting a module to a base unit
햴 All modules exept the Q66AD-DG:
Secure the module with an additional screw (M3 x 12) to the base unit
if large vibration is expected. This screw is not supplied with the
module.
햴 Q66AD-DG only:
Mount the module fixing bracket. Make sure that the module fixing
bracket is hooked on the 3rd slit viewed from the front of the
Q66AD-DG. Tighten the module mounting screw with the specified
torque.
Wiring
Please observe the following precautions for external wiring:
쎲
Use separate cables for the AC control unit and the external input sig
-
nals of the analog input modules to avoid the influence of AC side
surges and inductions.
쎲
Do not lay signal cables close to the main circuit, high-voltage power
lines, or load lines. Otherwise effects of noise or surge induction are
likely to take place. Keep a safe distance of more than 100 mm from
the above when wiring.
쎲
The shield of the signal cables must be grounded at one end.
E
CAUTION
쎲
Use the product in the environment within the general specifi
-
cations described in the Hardware Manual for the MELSEC
System Q. Never use the product in areas with dust, oily
smoke, conductive dusts, corrosive or flammable gas, vibra
-
tions or impacts, or expose it to high temperature, condensa
-
tion, or wind and rain.
쎲
When drilling screw holes or wiring, cutting chips or wire chips
should not enter ventilation slits. This may cause a short cir
-
cuit. Use the provided dust proof sheet to cover the ventilation
port. Be sure to remove this sheet from the PLC's ventilation
port when the installation work is completed to prevent over
-
heating.
DANGER:
Personnel health and injury warnings.
Failure to observe the precautions described here
can result in serious health and injury hazards.
P
E
CAUTION:
Equipment and property damage warnings.
Failure to observe the precautions described here
can result in serious damage to the equipment or
other property.
P
DANGER
쎲
Turn off all phases of the power supply for the PLC and other
external sources before starting the installation or wiring work.
MITSUBISHI
ELECTRIC
FACTORY AUTOMATION
Mitsubishi Electric Europe B.V. /// FA - European Business Group ///
Germany /// Tel.: +49(0)2102-4860 /// Fax: +49(0)2102-486112 ///
www.mitsubishi-automation.com
4~20mA
Q62AD-DGH
CHK-
CH1
I/CHK+
P
CHK-
CH2
I/CHK+
P
ALM
ERR
RUN
15
16
17
18
14
13
12
11
10
9
8
7
6
5
4
3
2
1
(FG)
IN
24VDC
Pin No.
B1
B20
Pin No.
A1
A20
Modules with terminal block
Modules with 40-pin connector
No.
Description
Status
LED
RUN
Indicates the operating status of the
module
ON: Normal operation
Flicker: Offset/gain setting mode
OFF: – 5 V power off
– Watchdog timer error
occurrence
– module change enabled status
during online module change
ERR.
Indicates the error status of the module
ON: Error (A/D conversion continues)
Flicker: Error (A/D conversion stops)
OFF: Normal operation
ALM
Indicates the alarm status
ON: An alarm has been occurred.
Flicker: Input signal error
OFF: Operating normally
쐇 Check terminals for analog input current (Q62AD-DGH only)
External power supply terminal (Q62AD-DGH only)
쐏 40-pin connector (female) for connection of the input signals
Terminal block for connection of the input signals
쐂 FG terminal (Q66AD-DG only)
I+
(FG)
C
H
4
C
H
1
C
H
2
C
H
3
AVD
0~±10V
0~±20mA
15
16
17
18
14
13
12
11
10
9
8
7
6
5
4
3
2
1
A.G.
V+
I+
V+
I+
V+
I+
V+
SLD
V-
SLD
V-
SLD
V-
SLD
V-
Q64AD
RUN
ERROR
a
b
c
Module
Dimensions [mm]
abc
Q62AD-DGH
27.4
98
112
Q64AD 90
Q64AD-GH 112
Q66AD-DG
102
130*
Q68AD-G 90*
Q68ADV
98 90
Q68ADI
Module
No. of analog
inputs
Analog input ranges
Voltage Current
Q62AD-DGH 2 — 4 to 20 mA DC
Q64AD 4 -10 to +10 V DC 0 to 20 mA DC
Q64AD-GH 4 -10 to +10 V DC 0 to 20 mA DC
Q66-AD-DG 6 — 0 to 20 mA DC
Q68AD-G 8 -10 to +10 V DC 0 to 20 mA DC
Q68ADV 8 -10 to +10 V DC —
Q68ADI 8 — 0 to 20 mA
Screw Torque
Module mounting screw (M3, essential for
Q66AD-DG, optional for other modules)
0.36 to 0.48 Nm
Terminal block screws (M3) 0.42 to 0.58 Nm
Terminal block mounting screws (M3.5) 0.66 to 0.89 Nm
FG-Terminal screw (Q66AD-DG only) 0.42 to 0.58 Nm
E
CAUTION
쎲
Do not drop the module or subject it to heavy inpact.
쎲
Do not open or modify a module. Doing so can cause a failure,
malfunction, injury or fire.
쎲
Always insert the module fixing latch of the module into the
module fixing hole of the base unit. Forcing the hook into the
hole will damage the module connector and module.
쎲
Do not touch the conductive or electronic parts of a module
directly. Doing so can cause a unit malfunction or failure.
햲
After switching off the power supply,
insert the module fixing latch into the
module fixing hole of the base unit.
햳
Push the module in the direction of arrow
to load it into the base unit.
Module mounting screw
Q66AD-DG
Module fixing bracket
3rd slit