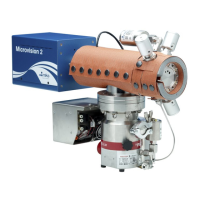
The Ophir Helios and Helios Plus are high-power industrial laser measurement devices designed for precise and reliable measurement of CW and pulsed lasers. These devices are suitable for various industrial applications, including laser welding in robotic cells.
Function Description
The Helios sensor measures high-power industrial lasers by measuring the energy of a short time exposure of the CW laser. The laser should be set to pulse from 0.1 to several seconds. The Helios measures the energy and exposure time of this sample of the power, and from this calculates the CW power. The Helios can measure power up to 12 kW and energy up to 10 kJ. The short exposure time enables power measurement by a small sensor without water cooling.
The Helios can be operated via RS232 using a PC Application supplied with the sensor, or via RS232 user commands. In addition, two industrial Ethernet protocols are supported: Profinet (P/N 7Z02768/7Z01700) and EtherNet/IP (P/N 7Z02789/7Z07101). The core of Helios is a high power copper thermopile disk that can measure short exposures of very high power lasers. The response time is 2-3 seconds so only energy of single-shots can be measured at short exposure times. An uncalibrated photodiode detects the backscattered light to measure the exposure time. Average power is then calculated by the formula P = E/Δt, where P is power, E is energy, and Δt is the time interval. This allows short measurements of multi-kW lasers in a small, uncooled body.
Important Technical Specifications
The Helios and Helios Plus series offer various models with different power ranges and interfaces.
Helios-Profinet (P/N 7Z02768)
- Absorber Type: High power industrial laser measurement
- Use: Industrial laser measurement
- Energy Range: 0.1 – 10 kJ
- Power Range: 50W – 12kW
- Response Time: 2-3s
- Wavelength Range: 860 – 1100nm (for 0.1-10kJ)
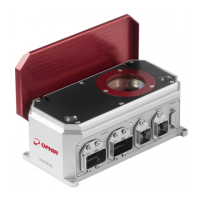
- Max Beam Diameter: 35mm
- Max Power Density: 4kW/cm²
- Accuracy: ±3% (900-1100nm)
- Repeatability: ±1% (900-1100nm)
- Communication: Profinet / RS232
- Dimensions (L x W x H): 200 x 100 x 84 mm (closed); 200 x 123 x 144 mm (open)
- Weight: 2.5kg
- Operating Temperature: 10-40°C
Helios-EtherNet-IP (P/N 7Z02789)
- Absorber Type: High power industrial laser measurement
- Use: Industrial laser measurement
- Energy Range: 0.1 – 10 kJ
- Power Range: 50W – 12kW
- Response Time: 2-3s
- Wavelength Range: 860 – 1100nm (for 0.1-10kJ)
- Max Beam Diameter: 35mm
- Max Power Density: 4kW/cm²
- Accuracy: ±3% (900-1100nm)
- Repeatability: ±1% (900-1100nm)
- Communication: EtherNet/IP / RS232
- Dimensions (L x W x H): 200 x 100 x 84 mm (closed); 200 x 123 x 144 mm (open)
- Weight: 2.5kg
- Operating Temperature: 10-40°C
Helios Plus – Profinet (P/N 7Z07100)
- Absorber Type: High power industrial laser measurement
- Use: Industrial laser measurement
- Energy Range: 100J – 5kJ
- Power Range: 50W – 12kW
- Response Time: 2-3s
- Wavelength Range: 860 – 1100nm (for 0.1-10kJ)
- Max Beam Diameter: 35mm
- Max Power Density: 4kW/cm²
- Accuracy: ±3% (900-1100nm)
- Repeatability: ±1% (900-1100nm)
- Communication: Profinet / RS232
- Dimensions (L x W x H): 200 x 100 x 84 mm (closed); 200 x 123 x 144 mm (open)
- Weight: 2.5kg
- Operating Temperature: 10-40°C
Helios Plus – EtherNet-IP (P/N 7Z07101)
- Absorber Type: High power industrial laser measurement
- Use: Industrial laser measurement
- Energy Range: 100J – 5kJ
- Power Range: 50W – 12kW
- Response Time: 2-3s
- Wavelength Range: 860 – 1100nm (for 0.1-10kJ)
- Max Beam Diameter: 35mm
- Max Power Density: 4kW/cm²
- Accuracy: ±3% (900-1100nm)
- Repeatability: ±1% (900-1100nm)
- Communication: EtherNet/IP / RS232
- Dimensions (L x W x H): 200 x 100 x 84 mm (closed); 200 x 123 x 144 mm (open)
- Weight: 2.5kg
- Operating Temperature: 10-40°C
All models feature no water cooling, up to 12000W, Profinet / EtherNet/IP and RS232 interfaces, and a remote actuated protective cover.
Usage Features
The Helios devices are designed for easy integration into existing line or ring topologies as well as RS232 connection.
PC Application: The Helios Control Application allows users to connect to the device, set parameters, and view measurement results.
- Connection: Connects via RS232, Profinet, or EtherNet/IP.
- Measurement Display: Shows pulse power, exposure time, energy, housing temperature, and protocol status.
- Settings: Users can select wavelength range (NIR, Blue-Green, B-G) and desired energy range (or scale).
- Instantaneous Power: Displays instantaneous power during measurement.
- Log Files: Generates log files in CSV format for various data, including full data, output data, and RS232 communication logs. These files are stored in the Helios installation directory.
Profinet Setup:
- Connection: Connect 24 V DC to standard Profinet / EtherNet/IP jack. Use Ophir Power Cable for Helios P/N 7Z10458A.
- RJ45 Connection: Connect Profinet RJ45 cable to jack. Use Ophir Profinet Cable for Helios P/N 7E01298.
- Integration: Integrate the device into the network using GSDML file from Helios product page.
- Software Setup: Set up Profinet network in software (e.g., TIA, STEP7).
- Device Address: Set up device addresses as marked inside the red circle in the software interface.
- Measurement Integration: Integrate the power measurement into the customer software (controlled by the PLC).
- Test Measurements: Begin test measurements and integrate into production line routine.
EtherNet/IP Setup:
- Connection: Place the Helios where it will be convenient to measure the laser. Connect 24 V DC to standard Profinet / EtherNet/IP jack. Use Ophir Power Cable for Helios P/N 7Z10458A.
- RJ45 Connection: Connect EtherNet/IP RJ45 cable to jack. Use Ophir EtherNet/IP Cable for Helios P/N 7E01299.
- IP Address: The Helios is delivered with a factory default IP address of 10.0.0.2, Subnet Mask 255.255.255.0, and Default Gateway 10.0.0.1.
- Web Browser Access: The current IP address is known, and it is possible to connect to it via a PC and to connect to the Helios using a web browser tool such as Chrome or Internet Explorer. Enter the present IP address in the browser address window, and the following window should open. Select "Settings".
- Network Settings: Configure network settings, including IP address, subnet mask, and gateway.
- PC Application: Use the PC application to search for devices on the network and install the EDS file.
RS232 Setup:
- Connection: Place the Helios where it will be convenient to measure the laser. Connect 24 V DC to standard Profinet / EtherNet/IP jack. Use Ophir Power Cable for Helios P/N 7Z10458A.
- RS232 Cable: Connect a standard RS232 cable to the D9 jack.
- Installation: Install the Helios PC Application by copying it from the Helios product page in the website and following the installation wizard steps.
- Integration: Integrate power measurement into customer software (by scripting commands) as fits their application and needs.
- Production Line Integration: Integrate into the production line routine, using RS232 program.
Check Before Use:
- Laser Parameters: Check the laser parameters before turning it on to ensure no damage to Helios.
- Preliminary Test: Perform a preliminary test to ensure everything is operating as it should. This includes setting up the Helios, checking the cover, measurement test prep, and checking for errors.
- Timing Considerations: Ensure appropriate timing for measurement, considering sensor cooling and exposure time.
- Temperature Failsafe: The Helios should not be used when the housing temperature exceeds 60 °C. If the temperature reaches 60 °C, it must be left to cool down, which typically takes 10-20 minutes.
Maintenance Features
Firmware Updates: The "Help" menu in the PC application contains an option for upgrading firmware as new versions are released.
Cover Operation:
- Initial State: Initially, the cover should be closed.
- Opening/Closing: After clicking "Open," the message "IN MOTION" flashes until the cover is in a fully open or closed position.
- Error Handling: If the cover is neither completely open nor closed, and has timed out (and so isn't considered "in motion" anymore), this usually indicates something blocking the cover. Contact Ophir for further assistance.
Data Logging: The PC application automatically generates log files (CSV, TXT) that record measurement data, status, and communication. These logs are useful for troubleshooting and performance analysis.
Error Messages: The device provides standard error messages for various issues, such as invalid parameters, unrecognized commands, or incorrect characters.
RS232 Commands: A comprehensive set of RS232 commands allows for detailed control and monitoring of the device, including:
- Ping: Check communication.
- Version: Retrieve software and firmware versions.
- Reset: Reset the MCU software.
- Head Information: Retrieve sensor head information (S/N, name, capability code).
- Write Head Range: Set power-up settings for measurement ranges.
- Read Head Range: Read current power-up settings.
- All Ranges: List all available energy ranges.
- Save Head Configuration Settings: Save current settings as power-up defaults.
- Calibration Query: Query and set currently active calibration factors.
- Cover Control: Commands to open, close, and query cover status.
- Send Exposure Time (Photodiode): Send desired laser exposure time.
- Send Complete Measurement: Send commands to measure energy, exposure time, and power.
- Send Temperature: Send commands to read internal and maximum allowed temperature.
- MAC Address: Retrieve MAC address.
- All Wavelengths: Retrieve a list of available laser options.
- Wavelength Index: Select a laser option index.
Flow Chart & Timing Diagrams: The manual includes detailed flow charts for measurement and shutter timing, which are essential for understanding the device's operational sequence and troubleshooting. These diagrams illustrate the steps involved in starting Helios, checking sensor status, opening/closing the cover, initiating laser pulses, and reading results, along with various checks and waits.