Do you have a question about the MKS Microvision2 and is the answer not in the manual?
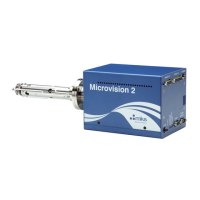
Lists key technical features and capabilities of the Microvision2 RGA.
Describes the different modes of operation for the Microvision2, including host computer and web browser control.
Details physical dimensions and weight for the Microvision2, power supply, and analyser.
Specifies power supply voltage, frequency, installation category, fuses, and insulation class.
Outlines operating temperature, humidity, pollution degree, and enclosure protection ratings.
Covers safety precautions, protective earth connection, and non-user-serviceable parts.
Describes requirements for external circuits, accessory ports, and power supply connections.
Explains warning labels related to hazardous voltages and tuning adjustment holes.
Specifies ventilation requirements and clearance for the unit.
Details required procedures for safe and compliant installation, including earthing and cable routing.
Covers authorized use, adherence to manuals, and limitations on adjustments.
Warns about dangerous voltages, requires competent persons for maintenance, and specifies returning faulty units.
Describes the X-Trip connector for protecting filaments and electron multiplier from high pressures.
Covers audio socket, emission, multiplier, and power indicators.
Describes the 9-way D-type socket for interfacing with a total pressure gauge.
Details the 2-pin D-type connector for the 24VDC power supply.
Details the 15-way D-type socket for interfacing with external equipment, including analog outputs and inputs.
Describes the 25-way D-type socket for external equipment, alarm signals, and trip signals.
Covers the RJ45 connector for connecting the Microvision2 to a network.
Explains external protection for the multiplier using the Digital IO connection.
Provides instructions for checking received items for damage and completeness.
Details how to handle and inspect the analyser for contamination and physical damage.
Specifies requirements for vacuum chamber flanges and mounting locations for the analyser.
Warns about operating pressure limits to prevent damage to filaments and the ion source.
Explains how to seal the analyser flange to the vacuum chamber using gaskets and bolts.
Guides on physically connecting the Microvision2 unit to the analyser, ensuring proper alignment and connection.
Details connecting the power supply, X-Trip, and other ports, and cable routing advice.
Explains how to connect the Microvision2 to networks using Auto-IP, DHCP, or BOOTP.
Guides on connecting the Microvision2 directly to a PC or MAC using an Ethernet cable.
Provides instructions for configuring a fixed IP address for the Microvision2 using RGA Device Manager.
Introduces the analyser's functional areas: ion source, quadrupole filter, detector, and flanged housing.
Describes using an ohmmeter to check for short circuits or open circuits in the analyser.
Explains how the Microvision2 monitors filament status and how to diagnose filament failures.
Provides a list of tools and the procedure for removing and replacing filaments in the ion source.
Details methods for cleaning the ion source, both while fitted and after removal.
Illustrates the pin connections for the analyser feedthrough with descriptions.
Lists part numbers for replacement filaments based on ion source type.
Lists part numbers for replacement ion sources based on filter type and ion source type.
Provides contact phone numbers for service in Europe and the USA.
| Brand | MKS |
|---|---|
| Model | Microvision2 |
| Category | Measuring Instruments |
| Language | English |