12
Model without sails
Even without sails, some of the rigging lines
such as sheets, halliards, and clew lines are to
remain, along with their lead blocks. Some
of the lines are to be hooked together, such
as head staysail halliards and sheets, and yard
clew lines and sheets. The hauling ends of
these lines should be belayed at their proper
locations. Installing these sail rigging lines on
the model adds tremendously to the look of
the model, especially at the stays where the
contrasting black stay and light running
lines, along with their blocks, create interest-
ing visual detail.
4. Applying Beeswax to the Lines
Before placing rigging lines on the model,
run the line through a block of beeswax sev-
eral times. Then, run the line through your
fingers. This heats the wax slightly and rubs
it into the line. The beeswax will cut down
on fuzz and protect the line from moisture.
5. Seizing Rigging Lines
Seizing of lines (binding or securing two
lines or different parts of the same line) can
be done as shown in Figure E-5. To prevent
seizings from unraveling, add a touch of CA
glue. For seizings, use the smallest line in the
kit or sewing thread.
6. Fittings & Block Strops
Making Fittings - This model is of a period
when iron fittings were used extensively
throughout the ship. Most of these fittings
on the model must be made from scratch
unless a casting is provided. Brass is a pre-
ferred material for these fittings, which may
or may not require soldering, but there are
other options that can be considered. The
following listed sketches illustrate some typi-
cal fittings and some simplified methods for
modeling them. The methods can be applied
to any similar fitting.
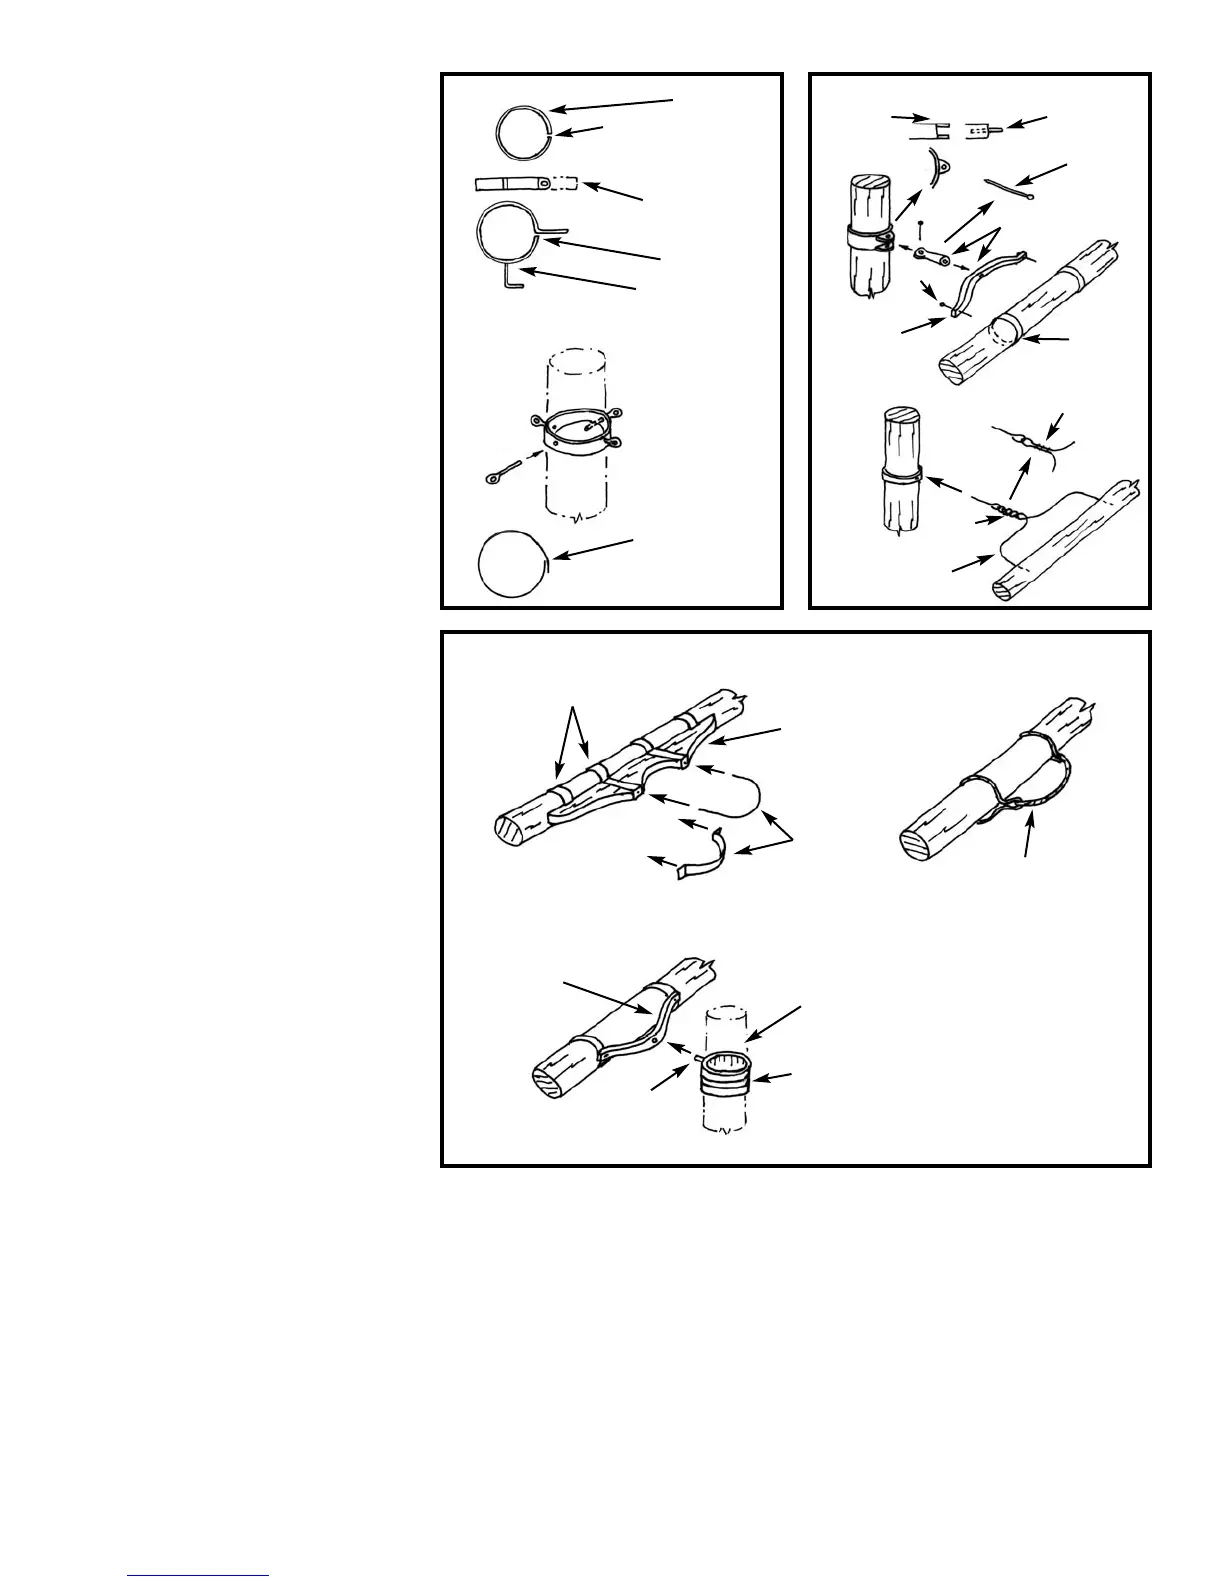
F
igur
e E-6
- Rigging bands found ar
ound
such items as masts, yards, booms, gaffs,
bowsprits, and jibbooms.
Figure E-7 - Fixed yard truss.
Figure E-8 - Moving yard parrels.
N
ote that brass strip
, self adhesiv
e copper
tape, and ey
ebolts ar
e provided in the kit.
Sufficient quantities are supplied no matter
which method y
ou choose for y
our fittings.
B
lock S
trops
- A str
op is an ir
on or rope
band or grommet around the shell of a block
for attaching lines.
The blocks in the kit ar
e
fairly small so it will not be easy for you to
cr
eate the exact detailing. S
ome modeling
shor
tcuts ar
e in or
der
. S
ee Figure E-9 for
some life-size ship details and model options.
N
ote: F
or the
N
ewsbo
y
, like the other metal
fittings, ir
on str
opped blocks will be used
quite often. However, rope stropped blocks
w
er
e also used and often pr
eferr
ed to prevent
chafing of sails, safety, and other reasons.
Y
ou won
’t be wrong, no matter which
method you use. The reprint of the book
S
pars and Rigging fr
om N
autical R
outine
(see bibliography) is an ex
cellent text to
consult for the period. Both iron and rope
str
opped blocks ar
e discussed.
7. Rigging Tools & Belaying Lines
The belaying pins in the kit ar
e a little o
v
er
-
size since they are the smallest pins available.
They could be cut to a shor
ter length or just
left as is.
To aid the rigging process homemade tools can
be made fr
om brass r
od with a push for
k end
or a hook end (F
igur
e E-10). Use a brass rod
long enough to r
each in wher
e your hand can-
not. Such tools are also available commercially.
When belaying lines on small scale models it
is best to secure the line to pins or cleats first.
Then add a coil of line on the belaying point
separately
. S
ee F
igure E-11.
A word of advice - Rigging plans are some-
times hard to follow. Lines may cross each
other and they sometimes go behind some
-
thing or seem to disappear into thin air.
Before you start the rigging, get a notebook
and do a small sketch of each rigging line on
a separate page. Sketch in where the lines
end such as at an eyebolt and label these
points. If something seems to be missing
FIG. E-6
RIGGING
BANDS
FIG. E-8 YARD PARRELS
FIG. E-7 MODEL YARD TRUSS
BRASS STRIP OPTIONS
SELF-ADHESIVE
COPPER TAPE
HINGED STRAP TYPE
BARREL TYPE
WRAP TAPE ON SPAR.
DRILL HOLES FOR
EYEBOLT EYES
EYEBOLT
EYES
BRASS OR
TAPE BANDS
WOOD
CHEEK
WIRE OR
STRAP
PARREL
SIMPLE ROPE-TYPE
(OLDER, SMALLER SHIPS)
BAND
PIN OR
SOLDER
BAR SIMILAR TO
FIXED TRUSS
BARREL FROM TUBING,
WOOD, BRASS STRIP,
OR TAPE
SOLDER
SHAPE
& DRILL HOLE
SOLDER
SOLDER
MAST
SOLDER
BRASS
BAR
SIMPLIFIED
ALL-WIRE
TRUSS
OPTION - SOLDER
BANDS -
BRASS OR
T
APE
PIN
Y
ARD
TWIST
OPTION - USE PIN
OPTION - USE
EYEBOLT
DRILL HOLES
FOR
EYEBOL
TS
BEFORE
INST
ALLING
BAND ON SPAR
SOLDER &
SHAPE
SIMILAR EYES