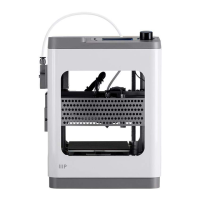
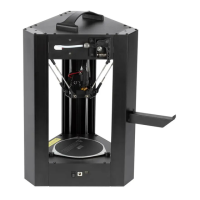
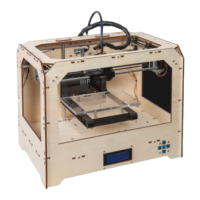
The Monoprice Cadet 3D Printer is a compact and user-friendly device designed for rapid prototyping and personal fabrication, making it an ideal choice for beginners and educational environments. Its primary function is to convert digital 3D models into physical objects using fused deposition modeling (FDM) technology. This process involves extruding a thermoplastic filament, layer by layer, to build the desired shape.
Function Description
The core function of the Monoprice Cadet 3D Printer is to bring digital designs to life. It operates by heating a thermoplastic filament to its melting point and then precisely depositing it onto a build platform in a series of thin layers. Each layer solidifies upon deposition, adhering to the previous one, until the complete 3D object is formed. The printer is controlled by a built-in interface, allowing users to select and initiate print jobs from a microSD card. It supports standard G-code files, which are generated from 3D models using slicing software (not explicitly detailed in the rapid launch guide but implied by the use of .gcode files). The printer's design emphasizes simplicity and ease of use, aiming to make 3D printing accessible to a broad audience, including those new to the technology. The "First Mission to Discovery" tagline reinforces its role as an entry-level device for exploration and learning in the world of additive manufacturing.
Usage Features
The Monoprice Cadet 3D Printer is designed with several features to ensure a straightforward and intuitive user experience.
- Unboxing and Setup: The rapid launch guide details a simple unboxing process, starting with removing the printer and its accessory box from the packaging. The printer is secured with an eggshell carton and plastic bag, which are easily removed. A cardboard block inside the printer also needs to be removed before operation. These steps highlight a focus on secure packaging and minimal setup complexity.
- Accessory Verification: Upon opening the accessory box, users are guided to verify a comprehensive list of included parts. This list includes essential tools and components such as a platform sticker, various hex wrenches (1.5mm, 2.0mm, 2.5mm), a Phillips screwdriver, an 8mm wrench, an M6 brass nozzle, a microSD card, a microSD card reader, a USB cable, an AC power adapter, an AC power cord, a stick of glue, a package of sample filament (200g), and a quick start guide. The inclusion of these items ensures that users have everything they need to begin printing immediately without requiring additional purchases.
- Filament Guide Tube Insertion: A key step in preparing the printer involves inserting the filament guide tube into the black pneumatic connector on top of the extruder. This ensures proper feeding of the filament into the print head, preventing tangles and misfeeds.
- Power Connection: The printer's power connection is straightforward. Users are instructed to ensure the power switch on the inline control of the AC power adapter is in the OFF position (O) before plugging the DC barrel connector into the power port on the right side of the printer. The AC power cord then connects to the adapter and a wall outlet. This sequence emphasizes safety and proper power-up procedure.
- Intuitive User Interface: The printer features an LCD screen and a knob for navigation. After powering on, the printer displays a "Welcome" screen, followed by a "STEP1: LOAD FILAMENT" screen. Users interact with the interface by depressing the knob to select "Next" and navigate through the wizard. This knob-based control system is common in many 3D printers and provides a tactile and easy way to interact with the device.
- Filament Loading Process: The filament loading process is guided by the on-screen wizard. Users are instructed to cut about an inch off the end of the filament and straighten it. Then, by squeezing a lever on the extruder, the filament is inserted into the bottom until resistance is met, after which the lever is released. The printer then prompts the user to press the knob to start loading filament. Once filament begins extruding from the nozzle, the knob is pressed again to stop extrusion, and the "Continue" option is selected. This detailed guidance minimizes potential errors during filament loading, a common point of frustration for new users.
- Print Job Selection: The printer utilizes a microSD card for storing print files. Users insert the provided microSD card into the slot next to the LCD screen. The wizard then progresses to "STEP2: INSERT SD CARD." After insertion, users select "Print From SD" and rotate the knob to highlight a .gcode file on the card. Pressing the knob initiates the printing of the selected model. This method of file transfer and selection is standard for many standalone 3D printers, offering convenience and independence from a computer during printing.
- Magnetic Print Bed: A notable feature is the magnetic print bed. Once a print is finished, the magnetic print bed can be easily removed from the metal print platform. The flexibility of the magnetic bed allows users to bend it, which helps in detaching the printed model without the need for tools or excessive force, thus reducing the risk of damaging the print or the bed. After removal, the magnetic print bed is simply replaced on the metal platform, ready for the next print. This feature significantly improves the post-printing experience, making model removal cleaner and safer.
- Sample Filament: The inclusion of a 200g package of sample filament allows users to start printing immediately after setup, without needing to purchase filament separately. This is particularly helpful for first-time users who might not be familiar with different filament types or brands.
Maintenance Features
While the rapid launch guide primarily focuses on initial setup and operation, it implicitly touches upon some maintenance aspects and provides tools for basic upkeep.
- Nozzle Replacement: The accessory box includes an M6 brass nozzle and an 8mm wrench. This suggests that the nozzle is a replaceable component, and users are provided with the necessary tool to perform this maintenance task. Nozzle replacement is a common maintenance procedure for 3D printers, as nozzles can wear out or become clogged over time. Providing a spare nozzle and the correct wrench empowers users to perform this basic maintenance themselves, extending the life of the printer.
- Cleaning Extruded Filament: During the filament loading process, users are instructed to "Clean the extruded filament." This highlights the need for basic cleanliness around the nozzle area to prevent contamination or buildup that could affect print quality.
- Glue Stick: The inclusion of a stick of glue in the accessory box suggests its use for improving print adhesion to the build platform. While not explicitly detailed as a maintenance item, proper bed adhesion is crucial for successful prints, and applying glue can be considered a routine preparation step that contributes to the printer's overall performance and longevity by preventing prints from detaching prematurely.
- Digital Manual Access: The rapid launch guide provides a QR code and a website link to download the full manual. This ensures that users have access to comprehensive information regarding advanced features, troubleshooting, and more detailed maintenance procedures beyond what is covered in the quick start guide. This digital access is a crucial maintenance feature, as it allows users to find solutions to problems and understand their device better over its lifespan.
In summary, the Monoprice Cadet 3D Printer is designed as an accessible and reliable entry point into 3D printing, with a strong emphasis on ease of use, guided setup, and essential tools for immediate operation and basic maintenance. Its features cater to a seamless "first mission to discovery" for new users.