22
DK ENG
1.5 The chimney
Only if National or Local Regulations permit are you permitted to connect a stove into a chim-
ney that is shared by another appliance. YOU MUST be aware of any applicable Regulations
in this respect.
e wood-burning stove must never been connected to a chimney to which a gas-burning stove or ap-
pliance is connected.
An ecient modern stove places heavy demands on the chimney, and you should have the
chimney regularly swept and inspected by your approved chimney sweep.
The cross-sectional area of the chimney (at its narrowest point) must comply with National and
Local Building Regulations. Generally, the area needed for a Morsø wood-burning stove installa-
tion should measure at least 175 cm2 (150 mm diameter). An over-sized chimney is generally hard
to keep warm and results in poor draft. In cases where there is an oversized masonry chimney, it
is recommended that the chimney be lined using an appropriate chimney lining system with the
correct internal diameter. With respect to the chimney termination, all chimneys should terminate
in accordance with National and Local Building Regulations. Note that National and Local Regula-
tions also apply with regard to the placement of chimneys and ues in connection with thatched
roofs. See the section on Draft Conditions, 1.9.
The chimney or ue system must be equipped with access doors for inspection and clea-
ning. The size of the cleaning door in the chimney must at least equal to that of the cross-
sectional area of the chimney.
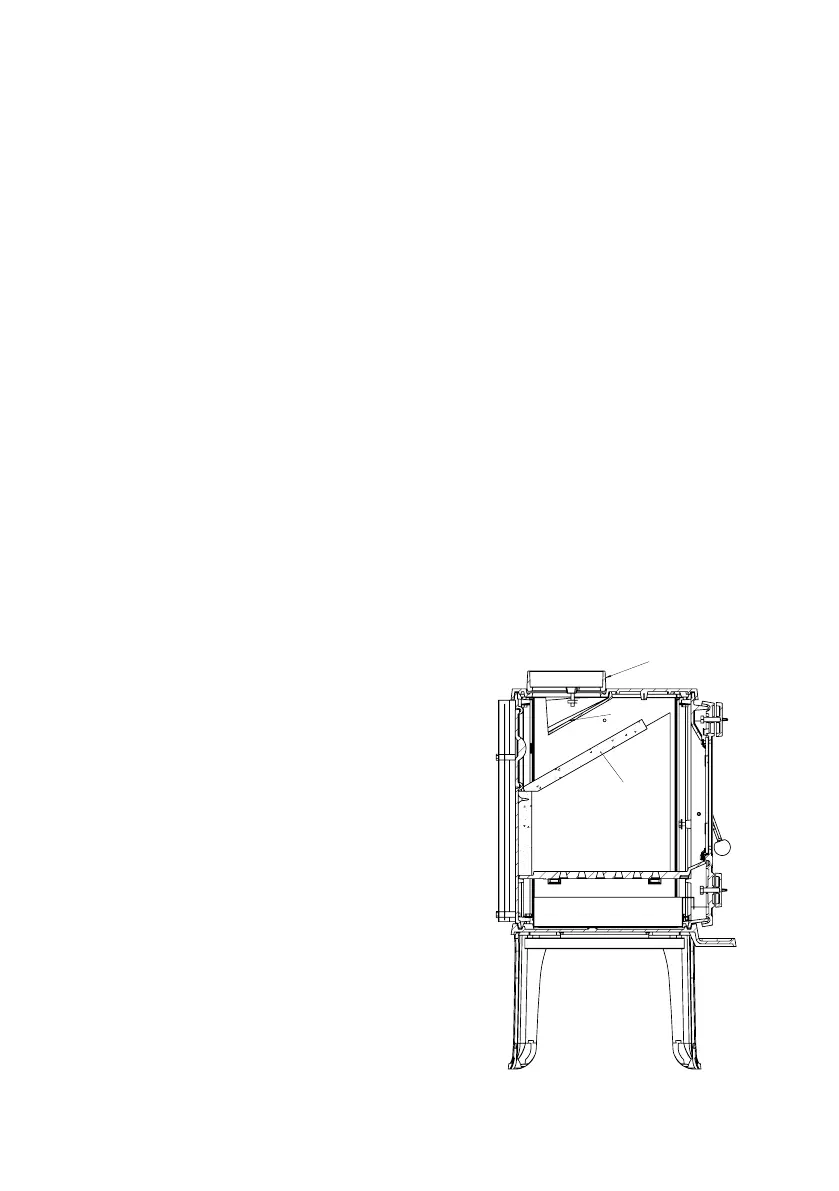
1.6 Fluepipe connections
Your stove is supplied prepared for a top ue connection (3) and the rear ue outlet is tted
with a cover plate and is situated behind the rear heat shield/convection panel.
Mounting the ue collar pointing upwards
Before installing the ue collar to the top, remove
the bae (2) and smoke hood (1), which is located under
the top cover by turning it clockwise. Then insert
and tighten the ue collar (3) with the l
oose screws and clamps. Replace the smoke hood
(1) by lifting it into place and turning it counterclockwise
and place the bae again.
Mounting the ue collar to the rear
Where a rear ue installation is required, simply knock out
the steel plates in the rear heat shield/convection panel.
This is best done by applying gentle hammer taps imme-
diately onto the small ”bridges” in the circular
cut-outs. Once the knock-outs have been removed
unbolt the cast iron cover plate and install it into the top of
the stove. The ue collar can then be bolted over the rear
ue outlet using the loose bolts and clamps.
Where applicable, the smoke hood (1) must not be used if
the stove is to be installed with a rear ue outlet (3).
Make sure that the bae (2), smoke hood,
rebricks and the riddling grate are positioned
correctly.
475
701
730
T
T
VV
Primary air:
Maximum: ≈ 4 turns
Under the grate air:
Maximum: ≈ 2 turns
Only for start-up phase
3
2
1
UU
18
9
388
309,5
34,7 30
SECTION U-U
Ash drawer
Internal dimensions
273 x 175 x 54 mm
9 x Ø4
150
9
20
10
25
SECTION V-V
Vermiculite stone
W
W
9 x
4
SECTION W-W
Revisions
Rev.
Sign.:
Title:
Drawing no.:
1:5
Main dimensions
Morsø 1010
FJN
18.05.2017
A2
Assembly drawing
Date of print: 18-05-2017
1400-421
Itemno.:
This drawing is Morsø Jernstøberi A/S' property and must not be sold, lended or copied without any written authorization from the company.
Material:
Weight kg.:
Model no.
Drawingtype:
Location of file:
Scale:
Format:
Released:
Construction:
Date: