RF Test Mode 3-3
To enter test mode:
1. Turn the radio on.
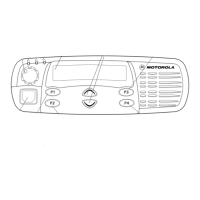
2. Within ten seconds after the self test is complete (self test tone is heard), press SB2 (Side Button
2 in Figure 3-2) five times in succession. If the self test complete tone is not heard, see Error
Codes information in Section 5. Entry into the test mode is indicated by a positive indicator tone
followed by a good key chirp (GKC).
3. Upon entering test mode, the radio is on carrier squelch mode.
4. Press SB1 (Side Button 1) and scroll through and access test environments as shown in Table 3-
2.
5. Press SB2 and scroll through the channel spacing available as shown in Table 3-3.
6. Turn the channel selector knob to change the test channel for that environment as shown in Table
3-4.
7. Press the PTT on a test channel to cause the radio to transmit at the test frequency for the chan-
nel.
Table 3-2 Test Environments
No. of
Beeps
Description Function
1
GKC*
Carrier Squelch RX: unsquelch if carrier detected
TX: mic audio
1
BKC*
Tone
Private-Line
RX: unsquelch if carrier and tone (192.8Hz) detected
TX: mic audio + tone (192.8Hz)
2
BKC
Digital
Private-Line
RX: unsquelch if carrier and digital code (131) detected
TX: mic audio + digital code (131)
3
BKC
Dual-Tone Mul-
tiple Frequency
RX: unsquelch if carrier detected
TX: selected DTMF tone pair. (Available for 4W & 5W
models only).
5
BKC
Unsquelch
Open
RX: constant unsquelch
TX: mic audio
9
BKC
High-Speed
Signaling
RX: unsquelch if carrrier detected
TX: 1500Hz tone
11
BKC
Companding RX: unsquelch if carrier detected
TX: mic audio
* “BKC” means Bad Key Chirp (low-pitched tone), “GKC” means Good Key Chirp (high-
pitched tone).
Table 3-3 Test Channel Spacing
No. of BKC Channel Spacing
1 25 kHz
2 12.5 kHz
3 20 kHz
 Loading...