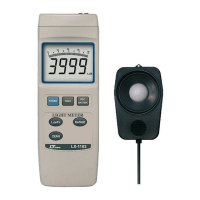
6)Zero adjustment
a. Cover the " Light Sensor " ( 3-13, Fig, 1 ) using the
"
Sensor Cover " ( 3-14, Fig. 1 ).
b. Set to 40.00 Lux range.
c. Pushing the " Zero Button " ( 3-7, Fig. 1 ), LCD will reach
to zero values.
d. Upon completion, remove the sensor cover.
Note :
For precision measurement, only the 40.00 Lux
range need to make Zero Adjustment.
7) Data Hold
a. During the measurement, pushing the " Hold Button "
( 3-3, Fig. 1 ) will hold the measured value & the LCD
will indicate " HOLD " symbol.
b. Push the " Hold Button " again to release the data hold
function.
8)Peak Ho
ld
a. During the measurement, pushing the " Hold Button "
( 3-3, Fig. 1 ) at least 2 to 3 seconds continuously, the
meter will execute the Peak Hold function and at the
same time LCD display will show the " Peak HOLD "
indicator.
b.
During execute the Peak Hold function, pushing the
" Hold Button " ( 3-3 , Fig. 1 ) once a while will clear
the Peak Value from the display and enter the new
Peak Value again.
c. When execute the Peak Hold function, pushing th
e
"
Hold Button " ( 3-3 , Fig. 1 ) at least 2 seconds
continuously will cancel the Peak Hold function, the
the " Peak HOLD " indicator will be disappeared.
8
 Loading...