2 Donning
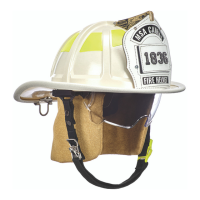
US MSA Cairns® 1836 7
Area Adjustment Procedure
Ratchet
WARNING!
To provide maximum protection, make sure to adjust the fire helmet properly. Tightening the ratchet
beyond its limits can cause damage to internal gears and result in reduced protection.
Failure to follow this warning can result in serious personal injury or death.
1. Turn the ratchet knob counterclockwise (left) to open the headband.
2. Put the fire helmet on your head. While holding the fire helmet down on your head, turn the
ratchet knob clockwise until the fire helmet is snug and comfortable.
a. The ratchet adjusts in 1/8 inch (0.3 cm) increments, and the pivoting nape rotates 20
degrees to ensure a comfortable fit.
3. Lower the ear cover over your ears and the ratchet knob.
NOTE: The headband adjustment size for the Cairns 1836 helmet accommodates hat sizes 5 - 3/8
to 8 - 1/2.
Chinstrap
WARNING!
Never wear the fire helmet without fastening and tightening the chinstrap.
Failure to follow this warning can result in serious personal injury or death.
1. Pull the chinstrap to a comfortable fit and connect the ends.
2. Use the hook-and-loop closure to make extra strap material secure.
Goggles (external)
WARNING!
Cairns Firefighter Goggles will interfere with glasses. Do not attempt to wear prescription eye or
safety glasses under the Cairns Firefighter Goggles.
Failure to follow this warning can result in serious personal injury or death.
1. Remove the protective cover from the lens.
2. Don the fire helmet.
3. Adjust the headband, ratchet, and chinstrap according to the instructions in this table.
4. Use both hands to pull the goggles out in front of your face and then down toward your face.
5. The goggles are in the correct position when they fit comfortably with no gaps. To adjust the fit
of the goggles, do the following:
○ To reduce gaps and tighten the fit, pull the straps backward through the slide buckle.
○ To relax the fit, loosen the straps through the slide buckle toward the front.