This document provides a comprehensive guide for the MSI® C236M WORKSTATION motherboard, covering its unpacking, safety information, quick start, component overview, BIOS setup, software description, RAID configuration, troubleshooting, and regulatory notices.
Unpacking
The motherboard package includes the MSI® C236M WORKSTATION motherboard, a Drivers & Utilities Disc, a Motherboard User Guide, an I/O Shield, and a SATA Cable. Users are advised to contact their dealer if any item is missing.
The components are sensitive to electrostatic discharge (ESD). Users should ensure all connections are secure, hold the motherboard by its edges, and wear an ESD wrist strap or discharge static electricity before handling. The motherboard should be stored in an electrostatic shielding container when not installed. Before powering on, ensure no loose screws or metal components are present. Do not boot the computer before installation is complete to prevent damage. Consult a certified computer technician for help. Always turn off the power supply and unplug the power cord before installing or removing components. Keep the user guide for future reference and keep the motherboard away from humidity. Ensure the electrical outlet voltage matches the PSU. Place the power cord to avoid tripping and do not place anything over it. Note all cautions and warnings. If liquid penetrates, the motherboard is exposed to moisture, it doesn't work well, or it's dropped/damaged, or shows signs of breakage, have it checked by service personnel. Do not expose the motherboard to temperatures above 60°C (140°F).
Quick Start
This section outlines the tools and components needed for assembly, including an Intel® LGA 1151 CPU, CPU Fan, Thermal Paste, DDR4 Memory, Chassis, Power Supply Unit, SATA DVD Drive, SATA Hard Disk Drive, Graphics Card, Phillips Screwdriver, and a Package of Screws. Detailed steps are provided for installing the processor, DDR4 memory, connecting the front panel header, installing the motherboard, installing SATA drives, installing a graphics card, connecting peripheral devices, and connecting power connectors, followed by instructions for powering on the system.
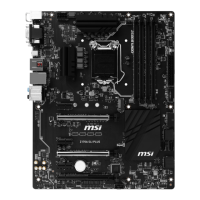
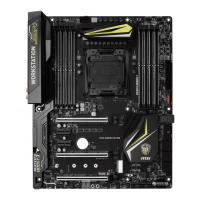
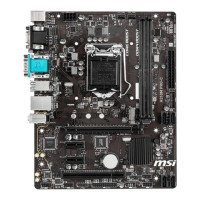
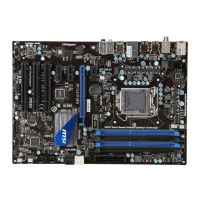
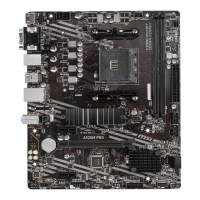
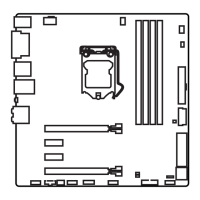
Component Overview
The motherboard features:
- CPU Socket: LGA1151 CPU Socket (page 25).
- DIMM Slots (DIMM1~4): 4x DDR4 memory slots, supporting up to 64GB of DDR4 2133 MHz memory with dual-channel architecture, ECC, un-buffered memory, and Intel® Extreme Memory Profile (XMP) (page 26).
- PCIe Expansion Slots (PCI_E1~4): 2x PCIe 3.0 x16 slots (support x16/x4) and 2x PCIe 3.0 x1 slots. The PCI_E4 slot runs at PCIe 3.0 x2 speed when a device is installed in PCI_E3 (page 27).
- SATA Connectors (SATA1~6): 6x SATA 6Gb/s ports (page 28).
- SATAe Connector (SE1_21): 1x SATAe port, backward compatible with SATA (page 28).
- Power Connectors (JPWR1~2): ATX power supply connectors (page 29).
- Front Panel Connectors (JFP1, JFP2): Connects to front panel switches and LEDs (page 29).
- USB 3.1 Gen1 Connectors (JUSB2, JUSB3): Supports additional 4 USB 3.1 Gen1 ports (page 30).
- USB 2.0 Connector (JUSB1): Supports additional 2 USB 2.0 ports (page 30).
- Front Audio Connector (JAUD1): Connects to front panel audio jacks (page 31).
- TPM Module Connector (JTPM1): For Trusted Platform Module (page 31).
- Serial Port Connector (JCOM1): For an optional serial port bracket (page 31).
- Fan Connectors (CPUFAN1, SYSFAN1~2): PWM and Voltage Mode fan connectors for CPU and system fans (page 32).
- Clear CMOS Jumper (JBAT1): Resets BIOS to default values (page 33).
- XMP Status Indicator (XMP LED): Indicates XMP status (page 33).
- Debug LED Indicators (EZ Debug LED): Indicates status of CPU, DRAM, and VGA (page 33).
- Chassis Intrusion Connector (JCI1): Connects to the chassis intrusion switch cable (page 34).
BIOS Setup
The BIOS setup provides optimal performance settings. Users can enter BIOS by pressing DEL during POST or using MSI FAST BOOT. Function keys F1-F10 provide various shortcuts.
- Resetting BIOS: Methods include loading optimized defaults (F6), shorting the Clear CMOS jumper, or pressing the Clear CMOS button on the rear I/O panel (page 36).
- Updating BIOS: Can be done via M-FLASH using a USB flash drive or through MSI LIVE UPDATE 6 (page 36).
- EZ Mode: Provides basic system information and settings. Users can switch to Advanced Mode with F7. Features include XMP switch, Setup Mode switch, Screenshot, Favorites, Language, System information, Boot device priority bar, Function buttons (LAN Option ROM, Fast Boot, HD audio controller, AHCI, RAID, CPU Fan Fail Warning Control, BIOS Log Review), Hardware Monitor, M-Flash, and Information display (page 37).
- Advanced Mode: Offers detailed configuration options. BIOS menu selections include SETTINGS (chipset and boot devices), OC (frequency and voltage adjustments), M-FLASH, OC PROFILE (manage overclocking profiles), HARDWARE MONITOR (fan speeds and voltages), and BOARD EXPLORER (installed devices information) (page 39).
- SETTINGS: Includes System Status (date, time, SATA info, system info, DMI info), Advanced (PCI Subsystem, Integrated Peripherals, USB Configuration, Super IO Configuration, Power Management, Windows OS Configuration, Secure Boot, Wake Up Event, Resume From S3/S4/S5 by PS/2 Keyboard, Realtek PCIe GBE Family Controller), and Boot (Full Screen Logo Display, Bootup NumLock State, AUTO CLR_CMOS, Boot Mode Select, FIXED BOOT ORDER Priorities, Boot Option Priorities) (page 40).
- OC: Overclocking settings for CPU Ratio, Ring Ratio, GT Ratio, DRAM Frequency, and various voltages. Includes features like EIST, Intel Turbo Boost, Extreme Memory Profile (X.M.P.), and Memory Fast Boot. Overclocking is for advanced users and may void warranty (page 49).
- M-FLASH: Utility to update BIOS using a USB flash drive (page 55).
- OC PROFILE: Manages overclocking profiles, allowing users to save, load, and clear profiles (page 56).
- HARDWARE MONITOR: Displays current CPU/system temperature, fan speeds, and voltages. Smart Fan mode allows automatic fan speed control based on CPU temperature (page 57).
Software Description
- Installing Windows® 7/8.1/10: Step-by-step guide for OS installation (page 58).
- Installing Drivers & Utilities: Instructions for installing drivers and utilities (page 58).
- COMMAND CENTER: User-friendly software for adjusting system settings and monitoring status under OS. Features include CPU Frequency control, DRAM Frequency & Voltage, IGP Frequency & GT Voltage, and various option buttons for advanced settings, record, warning, and mobile control. Gadget mode allows monitoring system status (page 59).
- LIVE UPDATE 6: Scans and downloads the latest drivers, BIOS, and utilities. Features include Live Update, History, Setting, and System Information tabs. Provides a Total Installer for simplified installation (page 63).
- SHORTCUT MANAGER: Customizes hotkeys for various functions, including Windows Keys, Login Keys, and MSI Smart Keys. Allows creating, editing, and deleting hotkeys (page 65).
- Mouse Master: Provides mouse macro functions and DPI adjustment. Users can set delay times, assign hotkeys, record mouse actions, and test mouse movements (page 66).
- M-CLOUD: MSI network sharing application to turn the computer into a Wi-Fi AP and transfer files. Features include Soft AP ON/OFF, Server Information, History, Users & Permissions, Local/Server Directory management, and File Transfer (page 67).
- RAMDISK: Creates a virtual RAM drive for temporary information storage, enhancing performance and SSD lifespan. Allows setting disk letter, name, size, format, and backup options (page 70).
- NETWORK GENIE: Optimizes bandwidth control for Realtek LAN chip. Offers Game, Stream, Browser, and Auto modes. Allows configuring application network priority and internet speed settings (page 71).
- Intel® Extreme Tuning Utility (Intel XTU): Overclocking software for tuning, testing, and monitoring the system. Features include System Information, Advanced Tuning, Stress Test, Benchmarking, Profiles, Tuning Controls, System Table, System Graphs, and System Monitors (page 73).
RAID Configuration
Describes RAID 0, RAID 1, RAID 5, and RAID 10 types and their characteristics. Provides instructions for using Intel® Rapid Storage Technology Option ROM to create, delete, and reset RAID volumes (page 74). Includes procedures for handling degraded RAID arrays and missing hard drive members (page 77).
Troubleshooting
Offers solutions for common issues such as the computer not powering on, no signal to monitor, computer not booting after BIOS update, lost BIOS password, no audio, no network, and USB device not working (page 79).
Regulatory Notices
Includes FCC Compliance Statement, Battery Information (European Union, Taiwan, California, USA), Chemical Substances Information (EU REACH Regulation), and WEEE (Waste Electrical and Electronic Equipment) Statement (page 80).