EasyManua.ls Logo

NADAMOO Bur3074 User Manual

NADAMOO Bur3074
22 pages
To Next Page IconTo Next Page
Page #1 background imageLoading...
Page #1 background image
1
Bur3074 NADAMOO 2.4G Wireless & USB wired Barcode Scanner
Quick Start Guide
In order to correctly use the bar code scanner, please read the instruction
carefully and do not arbitrarily scan the settings code, otherwise some
settings may not be available.
Please keep this instruction for reference in the future.
If you have any question or concern about the operation of the scanner,
please contact us at Email: server@nadamoo.cn / burnfree@126.com.
Package Include
:
1 x Bar code scanner
1 x USB cable
1 x USB Wireless receiver
1 x User manual
Charging
Please ensure that the scanner has enough power. If the scanner runs out of
power, the buzzer will ring for seconds, and the scanner will shut down
automatically. At this case, please stop scanning and recharge the scanner.
Please insert one end of USB cable into the scanner correctly, and insert
another end to computer USB interface or 5V DC USB interface power (NOTE:
please use computer USB interface or special 5V DC power supply to charge, the
abnormal power will cause permanent damage to scanning gun and battery).
Yellow LED light will light up when the scanner is at charge statue. It will take
about 4 hours to recharge the scanner. After full charged, the LED light will go
out automatically.
Connection Setting
This scanner has two connection mode:
Mode 1: Wired Mode.
Set by steps
1. Connect the scanner to your computer via USB cable;
2. Scan the code " PS2 keyboard wired mode " to convert the scanner to wired mode.
PS2 keyboard wired mode
Question and Answer IconNeed help?

Do you have a question about the NADAMOO Bur3074 and is the answer not in the manual?

NADAMOO Bur3074 Specifications

General IconGeneral
BrandNADAMOO
ModelBur3074
CategoryBarcode Reader
LanguageEnglish

Summary

Package Contents

Scanner Charging

Connection Settings

Wired Mode Setup

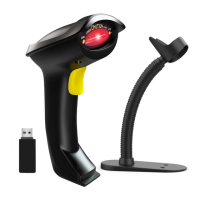
Steps to connect and configure the scanner in wired mode.

Connection Settings

Wireless Mode Setup

Steps to connect and configure the scanner in wireless mode.

Customer FAQ

Barcode Interpretation

Explains how scanner interprets barcodes and relates to product names.

Customer FAQ

Barcode Reading Issues

Addresses common reasons why the scanner might fail to read barcodes.

Barcode Reading Accuracy

Fixes for incorrect barcode readings due to start/end characters.

Scanning Mode Settings

Scanning Mode Selection

Options for key trigger or continuous scanning modes.

Buzzer Settings

Buzzer Configuration

Settings to control buzzer sound and volume.

Case Sensitivity Settings

Letter Case Configuration

Options for managing letter case during scanning.

Insert Character as Prefix

Prefix Insertion Procedure

Steps to add characters before scanned barcodes.

Insert Character as Suffix

Suffix Insertion Procedure

Steps to add characters after scanned barcodes.

Clear Prefix/Suffix Characters

Clear Prefix/Suffix

Instructions to remove configured prefix or suffix characters.

Terminator Setting

Terminator Configuration

How to set terminators like TAB, CR, or CR&LF after scanned data.

Hide Characters from Start Position

Hide Leading Characters

Configure the scanner to hide characters from the beginning of a barcode.

Hide Characters from End Part

Hide Trailing Characters

Configure the scanner to hide characters from the end of a barcode.

Hide Characters from Specific Part

Hide Middle Characters

Hide a specified range of characters from the middle of a barcode.

Identify Barcode Type

Barcode Type Identification

Methods to identify barcode types by adding ID as prefix or suffix.

Barcode Setting

Enable/Disable Barcode Types

Options to enable/disable specific barcode types and functions.

Character Table

Power Off Settings

Automatic Power Off

Configure the automatic power-off standby time for the scanner.

Factory Default Setting

Factory Reset Procedure

Procedure to reset the scanner to its original factory default settings.

Technical Parameters

Related product manuals