EasyManua.ls Logo

NAiS FP0-C14RS - User Manual

Default Icon
173 pages
Print Icon
To Next Page IconTo Next Page
Loading...
PROGRAMMABLE CONTROLLER
FP0
Hardware
is a global brand name of Matsushita Electric Works.

Table of Contents

Questions and Answers

  • R
    Rachel PetersenAug 9, 2025
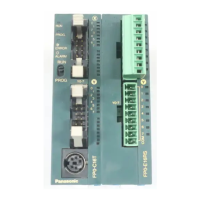
    Why is the ERROR/ALARM LED on my NAiS Controller ON?
    • T
      tiffany81Aug 9, 2025
      The ERROR/ALARM LED might be on for several reasons: * The system watchdog timer may have been activated, stopping FP0 operation. To resolve this, set the mode switch from RUN to PROG. and cycle the power OFF and then ON. * The program execution time might be too long. Review your program for instructions like JP or LOOP that could prevent a scan from finishing. * Interrupt instructions might be executed in succession. * You can also try setting the mode switch from PROG. to RUN.
  • M
    Michael FischerAug 20, 2025
    What to do if the ERROR/ALARM LED is blinking on my NAiS Controller?
    • E
      Elizabeth PooleAug 20, 2025
      If the ERROR/ALARM LED is blinking, it indicates a self-diagnostic error or a syntax error in the program. Here's what you can do: * Check the error code using the programming tool. * If there's a syntax error, switch to PROG. mode and clear the error. You can also execute a total-check function to pinpoint the syntax error's location. * For self-diagnostic errors other than syntax errors, use the programming tool in PROG. mode to clear the error. * In PROG. mode, turning the power OFF and then ON again can clear the error, but note that this will erase the operation memory (except hold type data). * Alternatively, you can clear the error by executing a self-diagnostic error set instruction F148 (ERR).
  • K
    Kayla PerkinsAug 29, 2025
    How to troubleshoot if all LEDs are OFF on NAiS FP0-C14RS?
    • Q
      qmanningAug 29, 2025
      If all LEDs are OFF on your NAiS Controller, try the following: * Check the power supply wiring. * Ensure the power supplied to the FP0 control unit is within the rated range. * If the FP0 control unit shares its power supply with other devices, disconnect their power supply wiring. * Consider using a separate power supply for other devices or increasing the capacity of the current power supply.

Summary

Chapter 1 Overview

1.1 Components

Overview of FP0 control units and expansion units available.

1.4 Programming Tools

Lists software and hardware tools for programming the FP0 controller.

Chapter 2 Control Units

2.2 Specifications

Details the technical specifications for FP0 control units.

Chapter 3 Expansion I;O Units

3.2 Specifications

Provides detailed technical specifications for FP0 expansion I/O units.

Chapter 4 Analog I;O Unit

4.2 Specifications

Details the technical specifications for the Analog I/O Unit.

4.3 A;D Conversion Characteristics

Explains how analog input signals are converted to digital values.

4.4 D;A Conversion Characteristics

Describes the conversion of digital values to analog output signals.

4.5 Wiring

Provides instructions and diagrams for wiring analog input/output.

Chapter 5 I;O Allocation

Chapter 6 Installation

Chapter 7 Wiring

7.1 Safety Instructions

Essential safety precautions to prevent malfunctions and accidents.

7.2 Wiring the Power Supply to the Control Unit

Instructions for correctly connecting the power supply to the FP0 unit.

Chapter 8 Connecting the I.O.P. Display Panel

Chapter 9 Trial Operation

9.1 Before Turning ON the Power

Checklist of items to verify before powering on the controller.

Chapter 10 Self-Diagnostic and Troubleshooting

10.1 Self-Diagnostic Function

How the FP0 unit performs self-diagnostics and indicates errors via LEDs.

10.2 Troubleshooting

Guidance on diagnosing and resolving common operational issues and errors.

10.3 Error Codes

List and explanation of error codes for self-diagnosis and syntax checks.

NAiS FP0-C14RS Specifications

General IconGeneral
BrandNAiS
ModelFP0-C14RS
CategoryController
LanguageEnglish

Related product manuals