Do you have a question about the Nakamichi 350 and is the answer not in the manual?
Facilitates locating pre-recorded selections on the cassette.
Temporarily halts tape in Play or Record mode; second press resumes playback.
Stops transport; firm push ejects cassette. Necessary for changing transport modes.
Regular cleaning of heads, capstan, and pressure roller is crucial for preventing signal dropouts and maintaining sound quality.
Demagnetize metal parts like heads and capstan periodically to prevent residual magnetism that can add hiss and degrade high frequencies.
Moving parts of the transport have oil-less bearings; no user lubrication is required.
For repairs, consult dealer; unit has no user-serviceable parts. Read warranty information.
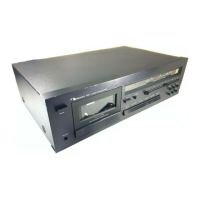
The Nakamichi 350 is a 2-head cassette deck designed for high-quality audio playback and recording. It is versatile, suitable for use in automobiles, planes, boats, or any mobile environment with a 12-volt DC source, and can also be integrated into a home music system with an optional AC adaptor.
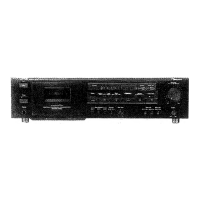
The Nakamichi 350 facilitates both playback and recording of cassette tapes. It features a tape counter for easy location of pre-recorded selections, and a cassette lid for inserting and removing tapes. The deck includes a pause button to temporarily halt tape operation in play or record mode, and dedicated buttons for fast forward, play, stop/eject, rewind, and record functions. The stop/eject button requires a firm push to eject the cassette.
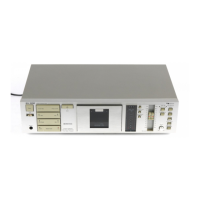
For monitoring audio levels, the Nakamichi 350 is equipped with a peak level meter that displays the higher of the left and right channels during both recording and playback. Input level controls allow for precise adjustment of recording levels, whether from line inputs or microphones. These controls are concentric and friction-coupled, enabling separate level settings for each channel. A blend mic level control is also provided.
Output levels for headphones and line outputs are managed by a concentric, friction-coupled control, which also allows for L/R balance adjustment. The deck includes a tape selector switch to match the tape type and equalization settings, and a Dolby Noise Reduction System switch for engaging or disengaging Dolby processing.
Power is supplied via a DC 12-volt jack, which accepts an AC Power Pack for home use. A 6-pin DC 12-volt car connector allows seamless integration with the ADS 2002 system, handling all audio and power connections. The unit also features left and right mic input jacks, line output jacks, and line input jacks. A headphone jack is provided for private listening, recommending stereo headphones within an impedance range of 8-16 ohms for optimal performance.
Power Management: The Nakamichi 350 does not have a dedicated power switch. Depressing any transport function button automatically turns on the power. The deck is "off" in the stop mode. When used with an ADS miniature speaker system and appropriate cables, power to the ADS system is activated only when the play button on the 350 is depressed.
Playback Procedure:
Recording Procedure:
Mounting: The 350 can be mounted using a bracket. Choose a level location away from heat and AC ducts. Drill four holes using the upper bracket as a template, then attach the upper bracket to the dashboard. Attach the lower bracket to the upper bracket, selecting rear holes for the most level installation. Place the 350 on the lower bracket and secure it with the two dial knobs.
Carrying Case (Optional): To install the 350 in its carrying case, open the rear flap, ensure the 6-pin connector is out of the way, then slowly slide the 350 in. Tighten the thumbscrew at the bottom to secure it. The rear flap should be turned around and fastened to the side. Connect the 6-pin connector on the carrying case to the 6-pin 12 Volt DC Car Connector on the rear panel of the 350. Unplug this connector when closing the rear flap. Microphones and headphones connect to the appropriate jacks on the rear panel.
Cleaning: Frequent cleaning of heads, capstan, and pressure roller is crucial to prevent signal dropouts, loss of high frequencies, and wow/flutter. A cleaning kit is supplied, or Q-tips and undiluted methanol alcohol can be used. Dip a Q-tip in alcohol, squeeze excess, and rub over the head surfaces. For the capstan and pressure roller, put the deck in play mode with power on, apply the moist Q-tip to the right side of the rubber pressure roller, and move it to clean the entire surface. Repeat with the capstan in fast forward mode.
Demagnetizing: All metal parts in contact with the tape should be occasionally demagnetized to prevent residual magnetism, which can cause hiss and partially erase high frequencies. While Nakamichi decks require less frequent demagnetization than many others, it should be done every 50 hours of use. A Nakamichi Demagnetizer is recommended. Remove all tapes from the vicinity, ensure the deck is "OFF," turn on the demagnetizer, and slowly bring the tip close to the rec/pb head (without contact unless covered with vinyl/rubber). Move the demagnetizer tip slowly in a random pattern for at least 10 seconds, then move it to the capstan. Slowly withdraw the demagnetizer, turning it off only when at least 2 feet away from the player. Never turn it off while close to the head or capstan, as this can magnetize the metal part. The erase head does not require demagnetization.
Lubrication: The moving parts of the Nakamichi 350 transport are fitted with oil-less bearings, so user lubrication is not necessary.
Fuse Replacement: The 12V supply wire for the 350/2002 system includes an in-line fuse holder. If the fuse blows, it indicates a short circuit or heavy load. Disconnect the 6-pin plug from the rear panel. Open the fuse holder by pushing and twisting the ends. Replace the blown fuse with a 6-ampere, fast-acting type. Re-connect the 6-pin plug. If the fuse blows again, consult a qualified service technician.
Troubleshooting: A chart is provided to diagnose common issues such as no power, no sound, noise during playback, excessive wow and flutter, dropout of sound, distortion, loss of high frequencies, no fast forward or rewind, uneven sound, and crosstalk, along with probable causes and recommended remedies.
| Track System | 4-track, 2-channel stereo |
|---|---|
| Heads | 1 x record/playback, 1 x erase |
| Total Harmonic Distortion | 1.5% |
| Type | Cassette Deck |
| Motor | DC servo controlled |
| Inputs | line |
| Outputs | line |