EasyManua.ls Logo

Napoleon CFF User Manual

Napoleon CFF
4 pages
To Next Page IconTo Next Page
Page #1 background imageLoading...
Page #1 background image
SAF
E
T
Y SCREEN
CFF
FRONT INSTALLATION INSTRUCTIONS
INSTRUCTIONS D’INSTALLATION DU FAÇADE DE LA CFF
4
1 2
Wolf Steel Ltd., 24 Napoleon Rd., Barrie, ON L4M 0G8 Canada • (705)721-1212 • fax (705)722-6031 • www.napoleonreplaces.com
!
!
WARNING
!
AVERTISSEMENT
!
DO NOT TOUCH SAFETY SCREEN UNTIL COOLED.
ALLOW SAFETY SCREEN TO COOL COMPLETELY BEFORE ANY MAINTENANCE, AS IT WILL REMAIN HOT
AFTER APPLIANCE IS NO LONGER OPERATING.
ENSURE THE UNIT IS COMPLETELY COOL BEFORE STARTING INSTALLATION.
TO AVOID DANGER OF SUFFOCATION KEEP THE PACKAGING BAG AWAY FROM BABIES AND
CHILDREN. DO NOT USE IN CRIBS, BED, CARRIAGES OR PLAY PENS. THIS BAG IS NOT A TOY.
KNOT BEFORE THROWING AWAY.
NE TOUCHEZ PAS L’ÉCRAN DE PROTECTION JUSQU’À CE QU’IL AIT REFROIDI.
LAISSEZ LE L’ÉCRAN DE PROTECTION REFROIDIR COMPLÈTEMENT AVANT D'EFFECTUER UN ENTRETIEN,
CAR IL DEMEURERA CHAUD APRÈS L'ARRÊT DE L'APPAREIL.
ASSUREZ-VOUS QUE L’APPAREIL EST COMPLÈTEMENT REFROIDI AVANT DE COMMENCER L’INSTALLATION.
AFIN D’ÉVITER LES RISQUES DE SUFFOCATION, GARDEZ LE SAC D’EMBALLAGE LOIN DES BÉBÉS ET DES
JEUNES ENFANTS. NE LE LAISSEZ PAS TRAÎNER DANS LES BERCEAUX, LES LITS, LES POUSSETTES OU
LES PARCS DE JEU. CE SAC N’EST PAS UN JOUET. NOUEZ-LE AVANT DE LE JETER.
CAUTION: A BARRIER DESIGNED TO REDUCE THE RISK OF BURNS
FROM THE HOT VIEWING GLASS AND IS PROVIDED WITH THE
APPLIANCE AND SHALL BE INSTALLED. THIS BARRIER IS NOT
DESIGNED FOR PROLONGED CONTACT.
CAUTION: UNE BARRIÈRE CONÇU À RÉDUIRE LE RISQUE DE
BRÛLURES À PARTIR DE LE CHAUDE LA VITRE EST À CONDITION
QUE AVEC L’APPAREIL ET SERA ÊTRE INSTALLÉS. L’ÉCRAN DE
PROTECTION N’EST PAS EST CONÇU POUR UN CONTACT PROLONGÉ.
INSTALLER: LEAVE THIS MANUAL WITH THE APPLIANCE.
CONSUMER: RETAIN THIS MANUAL FOR FUTURE REFERENCE.
INSTALLATEUR: LAISSEZ CE MANUEL AVEC L’APPAREIL.
PROPRIETAIRE: CONSERVEZ CE MANUEL POUR
CONSULTATION ULTÉRIEURE.
W415-1515 / B / 08.14.15
L’É
C
R
A
N
D
E
PRO
TEC
TION
X4
REMOVE SHOULDER SCREWS. DO NOT DISCARD.
ENLEVER LE VIS À ÉPAULEMENT. NE JETEZ PAS.
YOU WILL NEED:
VOUS AUREZ BESION DE:
3/8" & 1/4" SOCKET WRENCH
CLÉ À DOUILLE 3/8” & 1/4"
LATCH TOOL
OUTIL DE LOQUET
REMOVE THE SUPPLIED SCREEN FROM THE FRONT PRIOR TO
INSTALLING ON THE APPLIANCE. DISCARD SCREEN.
RETIREZ L’ÉCRAN FOURNI PAR L’AVANT D’INSTALLER SUR L’APPAREIL.
JETER L’ÉCRAN.
3
REMOVE THE HOOD SCREWS & HOOD.
RETIRER LES VIS DE CAPOTE ET CAPOTE.
X4
Question and Answer IconNeed help?

Do you have a question about the Napoleon CFF and is the answer not in the manual?

Napoleon CFF Specifications

General IconGeneral
BrandNapoleon
ModelCFF
CategoryFireplace Accessories
LanguageEnglish

Summary

Front Installation Instructions

Important Safety Precautions

Covers essential warnings about hot surfaces, cooling periods, and suffocation hazards from packaging.

Tools and Installer Guidance

Lists necessary tools and provides instructions for installers and consumers regarding manual retention.

Initial Removal Steps

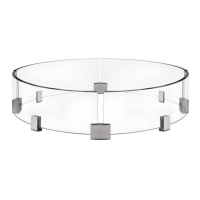
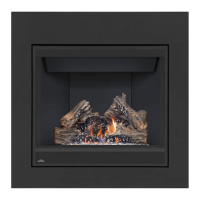
Details on removing the supplied screen, hood screws, hood, and shoulder screws prior to installation.

Appliance and Front Pre-Installation

Screen Re-installation Procedure

Instructions for re-installing the safety screen using shoulder screws removed earlier.

Magnet Location Check

Guidance on verifying the upper magnet location for proper screen engagement.

Engaging the Safety Screen

Steps to engage the front safety screen and secure it with spring-loaded magnet catches.

Framing and Finishing Requirements

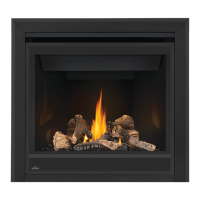
Details on non-combustible material requirements for framing and finishing around the appliance.

Post-Installation and Cleaning

Framing and Finishing Compliance

Reinforces the necessity of non-combustible materials for framing and finishing below the recess.

Safety Screen Cleaning

Instructions on cleaning the safety screen using a vacuum with a brush attachment.

Glass Screen Removal and Installation

Warning for Glass Screen Handling

Caution against inserting fingers into gaps due to the spring mechanism risk.

Disengaging Bottom Latches

Procedure for disengaging the bottom latches using the provided latch tool.

Installing the Glass Screen

Steps for connecting the latch tool and disengaging latches to install the glass screen.

Related product manuals