Quick Start Steps
1. Choose whether to use the device as a PCI Express device or as an Ethernet device.
Note NI 294x/295x devices support both PCI Express and Ethernet bus
connections. All other devices support only Ethernet.
2. Install the driver software media.
3.
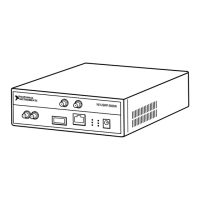
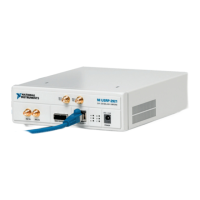
Connect the device.
• Ethernet connection—Keep the computer powered on. Attach the antenna or cable to
the front panel terminals of the NI USRP-29xx device as desired. Connect the device
directly to your computer with the included Ethernet cable and connect the power.
• PCI Express connection—Power off the computer and the device. Connect the
device to an MXI Express interface on your computer. Power on the device before
powering on your computer. Attach the antenna or cable to the front panel terminals
of the NI USRP-29xx device as desired.
Note Do not connect a single device to both MXI Express and Ethernet.
4. Configure your computer.
•
Ethernet connection—Change the IP address of your standard Ethernet port to a
static IP. NI recommends a static IP address of 192.168.10.1.
• PCI Express connection—Identify your device in Measurement & Automation
Explorer (MAX) and note its RIO resource name. Optionally, create an alias for
your device.
5. (Optional) Update the firmware using the NI-USRP Configuration Utility. If you are
programming the device through the NI-USRP application programming interface (API)
and you need to update the firmware, select Start»All Programs»National
Instruments»NI-USRP»NI-USRP Configuration Utility to open the NI-USRP
Configuration Utility. On the N2xx/NI-29xx Image Updater tab, click Browse to select
a firmware image.
6. Run an example VI or sample project.
If you have trouble with any of the preceding steps, refer to the detailed sections of this guide.
Related Information
Installing the Software on page 7
Installing NI 29xx Devices on page 7
Updating Device Firmware and FPGA Images on page 14
Programming the NI 29xx on page 19
NI USRP-29xx Getting Started Guide
| © National Instruments | 3