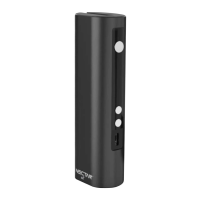
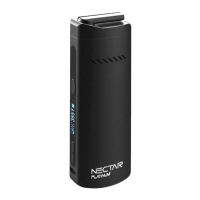
The Nectar V2 is a dry herb smart vaporizer designed to allow users to utilize the benefits of cannabinoids while eliminating the intake of toxins and carcinogens. It aims for 100% customer satisfaction and offers a 2-year warranty upon registration.
Product Contents
The Nectar V2 package includes:
- 1x Nectar V2 device
- 1x Charging Cable
- 1x Accessory Kit
- 1x QR Code Card
Technical Specifications
- Dimensions: 9.4cm x 3.1cm x 2.1cm
- Device Weight: 124g
- Colour: Matte Black
- Compatible Ingredients: Dry Herbs
- Temperature Range: 100°C - 225°C / 212°F - 437°F
- Battery Capacity: 2600mAh (20A)
- Materials: Ceramic Chamber / Aluminium Body / Zirconia Mouthpiece
- Temperature Precision: 5°C Increments
- Heating Time: 160°C in 30 seconds
- Battery: 2200mAh
- Display: OLED Screen
- Airflow: Isolated Airflow
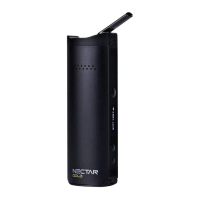
Diagram
The Nectar V2 consists of several key components:
- Ceramic Mouthpiece: The part where the user inhales.
- Main Body: The primary housing of the device.
- Chamber Filter: Filters the vapor before it reaches the mouthpiece.
- Chamber Cap: Covers the heating chamber.
- Heating Chamber: Where the dry herbs are placed for vaporization.
- Power Button: Used to turn the device on/off and start heating.
- Up/Down Buttons: Used to adjust temperature settings.
- Charging Port: For connecting the charging cable.
Operating Guide: Charging
- Initial Charge: It is recommended to charge the Nectar V2 for 1 hour before its first use.
- Charging Indication: When charging, the OLED screen will display a blinking battery charging gauge. It will stop blinking and show a full gauge once fully charged.
- Charging Time: Approximately 2 hours.
- Battery Protection: Avoid overcharging to protect and extend battery life.
- Storage: After use, allow the device to cool down before storage. Store it in a dry and cool place, away from weather effects and out of reach of children, to prevent damage to the battery.
Operating Guide: Vaping Dry Herbs
-
Sterilising (Step 01):
- Detach the chamber cover by turning the vaporizer upside down and pressing on one edge of the cap.
- Before first use and after charging, sterilise the device (refer to page 11 of the manual for detailed sterilisation steps).
-
Packing your chamber/bowl (Step 02):
- Position the device upside down on a flat surface.
- Grind your herbs and pour them into the chamber, ensuring it is at least half full for best results.
- Press the herbs softly to compact them slightly, but avoid over-compacting as this will restrict airflow.
-
Turning your device on (Step 03):
- Press the power button 5 times to turn on the device.
- The OLED screen will display two temperatures: the 'set' temperature (blinking, selected by the user) and the 'run' temperature (detected in real-time).
- The device will vibrate once when it turns on.
- Tip: If the chamber cap gets stuck, insert the clearing rod through the mouthpiece hole and push it all the way through to dislodge the mouthpiece.
-
Setting the temperature (Step 04):
- Use the 'up' and 'down' buttons to increase or decrease your desired temperature.
- Press the power button to start heating. The device will vibrate once the desired temperature is reached.
-
Vaping your herbs (Step 05):
- Once the desired temperature is reached, wait an additional 20 seconds for the herbs to heat evenly.
- When ready, take long, slow, and smooth tokes, lasting around 5-10 seconds per toke, without pressing any buttons.
-
Choosing a temperature (Step 06):
- There is no single "optimum" temperature; it depends on personal preference and herb quality.
- It is suggested to start at 180°C and increase in 10°C increments until you find your preferred temperature.
Operating Guide: Timer
- Automatic Shut-off: The device has an automatic timer that turns it off after 5 minutes to conserve battery and prevent overheating.
- Vibration Alert: Another vibration will alert you when the device has turned off due to the timer.
Operating Guide: Toggles & Indicators
- Temperature Units: To toggle between Celsius and Fahrenheit, press and hold the 'down' button for 2 seconds.
- Haptic Feedback: To turn the vibrate function on or off, press and hold the 'up' button for 3 seconds.
- Safety Function: The device vibrates when turned on/off. If left untouched for more than 60 seconds while on, the temperature will automatically drop to 120°C (with a vibration notification). The device will increase its temperature again once picked up.
- OLED Screen Indicators:
- Set Temperature: The desired temperature selected by the user.
- Run Temperature: The real-time detected temperature.
- Heating Icon: Indicates when the device is heating.
- Battery Power: Shows the current battery level.
- Vibrate On: Indicates if haptic feedback is active.
Cleaning
Regular cleaning improves the device's lifespan and flavor.
-
Prepare for cleaning (Step 01):
- Allow the device to cool completely to avoid injuries.
- Detach the chamber cap.
- Brush away any loose leaf material.
-
Detaching the mouthpiece (Step 02):
- Grip the mouthpiece tightly between your thumb and forefinger and pull it out. Force may be needed as bearings secure it.
-
Cleaning the mouthpiece (Step 03):
- Soak a pipe cleaner with isopropyl alcohol (ISO) and scrub the inside of the mouthpiece.
- Wipe away the ISO with a clean/dry pipe cleaner.
- Clean the outside of the mouthpiece with an ISO-dipped cloth.
-
Cleaning the heating chamber (Step 04):
- Soak a cotton swab or cleaning brush with ISO.
- Insert into the chamber and scrub the sides and bottom with a circular motion until clean.
- Dry with a clean, dry cloth or cotton swab.
-
Cleaning the airflow path (Step 05):
- Soak a pipe cleaner with ISO and floss it through the airflow path from both ends.
- Use the clearing rod to push out leftover residue material by inserting it through either end.
- Dry with a new pipe cleaner, then sterilise and use.
-
Cleaning the chamber filters (Step 06):
- Use an ISO-dipped cloth or alcohol pads to rub away residue and clean each chamber filter individually.
- Reassemble the device, sterilise, and use.
Sterilising in 3 steps
-
Prepare for Sterilising (Step 01):
- Ensure the device is sufficiently charged (refer to page 4).
- If sterilising after cleaning, ensure all parts are wiped dry with a clean cloth.
-
Setting your temperature (Step 02):
- Set the vaporizer to the maximum temperature (240°C) by holding the 'up' button. (Refer to page 5 for more information).
-
Sterilising (Step 03):
- Allow the device to heat for 5 minutes with an empty chamber. The built-in 5-minute timer will turn it off once complete.
- Repeat this step twice: once without the cooling unit detached, and once with the cooling unit attached.
- Note: Isopropyl Alcohol (ISO) evaporates quickly. Any ISO on the vaporizer should evaporate within a minute, but it is still good practice to sterilise the vaporizer after each clean.
Nectar Club Subscription
The Nectar Club offers various benefits:
- Receive a refurbished device every year.
- Lifetime Insurance (Covers Accidental Breakage).
- Receive products worth up to £613.19 every 2 years.
- Receive a FREE upgrade/vaporizer once every 2 years.
- Receive a lifetime discount (up to 15% off sitewide).
- Monthly plans: Starter (£4.99/mo), Master (£12.99/mo), Guru (£18.99/mo).
- More details available by scanning the QR Code or visiting nectarmedicalvapes.com/nectar-club-pricing/.
Nectar Warranty Registration
The Nectar V2 comes with a 2-year warranty. To activate it:
- Provide Personal Details.
- Provide Order Information.
- Confirm registration.
Scan the QR Code or visit nectarmedicalvapes.com/warranty/ to register your device.
Warnings
- Liquids & Cleaning: Do not submerge the device or its chamber in water, ISO, or any other substance. Do not use viscous liquids/oils as they may block airflow holes.
- Condensation Treatment: Condensation can occur due to the environment or breathing into the device. It can be wiped away and is not a cause for alarm. Turn the pod upside down and shake lightly to remove it.
- Charging: Do NOT charge with a charger exceeding 5V/1A. Do not leave the device uncharged for over 2 months, as this can reduce battery capacity and lead to battery failure.
- Law & Age: This device is for various herbs and extracts, some of which may be restricted or illegal. Users must check local jurisdictions for legality and minimum age restrictions.
Disclaimer
- Read the instructions manual carefully for optimal performance and safety. Keep it in a safe place for future reference.
- This device is not intended to diagnose, cure, treat, or prevent diseases. Consult a doctor for health problems.
- Not for use by children, pregnant/breastfeeding women, or those with life-threatening illnesses without consulting a doctor. Do not use before driving or operating machinery.
- Not intended to administer illegal substances. Users are responsible for checking local laws and age limits.
Certifications
- CE: Certificate of Conformity (EU), indicating compliance with EU's New Approach Directives.
- FC: Federal Communications Commission, equipment authorization issued by an FCC recognized Telecommunication Certification Body.
- ROHS: Product level compliance based on the European Union's Directive 2002/95/EC, Restriction of the Use of Certain Hazardous Substances in Electrical and Electronic Equipment.
Support
- YouTube Support Videos: Scan QR Codes or click links to subscribe to the Nectar channel for support videos.
- Customer Support:
- WhatsApp: +44 773 2415 188 (Avg. Response: 0.5 hours)
- Email: info@nectarmedicalvapes.com (Avg. Response: 2 hours)
- Telephone: +44 207 050 0737 (Avg. Response: 30 seconds)