Unpack the Box and Verify the Contents
When you open the box, verify that you received everything.
The package includes:
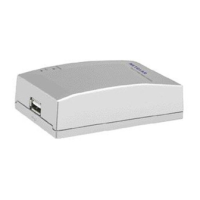
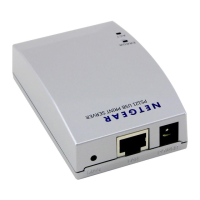
• PS121 USB Mini Print Server
• AC Power adapter
• 5 ft. (1.52 m) USB cable
• USB Mini Print Server Resource CD
• Installation guide
• Warranty/Support information card
Connect the Print Server
The PS121 USB Mini Print Server connects directly to the USB port on your printer.
After connecting it to your printer, you then connect the print server to a network device
(like a hub, router, or switch).
Before you share the printer with the NETGEAR PS121 USB Mini Print Server,
you should have at least one computer connected to an Ethernet network and have
one unused port on an Ethernet hub, switch, or router.
2
1
1
Introduction
Thank you for purchasing a
NETGEAR PS121 USB Mini Print
Server. With this print server you can
share your printer with all the
computers in your home or office that
run Microsoft
®
Windows
®
98, 2000,
NT 4.x, Me, or XP operating system.
This installation guide shows you how to
connect the print server to your printer
and configure it to use with your computers. Setup is easy – if you follow the instructions in this
guide, the print server will soon be up and running for your computers.
If you have problems, there is a troubleshooting section on page 8 to help you. You can get
more detailed troubleshooting information from the Reference Manual on the USB Mini Print
Server Resource CD or online at www.NETGEAR.com in our Support section.
Installation Procedure Overview
Estimated time: 30 minutes
1. Unpack the box and verify the contents.
2. Connect the print server to the printer and to the network.
3. Configure the print server to be recognized on the network.
4. Configure each computer to print through the print server.
Note: You only need to go through procedures 1 through 3 once. Repeat procedure 4 for
each computer that will share the printer with the print server. It takes less than 5 minutes
to configure and test each computer.
On the USB Mini Print Server Resource CD, you will find a Reference Manual containing more
detailed information about installation, troubleshooting and configuration.
1
2
2
 Loading...