EasyManuals Logo

NETGEAR WN3000RP Installation Guide

NETGEAR WN3000RP
20 pages
To Next Page IconTo Next Page
To Previous Page IconTo Previous Page
Page #6 background imageLoading...
Page #6 background image
6
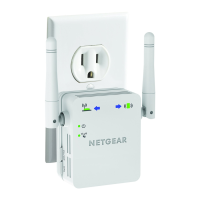
Install the WiFi Extender
Place the extender, apply power, and connect it to your WiFi network.
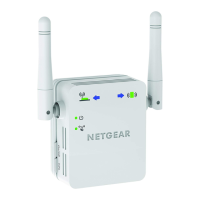
Place the Extender and Apply Power
1. Place your extender in the same room as your WiFi router.
Note: Proximity to the WiFi router is required only during the
initial setup process.
2. Plug the extender into an electrical outlet.
The Power LED lights green. If the Power LED does not
light, press the Power button.
Connect to an Existing WiFi Network
To extend the range of your WiFi network, you must connect the
extender to your existing WiFi network. You can do this in one of two
ways:
Connect with WPS. For more information, see Connect with
WPS on page 7.
Connect with the genie® web browser. For more information,
see Connect with NETGEAR genie Smart Setup on page 8.

Other manuals for NETGEAR WN3000RP

Questions and Answers:

Question and Answer IconNeed help?

Do you have a question about the NETGEAR WN3000RP and is the answer not in the manual?

NETGEAR WN3000RP Specifications

General IconGeneral
InterfaceEthernet
Connectivity technologyWireless
Wi-Fi bandSingle-band (2.4 GHz)
Ethernet LANYes
Security algorithmsWEP, WPA, WPA2-PSK
Networking standardsIEEE 802.11b, IEEE 802.11g, IEEE 802.11n
Maximum data transfer rate300 Mbit/s
Chipset-
InternalNo
CertificationRoHS, WEEE, CEC
Component forPC/Laptop
Product colorWhite
Dimensions (WxDxH)112 x 74 x 45 mm
Minimum system requirements802.11 b/g/n 2.4 GHz wireless router or gateway 802.11 b/g/n 2.4 GHz wireless adapter or Ethernet adapter and cable for each computer
Compliance industry standardsIEEE 802.11 b/g/n
Compatible operating systemsWindows 7, Vista, XP, 2000 Mac OS UNIX Linux
Weight and Dimensions IconWeight and Dimensions
Weight245 g

Related product manuals