– 7 –
Connecting the NXAMPmk2 power outputs
The NXAMPmk2 uses four NL4 outputs to connect the speak-
ers. The pin out is the following:
• Amplier CH1 outputs on NL4 A 1+/1- and NL4 B 2+/2-
• Amplier CH2 outputs on NL4 B 1+/1- and NL4 A 2+/2-
• Amplier CH3 outputs on NL4 C 1+/1- and NL4 D 2+/2-
• Amplier CH4 outputs on NL4 D 1+/1- and NL4 C 2+/2-
NXAMPmk2 outputs can be bridged two by two. Note that there
is no dedicated output to use the ampliers in bridge mode,
bridge being always available with the following pinout:
• Amplier CH1&2 (bridge) outputs on NL4 A 1+/1- and NL4 B
2+/2-
• Amplier CH3&4 (bridge) outputs on NL4 C 1+/1- and NL4
D 2+/2-
WARNING! When used in bridge mode, never touch
or short-circuit the unused pins on the output NL4 as some
high voltage can be present.
To help you connect seamlessly the NXAMKmk2 to your NEXO
speakers, an automatic Digital Patching Unit (reference DPU)
is available.
Please check the speaker impedance before connecting to the
NXAMPmk2.
WARNING! The NXAMPmk2 works with output load
down to 2 Ohms in four channels mode or down to 4 Ohms
in bridge mode.
Mains connections
The NXAMPmk2 can accept Mains from 100 to 240 Volts, both
50 to 60 Hz, thanks to its high efciency active PFC (Power Fac-
tor Correction) system.
WARNING! Check the local mains value and ensure
that it ts the need of the NXAMPmk2 before connecting.
Refer to the specication page of this document to know the
mains power requirement of the NXAMPmk2 depending on the
NXAMPmk2 model and the load connected.
The mains connection is done through a standard Powercon
20 connector.
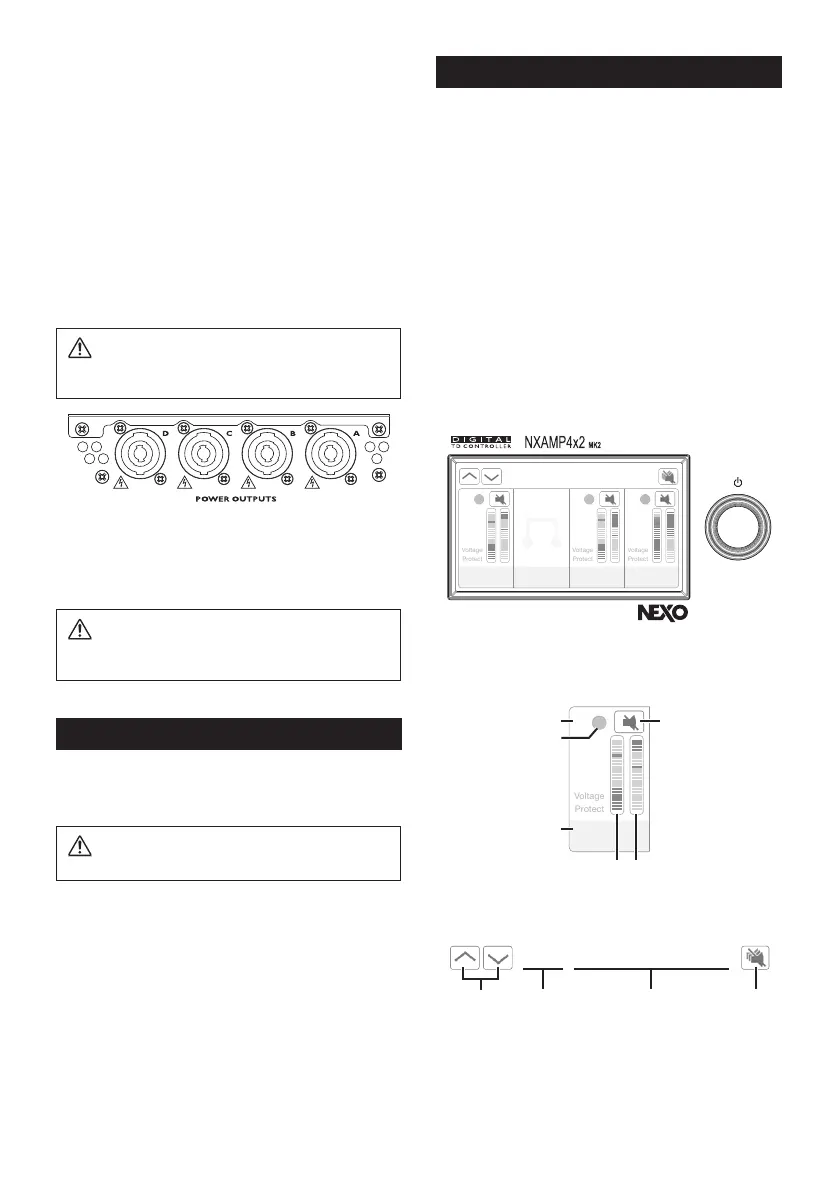
NXAMPmk2 setup
Front panel presentation
The NXAMPmk2 features a color 4.3 inches touch screen dis-
play and a push able rotary encoder with a surround backlight.
• The large tactile screen is used for the display of the ampli-
er settings and status. Up the Up/Down arrow to navigate
into the menus, select an area to adjust a parameter and turn
the encoder accordingly. When needed, press the encoder to
validate a value.
• When no parameter is selected, press the encoder to enter
the option menu. Turn the encoder to select an option, or
press the back button to go to main menu again.
• See the NXAMPmk2 user manual for detailed operation
mode.
NXAMPmk2 start-up
The NXAMPmk2 setup is straightforward. Once all the wiring
has been done and mains is present, the surround backlight of
the encoder is glowing slowly. Long press this encoder till the
system boots up.
Y001
NXAMP4x2mk2-123456
1
S118 OM
30-120
2 3
M28 LF MAIN
120-900
4
M28 HF MAIN
900-20k
This main display shows for each channel the Speaker Preset
(1), Output Meters (voltage (2) and Protection level (3)), Mute
button (4), Channel Number (5), and Output Current/Protec-
tion (6) indicators.
1
S118 OM
30-120
1
4
5
2 3
6
In the upper part of the display are shown the Menu Navigation
buttons (7), the Device ID (8), the Device name (9) and the
Global Mute button ()).
NXAMP4x2mk2-123456
7 )8 9
nxampmk2_en_um.indb 7 2019/03/01 14:32:36
 Loading...