English – 10
EN
PROGRAMMING
IMPORTANT! - After making all the connections, power the control unit and set the eight dip-switches on the board, on the basis
of the type of devices connected and the functions to be activated or deactivated. Refer to Table D for programming the unit.
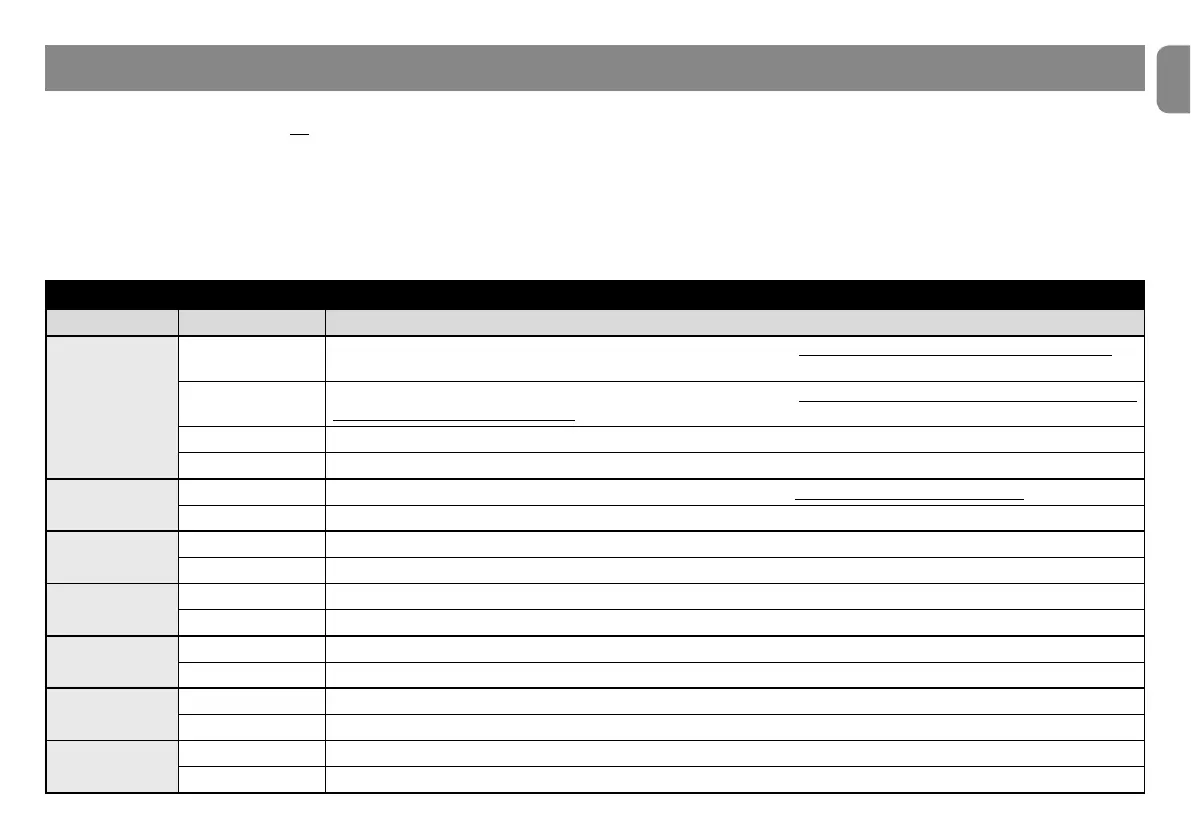
Table D - Setting the dip-switches
Dip-switch Setting Description of the set function
Switches
1 - 2
(1) OFF; (2) OFF
Enables the Stop input for the connection of a J´EHWDCQDRHRSNQVHSGNTSATSSNMf2tSG@SDWBKTCDRSGDHMUDQRHNM
(see Fig. 4)
(1) OFF; (2) ON
Enables the Stop input for the connection of a J´EHWDCQDRHRSNQVHSGATSSNMf2tSG@SHMSDQUDMDR@SLLEQNL
SGDKHLHSRVHSBGSNDWBKTCDHMUDQRHNM (see Fig. 4)
(1) ON; (2) OFF Enables the Stop input for the connection of a NO (normally open) contact
(1) ON; (2) ON Enables the Stop input for the connection of a NC (normally closed) contact
Switch 3
OFF
Enables the Stop input to stop the current manoeuvre and perform a brief inversion of the movement
ON Enables the Stop input to stop the current manoeuvre
Switch 4
OFF Enables the Photo input for the connection of photocells
ON Enables the Photo input for being used as a closing command
Switch 5
OFF $M@AKDRSGDENKKNVHMFBXBKHB@KBNLL@MCRNESGDRSDOAXRSDOSXOD.ODM2SNO"KNRD2SNO@F@HM
ON $M@AKDRSGDENKKNVHMFBXBKHB@KBNLL@MCRNESGDRSDOAXRSDOSXOD.ODM2SNO@F@HM
Switch 6
OFF Disables the condominium function
ON Enables the condominium function
Switch 7
OFF $M@AKDRSGDf#NNQNODMHMCHB@SNQKHFGStETMBSHNM
ON Enables the Photo Test function
Switch 8
OFF #HR@AKDRSGDf/@TRD3HLDtENQSGD@TSNL@SHBQDBKNRHMFNESGDCNNQENKKNVHMF@MNODMHMFBNLL@MC
ON $M@AKDRSGDf/@TRD3HLDtENQSGD@TSNL@SHBQDBKNRHMFNESGDCNNQENKKNVHMF@MNODMHMFBNLL@MC
 Loading...


