EasyManua.ls Logo

Nikon SB-21 User Manual

Nikon SB-21
56 pages
To Next Page IconTo Next Page
Page #1 background imageLoading...
Page #1 background image
-.
,",
Instruction
Manual
I
Question and Answer IconNeed help?

Do you have a question about the Nikon SB-21 and is the answer not in the manual?

Nikon SB-21 Specifications

General IconGeneral
BrandNikon
ModelSB-21
CategoryCamera Flash
LanguageEnglish

Summary

Nikon Macro Speedlight SB-21 Manual

Introduction to SB-21

Important Notes on Lens Usage

Details lens compatibility and usage restrictions for macro photography.

SB-21 Main Unit Nomenclature

Flash Head Components Identification

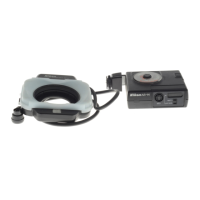
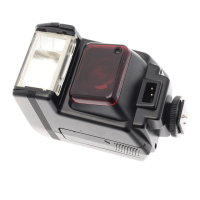
Identifies flash head parts like illuminator, switches, and adapters.

Controller Nomenclature

Controllers AS-12 and AS-14 Overview

Introduces the two controller models and their main features.

Exposure Calculator Dial and Controls

Explains the function of the calculator dial and related controls.

Basic Operation - Initial Setup

Inserting Batteries into Controller

Step-by-step guide for battery installation.

Attaching Controller to Camera

Instructions for mounting the controller onto the camera.

Attaching SB-21 Flash Head to Lens

How to connect the flash unit to the lens adapter.

Basic Operation - Settings

Setting Camera Shutter Speed for Sync

Adjusting camera shutter speed for proper sync.

Setting the Exposure Calculator Dial

Procedure for setting the exposure calculator dial.

Basic Operation - Shooting Procedure

Flash Tube Selection and Manual Light Control

Adjusting flash tube selection and manual output.

TTL Mode Operation and Shooting

Setting controller to TTL and taking photos.

Powering Off the SB-21

Steps to turn off the speedlight unit.

Detailed Sections - Lens Attachment

Attaching SB-21 with Reversed Lens

Guide to mounting the flash unit when the lens is reversed.

Detailed Sections - Controllers Explained

Controllers AS-12 and AS-14 Functions

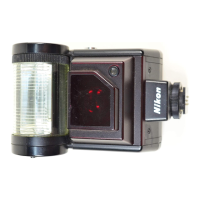
Detailed description of the AS-12 and AS-14 controllers.

Controller-Camera Compatibility Table

Table showing camera compatibility with controllers.

Detailed Sections - Shutter Speed Sync

Setting Camera Shutter Speed for Flash Sync

Guide to setting camera shutter speeds for flash synchronization.

Detailed Sections - Modes and Calculator Dial Usage

Mode Selector Functions Explained

Explanation of the mode selector's TTL and Manual settings.

Using the Exposure Calculator Dial

Detailed guide on using the exposure calculator dial.

Detailed Sections - Manual Flash Operation

Manual Flash with Reversed Lens Usage

Using the calculator dial for manual flash with reversed lenses.

Manual Flash Calculation Methods

Using the calculator dial for manual flash calculations.

Detailed Sections - Aperture Calculations

Determining Magnification Ratio

Methods for calculating shooting magnification ratios.

Calculating Correct Aperture Using Formulas

Using formulas for calculating correct aperture values.

Exposure Compensation Guide

TTL Flash Exposure Compensation Adjustments

Adjusting exposure compensation in TTL mode for accurate results.

Manual Flash Exposure Compensation Adjustments

Adjusting exposure compensation in manual mode.

Ready Light Indicator Functionality

Explains the function and meaning of the ready light.

Ready Light Warnings and Indicators

SB-21A Ready-Light Status and Warnings

Indicates ready light behavior and warnings with SB-21A.

SB-21B Ready-Light Status and Warnings

Indicates ready light behavior and warnings with SB-21B.

SB-21B Specific Warnings and Indicators

SB-21B Ready-Light and Camera Signals

Ready light indications specific to SB-21B usage.

Warning Indicators and Controls Overview

Overexposure Warning Lamp and Flash Button

Explains overexposure warning and flash test button.

Condenser Adapter SW-8 Usage Guide

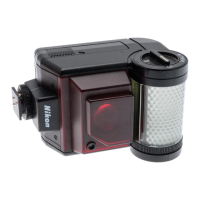
Instructions for using the SW-8 adapter for close-up shots.

Unit Features and Power Options

Flash Tube Selection and Illuminator Function

Explains flash tube switching and the focus illuminator.

Internal and External Power Source Details

Details internal and external power sources.

External Power Source - LA-2 Operation

How to Use AC Power Unit LA-2

Step-by-step guide for connecting and using the LA-2 unit.

External Power Source - LD-2 Operation

How to Use DC Power Unit LD-2

Step-by-step guide for connecting and using the LD-2 unit.

TTL Multiple Flash Photography Guide

TTL Multi-Flash System Chart Overview

Diagram of system configurations for TTL multi-flash setups.

TTL Multiple Flash - Slave Unit Connections

Slave Flash Unit Connections Diagram

Diagram showing connections for slave flash units.

Accessories and Handling Precautions

Lens Mounting Rings (BR-2A, BR-5, BR-6)

Describes adapter rings for lens mounting.

General Handling Precautions

Storage and Environmental Care Guidelines

Advises on storage, temperature, humidity, and water exposure.

Safety and Maintenance Warnings

Warns against disassembly, touching terminals, and recommends professional service.

Service and Cleaning Procedures

After-Sales Service Information

Details warranty and repair service procedures.

Equipment Cleaning Instructions

Instructions for cleaning the speedlight and controller.

Battery Information and Usage Guide

Battery Usage, Storage, and Care Guidelines

Guidance on battery selection, use, and storage.

Notes on NiCd Battery Usage

Specific considerations for using Nickel-Cadmium batteries.

Product Specifications Summary

Determining Aperture Using Graphs - Part 1

Graph 1: Micro-Nikkor 55mm f/2.8 and 55mm f/3.5 (Normal)

Graph for determining aperture with specific lenses.

Aperture Graphs - Micro-Nikkor Lenses

Graph 2: 55mm Reversed Lenses Aperture

Graph for determining aperture with reversed 55mm lenses.

Graph 3: 105mm f/2.8 Normal Lens Aperture

Graph for determining aperture with 105mm f/2.8 lens.

Graph 4: 105mm f/2.8 Reversed Lens Aperture

Graph for determining aperture with reversed 105mm f/2.8 lens.

Graph 5: 105mm f/4 Normal Lens Aperture

Graph for determining aperture with 105mm f/4 lens.

Aperture Graphs - Various Lens Types

Graph 6: 105mm f/4 Reversed Lens Aperture

Graph for determining aperture with reversed 105mm f/4 lens.

Graph 7: 200mm f/4 Normal Lens Aperture

Graph for determining aperture with 200mm f/4 lens.

Graph 8: 20-85mm Normal Lenses Aperture

Graph for determining aperture with 20-85mm lenses.

Graph 9: 100-200mm Normal Lenses Aperture

Graph for determining aperture with 100-200mm lenses.

Aperture Graphs - Reversed Lens Types

Graph 10: 20-24mm Reversed Lenses Aperture

Graph for determining aperture with 20-24mm reversed lenses.

Graph 11: 28-35mm Reversed Lenses Aperture

Graph for determining aperture with 28-35mm reversed lenses.

Graph 12: 50-58mm Reversed Lenses Aperture

Graph for determining aperture with 50-58mm reversed lenses.

Graph 13: 80-105mm Reversed Lenses Aperture

Graph for determining aperture with 80-105mm reversed lenses.

Lens Mounting and Aperture Determination for 60mm Lens

Attaching SB-21 to 60mm Lens (Normal Position)

Instructions for mounting the flash to the lens normally.

Determining Aperture for 60mm Lens Usage

Using graphs to determine aperture for 60mm lens.

Using AF Micro-Nikkor 105mm f/2.8 with SB-21

Attaching SB-21 to 105mm Lens (Normal)

Steps to attach the flash to the 105mm lens normally.

Determining Aperture for 105mm Lens Usage

Using graphs to determine aperture for 105mm lens.

AF Micro-Nikkor 105mm f/2.8 Lens Usage (Spanish Instructions)

Attaching SB-21 to 105mm Lens (Normal)

Steps to attach the flash to the 105mm lens normally.

Determining Aperture for 105mm Lens Usage

Using graphs to determine aperture for 105mm lens.

AF Micro-Nikkor 60mm f/2.8 Lens Usage with SB-21

Attaching SB-21 to 60mm Lens (Normal)

Steps to attach the flash to the 60mm lens normally.

Determining Aperture for 60mm Lens Usage

Using graphs to determine aperture for 60mm lens.

Related product manuals