Model 7500 Quick Start-up Guide
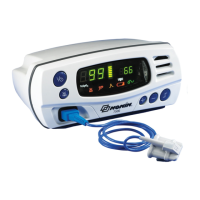
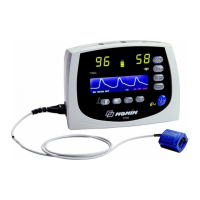
(On/Standby)
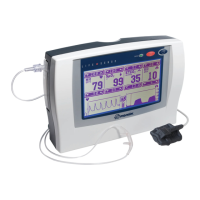
Alarm
Plus (+)
Minus (-)
Limits
%SpO
2
Display
Pulse Rate
Display
Alarm
Bar
Speaker
Sensor
Connector
Silence
Power
(step through settings)
1. Turn unit on – Review factory settings below
2. Step through ALL settings using
LIMITS button
3. Change desired settings using or
buttons
4. MUST push LIMITS button after each
setting to confirm & move on
5. Scroll to end of settings to 2nd symbol
( =minutes) and press LIMITS button
6. Unit will automatically review new settings
7. TO SAVE SETTINGS – press and hold
ALARM SILENCE button while briefly pressing
LIMITS button – “dEF On” will flash
Return to Factory Defaults
Note:
User-Defined Default values are lost
when returned to Factory Defaults.
1. Turn unit on – “dEF On” will appear
2. Press and hold ALARM SILENCE button
and briefly press button – “dEF OFF”
will flash
3. Press POWER button until unit turns OFF,
then turn back ON
SET USER-DEFINED DEFAULTS
SET PATIENT SECURITY MODE ON
DATA COLLECTION & DOWNLOAD
TO CLEAR MEMORY
1. Turn unit on – Review factory settings below
2. Step through ALL settings using
LIMITS button
3. Change desired settings using or
buttons
4. MUST push LIMITS button after
each setting
5. Scroll to end of settings to 2nd symbol
( =minutes) and press LIMITS button
6. Unit will automatically review new settings
7. TO SAVE SETTINGS – press and hold
ALARM SILENCE button while briefly pressing
LIMITS button – “dEF On” will flash
8. Press POWER button until unit turns OFF
9. TO SET – Press and hold ALARM SILENCE
button while turning the unit back ON
10.Screen will flash “SEC On”
Note:
To set “Low O2” alarm below 85%,
must set in User-Defined Defaults first,
then follow steps above.
Turn Off Patient Security Mode
1. Press POWER button until unit turns OFF
2. Together hold down ALARM SILENCE
button, then LIMITS button and then
POWER button
3. Units reads “SEC OFF”
Data Collection
1. Turn unit on – Recording begins
automatically
Note:
Data less than 1 minute is not saved.
Downloading Data To PC
Note:
Patient Security Mode must be OFF
1. Press POWER button until unit turns OFF
2. Connect unit to PC using 7500SC
download cable
3. Boot up nVISION and select FILE>New Data
Capture, click 7500 oximeter option
4. On 7500 unit press and hold and
POWER buttons - unit will display
“PLA bAC” during download
5. Unit returns to normal operating mode
after download
1. Turn unit on
Note:
Patient Security Mode must be OFF
2. Press LIMITS button until “CLr no”
is displayed
3. Press button until “CLr YES” appears
4. Press LIMITS button to confirm
5. “dEL no” appears, press button so
“dEL YES” appears
6. Press LIMITS button to confirm
7. “dnE CLr” confirms memory has been cleared
Alarm Limit
Setting
OptionsIncrement
KEY
SpO
2
Low Alarm Limit
85%Off, 50-9
%
Pulse Rate High Alarm Limit200 BPMOff, 75-275 5 BPM
Pulse Rate Low Alarm Limit50 BPMOff, 30-110 5 BPM
SpO
2
High Alarm Limit
OffOff, 80-100 1%
Alarm Volume High Off, Low, High N/A
No Yes, No N/A
Oximetry Averaging
Factory Default Settings
The values at right come pre-programmed in the Model 7500. The
Patient Security Mode is OFF, unless turned on.
For complete specifications, please
refer to the Operator’s Manual.