Do you have a question about the Nuna triv next and is the answer not in the manual?
Information about product guarantees and manufacturer's commitment.
Details for customer service, replacement parts, and warranty questions.
Specifies weight limits and compatibility with infant carriers/bassinets.
Critical safety instructions, potential hazards, and usage precautions for the stroller.
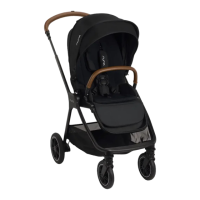
Comprehensive list and illustration of all stroller components and accessories.
Step-by-step instructions for unfolding the stroller frame.
Instructions for attaching and detaching the stroller seat.
Guidance on attaching front wheels, rear wheels, and the arm bar.
Ensuring the stroller frame, seat, wheels, and arm bar are securely attached.
Instructions on properly fitting and adjusting the child's harness.
How to open, close, and use the stroller canopy features.
Steps for adjusting the backrest recline and calf support positions.
Guidance on adjusting the handle height and operating the brakes.
Instructions for locking and unlocking the front swivel wheels.
Detailed steps for folding the stroller with the seat in place.
Instructions for folding the stroller frame without the seat attached.
How to place and secure the seat insert and thread harnesses.
Steps for attaching adaptors for infant carriers or bassinets.
Guidance on securing infant carriers and bassinets to the adaptors.
Instructions for fitting the rain cover onto the stroller.
Guidelines for cleaning the stroller frame, fabric, and wheels.
Recommendations for maintaining the stroller and checking parts.
The Nuna TRIV next is a versatile stroller designed to accommodate children from birth up to a maximum weight of 22.7 kg. It offers various configurations, including use with a TRIV or LYTL bassinet (up to 9 kg) or a KLIK plus infant carrier (up to 13 kg), making it adaptable to different stages of a child's growth. The stroller emphasizes safety, ease of use, and practical features for parents.
The TRIV next functions as a primary mode of transport for infants and toddlers, providing a secure and comfortable environment. Its core function is to allow parents to easily maneuver their child while on the go, offering features for folding, recline, and accessory attachment. The stroller is designed for use on flat or gently sloping surfaces and is not intended for jogging or skating.
To open the stroller, first release the storage latch. Then, rotate the handle upwards until the frame is fully open. Finally, pull the seat to open it, listening for a "click" sound, which indicates the seat is securely latched. Always ensure the stroller is completely latched open before use.
The seat can be reversed to face either forward or backward. To switch the seat, press the seat release buttons and lift the seat up. Then, reverse its orientation and reattach it to the frame, ensuring a "click" sound confirms secure attachment.
The arm bar provides an additional layer of security but is not a primary restraint device; the harness must always be used. To attach, align the arm bar ends with the arm bar mounts and insert until it clicks into place. To remove, press the arm bar release buttons and pull the arm bar away.
The stroller features a 5-point harness system. To secure your child, push the center button on the buckle to release the clasps, remove the clips, and place your child in the stroller. Connect the shoulder and waist clasps to the buckle, repeating for both sides. Adjust the harness snugly by pulling the adjustment straps to tighten the shoulder straps and then pulling the waist adjustment straps outwards. Ensure the harness is snug, with approximately one finger's thickness between the child and the harness. Do not cross the shoulder belts, as this can cause pressure on the child's neck.
The upper shoulder harness adjustor buckles can be moved up and down to achieve the correct fit for your child. Always ensure the harness is properly adjusted to prevent serious injury from falling or sliding out.
The canopy can be opened by pulling it toward the front of the seat and folded by pushing it back. For extra shade, open the zipper on the canopy. For added ventilation, flip up the canopy window cover. The canopy should not be removed when the stroller is in use, and the zipper between the canopy and seat pad should remain closed.
The backrest offers three recline positions. To adjust, squeeze the recline adjustment lever and pull the backrest up or down. Do not press the button in the middle of the recline adjustment lever while adjusting the angle. Always ensure the recline is properly adjusted for use.
The calf support has two positions. To raise it, simply lift it up. To lower it, press the adjustment button and push down.
The handle has five positions for height adjustment. To adjust, pull the handle adjustment button and move the handle up or down.
A tether strap is provided to prevent the stroller from inadvertently rolling away. Ensure your hand is through the loop to maintain control of the stroller.
To lock the rear wheels, step down on the brake lever. To unlock, step down on the brake lever again. Always apply the brake when the stroller is stopped, and push it slightly to ensure the brake is engaged.
For use on uneven surfaces, the front swivel locks can be engaged. Pull the front swivel lock up to lock the front wheel and push it down to unlock.
Before folding, adjust the handle to its lowest position and lock the front swivel wheels. First, fold the canopy. Next, press the folding release button on the middle of the recline adjustment button and then squeeze the recline adjustment lever. Finally, fold the seat. After folding, rotate the storage latch and secure it to the storage mount. The stroller can stand upright with the front swivel wheels locked. The stroller can be carried by lifting its carry/fold strap.
To fold the stroller without the seat, press the folding buttons of the seat mounts. Then, fold the stroller and secure the storage latch to the storage mount. The stroller can stand by its handle and front wheels in this configuration.
To assemble the insert, place it over the seat and thread the shoulder, waist, and crotch harnesses through their respective slots. Note that not all accessories are included on some models.
Post adaptors are used for attaching the TRIV or LYTL bassinet and KLIK plus infant carrier. To attach the adaptors, place them on the seat mount until a "click" confirms they are attached. To attach an infant carrier, place it on the post adaptors until a "click" is heard. Similarly, to attach a bassinet, place it on the post adaptors until a "click" confirms attachment. Refer to the infant carrier and bassinet instruction manuals for detailed assembly and usage. To remove an infant carrier, push the release buttons on the carrier and lift it up. To remove a bassinet, press the release buttons on the side of the bassinet and lift it up. To remove the post adaptors, pull the adaptor release buttons and lift them up. Always remove the infant carrier and bassinet before folding the stroller.
Before folding the stroller with post adaptors, adjust the handle to the lowest position and lock the front swivel wheels. Pull the carry/fold strap of the post adaptors to fold the stroller. The stroller with post adaptors can stand by its handle and front wheels.
Ensure the canopy is completely open before attaching the rain cover. Place the rain cover over the stroller. Always check for proper ventilation when the rain cover is on the product. Ensure the rain cover has been cleaned and dried before folding. Do not fold the stroller with the rain cover attached. Do not place your child in the stroller in hot weather with the rain cover attached.
The frame, plastic parts, and fabric should be cleaned with a damp cloth. Do not use abrasives or bleach. Avoid silicon lubricants, as they attract dirt and grime. Store the stroller in a dry place. Regularly clean the stroller wheels with water to remove any dirt.
To ensure the product's longevity, regularly clear debris, sand, hair, and other solids from the frame joints and wheels. After using the stroller in rainy weather or if spills occur, wipe it dry with a soft absorbent cloth.
Refer to the care label attached to the fabric for specific washing and drying instructions. It is normal for fabric to experience color fading from sunlight and show wear and tear over extended periods of normal use.
For safety reasons, only use original Nuna parts. Regularly check that all functions are working properly. If any parts are torn, broken, or missing, discontinue using the product immediately.
| Age Range | Birth to 50 lbs |
|---|---|
| Recline Positions | Multiple |
| Harness | 5-point harness |
| Frame Material | Aluminum |
| Brake Type | Foot brake |
| Canopy | UPF 50+ canopy |
| Seat Width | 12 inches |
| Compatibility | Nuna PIPA series car seats |