NXP Semiconductors
S32K344
White Board
5 White Board startup
Make sure the jumper J5 is closed and J87 is open so the SBC FS26 can power up in
debug mode. Apply 12V to the power supply input. Turn on the switch SW10. Connect
debugger to the SWD interface and refer to the White Board quick start guide to start the
software development.
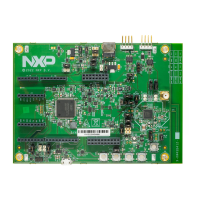
The following figure shows the LED indicators for various power supplies on the board.
Figure 4. S32K344 White Board features
The 12V can be applied either through the power jack J3, connector J88 or the connector
pins J33-9,10(GND)/J33-19,20(VBAT). The LEDs indicate the presence of power supply
as following:
• LED D10 – indicates that the 12V is connected to the board correctly;
• LED D11 – indicates that the 5V supply from SBC is ON;
• LED D12 – indicates that the 5V supply from the standalone DC/DC is ON;
• LED D13 – indicates that the 3.3V supply from SBC is ON;
• LED D14 – indicates that the 3.3V supply from standalone DC/DC is ON;
• LED D15 – indicates that the MCU RESET pin is low (MCU in reset status);
The above figure also shows the basic elements to start the White Board:
• 12V power input
• 10-pin Cortex Debug Connector (SWD/JTAG debug interface)
• 20-pin Debug + ETM connector (Debug with trace capability)
• RESET push button and RESET LED indicator
• USB2UART interface
UM11919 All information provided in this document is subject to legal disclaimers. © 2023 NXP B.V. All rights reserved.
User manual Rev. 1.0 — 11 April 2023
COMPANY PUBLIC 10 / 32
 Loading...