2.5
OPERATING TESTS AND
ANOMALY
DIAGNOSIS
The
conditioner is able
to
perform
a brief auto-diagnosis
cycle to check that the internal components are operating
normally
and
during
which it is
possible
to
perform
the
configuration of the electronic control based
on
whether installation
of the appliance
was
performed
to the upper
part
(to
the ceiling)
or
lower
part
(to
the
ground)
of the wall.
To
activate the self-diagnosis
function,
proceed
as follows:
-
power
the appliance by
connecting it
to a socket or by acting on the master switch
of the system;
-
ensure
that the machine is
on stand-by
(no
LED
should be lit on the console);
-
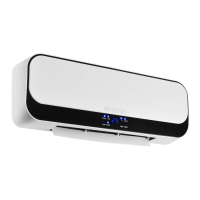
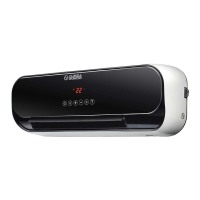
Press
the
micro-key
positioned
underneath
the hole to the
left
side of the console
(fig.
'19
ref. H) with
a
pointy
object for
at
least 10 seconds. The
acoustic
signal emitted indicates
that the self-diagnosis function has been activated.
At this
point
the current configuration
of
the machine will be displayed for a few moments
as indicated below:
LED A
(red)
on: appliance fitted
with heat
pump
function;
LED B
(green)
on: installation
to the lower
part
of the wall
(to
the
ground)
(factory
installation);
LED
C
(orange)
on:
installation
to the upper
part
of the wall
(to
the
ceiling);
LED
D
(green)
on: reset
settings function
after
an active black-out
(factory
setting).
Then,
all of the LEDs
on the console will
start flashing
simultaneously for 10 seconds.
During this
phase,
through
the micro key
(fig.
19 ref. H),
it is
possible
to modify
the
previously
displayed
setting related to the
type of appliance installation.
NB:
Configuration
of the electronic
control for installation
to the upper
part
of
the wall determines an automatic
correction
of the
room
temperature detected
of 3"C.
At this
point
the self-diagnostic
function
activates the appliance in heating mode
(if
fitted with the heat
pump
function) for
approx.2
minutes
and then in
cooling mode
for another 2 minutes.
It is
possible
to terminate
the function
prematurely
simply by switching the appliance
off using the remote control.
Should the conditioner
block
and signal
an error
(as
indicated in
the
following
table), specify the LEDs
that are flashing
to the service
centre in order to facilitate
the intervention (fig.
19).
DESCRIPTION
LED D
GREEN
LED C
YELLOW
LED
B
GREEN
LED
A
RED
Overtemperature
of internal
exchanger
(HTl)
OFF ONr:;:
OFF
Overtemperature
of
external exchanger
(HTE)
OFF
OFF
ON:,tj;l
ON
External
temperature
probe
fault
(short
circuit)
(TFS7)
OFF
ON'.i* OFF
OFF
External
temperature
probe
fault
(open
circuit)
(TFSB)
OFF OFF OFF
ON
lnternal
fan malfunction
(SV)
OFF
ON,
OFF
I
nsufficient
exchanger temperature (CF/RL)
OFF
ON
ON
.,
OFF
Maximum level
of condensate
water
(OF)
OFF
ONI
oN.:*;,
i
i
I
i
OFF
OFF
ON
!.:;: OFF
lnvalid
EEprom
parameters
(CKS)
Room
temperature
probe
fault
(short
circuit)
(TFS1)ON
ON:.:,i!,j-,
OFF OFF
Room
temperature
probe
fault
(open
circuit)
(TFS2)ON
oN,':::,
OFF
ON:
Internal
exchanger
temperature
probe
fault
(short
circuit)
(TFS3)
oN'
ON
.:,-ri
OFF
lnternal
exchanger
temperature
probe
fault
(open
circuit)
(TFS4)
ON
-ti..:l
ONi
OFF
ON
External
exchanger
temperature
probe
fault
(short
circuit)
(TFSS)
ON.r ONj;,:i
ON;
OFF
2.5.',|
External
exchanger
temperature
probe
fault
(open
circuit)
(TFS6)
ON':t-r.
ON
:l
oN ,,
ON
.
: flashing
WARNINGS
SIGNALLED
DURING
NORMAL
OPERATION
SHOULD NOT BE INTERPRETED
AS ANOMALIES.
LED
A: indicates
the filter may
need
cleaning
After
this operation
the LED
must be
switched
off
manually
as indicated in
section 2.6.1
LED
B steady light: high
battery
temperature
signal.
LED A
+
LED C flashing:
continuous
pump
operation.
Evacuating
condensate
water
during
an emergency
lf there
should be a malfunction
in the condensation
water
drain system,
the air conditioner
stops working and
signals, with flashir-9
orange,
green
and red lights (the
second
and third LEDs from
the left), the alarm
status.
To
enable
the air conditioner
to work
temporarily
until the
service
personnel
arrive,
you
can drain
the water out
by following
these
simple
instructions:
remove the
cap after
having
placed
a
good-sized
container underneath
it
(at
least
S-liter capacity)
to
collec:
the water
(see
fig. 20)
after having
cleared
the fault, the
service
personnel
will close
the evacuation
pipe.
gLISBJA
SPLENDID
32

 Loading...