J-1121-012
J-1121-012
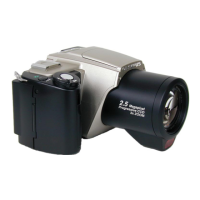
Taking Pictures With Your Olympus C-2500L SLR
World Leaders in Film and
Filmless Photography
Get Ready...
Before you begin using your Olympus C-2500L SLR Filmless Digital Camera:
1. Charge and load the 4 "AA" NiMH batteries in the compartment at the bottom of the
camera as indicated by the diagram imprinted on the camera body.
Load 1 3V Lithium battery with the "+" side facing upward in the compartment below
the main battery compartment. This battery provides a constant charge to the system
to sustain memory functions when the AA batteries are removed for recharging.
For best results, Olympus America Inc. strongly recommends using Olympus Brand Nickel
Metal-Hydride (NiMH) rechargeable "AA" batteries, as system power requirements can be
very demanding. (Do not use manganese or lithium "AA" batteries, which may overheat
and damage the camera.) An optional AC adapter may be used when downloading images
to ensure a consistent power supply voltage.
Thank you for choosing the Olympus® C-2500L SLR, the most advanced filmless
digital camera available today. It offers a full range of advanced features and the
professional image quality only Olympus can provide in a compact, all-in-one design.
For the finest in filmless photography, look to Olympus. World Leaders in Film and
Filmless Photography.
To ensure you are completely satisfied with your Olympus C-2500L SLR Filmless
Digital Camera purchase, we’ve prepared this easy-to-follow users’ guide. Just
follow these simple instructions to set up and begin using your new C-2500L SLR
Filmless Digital Camera. For more advanced instructions on feature use, please
refer to the complete Owner’s Manual included in your package.
First, take a moment to familiarize yourself with the key areas of camera operation
by reviewing the illustrations below.
2. Insert the SmartMedia™ Memory Card. Open the door to the right of the LCD panel and
slide the Card into the thinner slot located closest to the rear of the camera body. This
card is your "film." It stores your images for reviewing, downloading, and printing. To
insert, simply slide the card in—with the gold contacts facing lens—until you feel the
gentle click of the spring load. To eject, lightly press the card again.
You may also use CompactFlash memory cards with your C-2500L. Insert with the card’s
arrow facing you in the thicker slot closest the lens, using the procedure described above.
3. Turn on the power. The power button is located at the back of the camera in the center of
the Mode Dial. Icons representing default settings appear in the top LCD, along with the
number of pictures available at the preset memory settings.
To turn the camera off, press the Power button again. The LCD screen goes blank.
Get Set...
You’re just about ready to begin taking pictures with your Olympus C-2500L SLR Filmless Digital
Camera. First, perform the initial set-up. These are the default settings that will affect every
picture you take, until you change these default settings.
Note
: These settings can be changed at any time.
1. Choose your recording mode using the Mode Dial:
• P (Program) for fully automatic operation. The C-2500L SLR automatically sets the
proper exposure, f-stop and shutter settings for easy, point-and-shoot
filmless
photography.
• A (Aperture Priority) manually controls the f-stop between f/2.8 or f/5.6 with wide-
angle shooting, and between f/3.9 or f/7.8 with telephoto shooting. The shutter speed
is determined automatically.
• M (Manual Exposure) manually controls aperture as well as the shutter speed between
8 seconds and 1/10,000 second.
2. Use the color LCD screen to make specific adjustments to picture settings. With the
Mode Dial set to P, A or M, turn on the LCD screen by pressing the button. The first of
four menus will appear. Move the Jog Dial up and down to scroll through menus and their
available settings; move to the left and right to make your specific setting selections. Press
the OK button to confirm your selections.
DRIVE: Selects Normal (Rapid) Shooting Mode, Sequence (Burst) Mode, Remote
Control or Self-timer.
QUALITY: Choose an image resolution setting: Standard (SQ), High Quality (HQ) or the
Super High Quality (SHQ) mode.
WHITE BALANCE: Enter your light setting using the Jog Dial: AUTO, One Button White
Balance , or choose from six pre-set white balance settings to match special
shooting situations.
ISO SETTINGS: Equivalent to film speed settings in your filmless digital camera. Select
from 100, 200 or 400. The higher the ISO, the faster the shutter speed that can be used
and the lower amount of light required.
FLASH CONTROL MODE: For setting the exposure control of +/- 2 steps EV with the
built-in pop-up flash or the FL-40 external flash.
FLASH SYNC MODES: Choose to have the flash fire at beginning of the shutter
opening sequence; choose to have the flash fire at the end.
QUICK FOCUS: Select a focal length of from 1 foot to infinity from 15 preset ranges. The
selected setting such as the one shown here , will be the first to appear when
you use the flash shortcut key located on the top of the camera.
QUALITY SHARPNESS: Use NORMAL for printing sharp, clear images without manipu-
lation; Use SOFT for when you will apply image editing with sharpening filters to pictures
downloaded to your personal computer.
BEEP SOUND: Select ON or OFF to hear setting confirmation sounds.
POWER SETTINGS: Have images appear on the LCD monitor while recording with or
modes. This mode also sets time intervals for battery-saving standby mode.
SET DATE/TIME: Adjust the time and date setting using the Jog Dial. Press OK
to lock in the settings.
DISPLAY SET UP: Choose to see recorded information; choose to receive
focal distance information in meters or feet.
RESOLUTION SET UP: With SQ images, use the Jog Dial to select the image size:
1280 x 1024 pixels or 640 x 512 pixels. With SHQ images, you can save files in a JPEG
(compressed) or TIFF (noncompressed) format. The amount of frames you can store on
the SmartMedia or CompactFlash card depends on the image size and file format
you’ve selected. See the chart below:
FILE NAME: Choose AUTO FILE for sequential numbering of each Card used; AUTO
FOLDER to have numbers reset every time a new Card is inserted into your C-2500L SLR,
or NAME RESET to revert to default naming.
ALL RESET: YES returns all picture settings such as flash and focus modes to their
original factory set defaults.