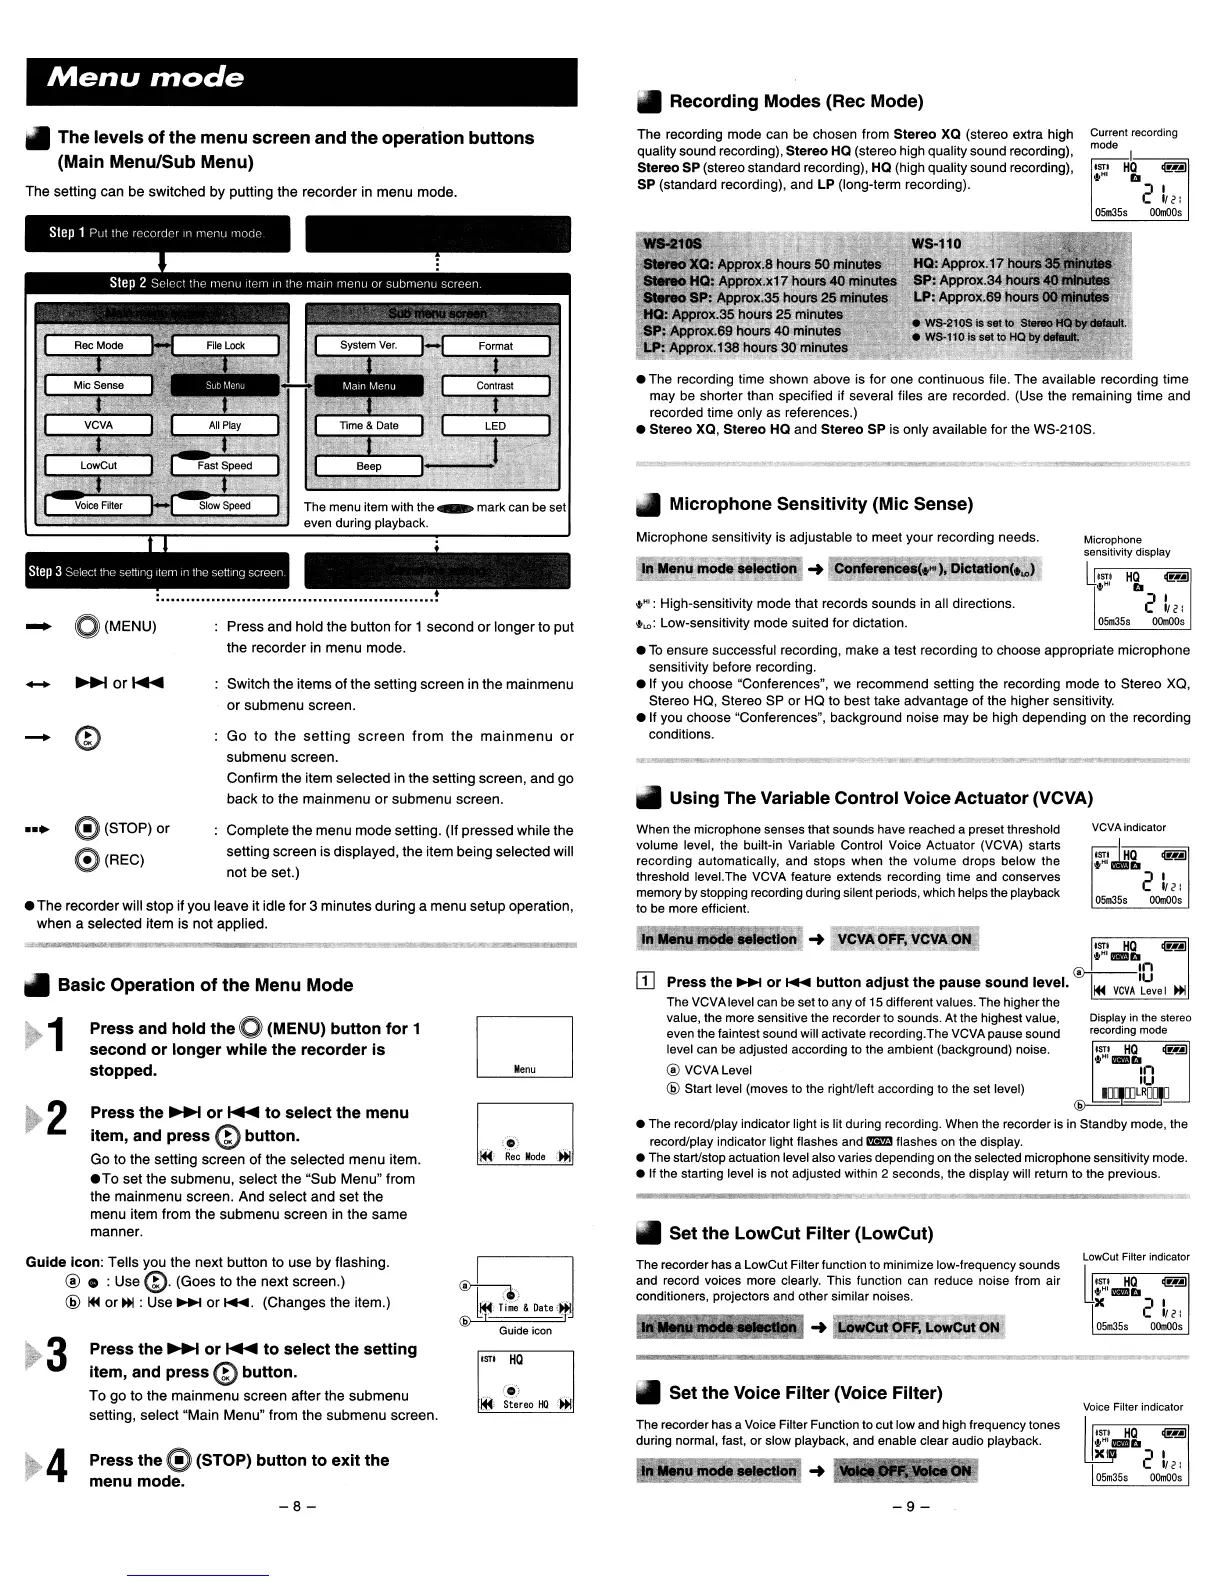
Menu
nlode
I
..
Recording Modes (Rec Mode)
Current recording
mode
I
'ST'
HQ
clmJ
+HI
iii
2"2:
05.355
00m005
Microphone
sensitivity display
I "STI
HQ
clmJ
U",HI
iii
2
1/2:
05.355
00m005
The recording mode can be chosen from Stereo XQ (stereo extra high
quality sound recording), Stereo HQ (stereo high quality sound recording),
Stereo SP (stereo standard recording), HQ (high quality sound recording),
SP (standard recording), and LP (long-term recording).
Microphone sensitivity is adjustable to meet your recording needs.
•
To
ensure successful recording, make a test recording to choose appropriate microphone
sensitivity before recording.
• If you choose "Conferences", we recommend setting the recording mode to Stereo XQ,
Stereo HQ, Stereo SP or HQ to best take advantage of the higher sensitivity.
• If you choose "Conferences", background noise may be high depending
on
the recording
conditions.
• The recording time shown above is for one continuous flie. The available recording time
may be shorter than specified if several files are recorded. (Use the remaining time and
recorded time only as references.)
• Stereo XQ, Stereo HQ and Stereo SP is only available for the WS-21
as
.
.'" : High-sensitivity mode that records sounds
in
all directions.
to",:
Low-sensitivity mode suited for dictation.
• Using The Variable Control Voice
Actuator
(VCVA)
..
Microphone Sensitivity (Mic Sense)
Switch
the
items
of
the
setting
screen
in
the
mainmenu
or
submenu
screen.
Press
and
hold
the
button for 1
second
or
longer
to put
the
recorder in
menu
mode.
Go
to
the
setting
screen
from
the
mainmenu
or
submenu
screen.
Confirm
the
item
selected in
the
setting screen,
and
go
back
to
the
mainmenu
or
submenu
screen.
o
(MENU)
++
The setting can
be
switched
by
putting
the
recorder
in
menu
mode.
-
II
The levels
of
the menu screen and
the
operation
buttons
(Main Menu/Sub Menu)
-
•
The
recorder will stop if
you
leave it idle
for
3
minutes
during a
menu
setup operation,
when
a selected
item
is
not
applied.
VCVA indicator
'STI
-lliQ
clmJ
+HI~b
2
"2:
05m355
OOm005
Display in the stereo
recording mode
'STI
HQ
clmJ
..,HI_1lI
In
IU
1Q;JQ;)lRQI!
'ST'
HQ
clmJ
+HIBSb
®+--,n
Press
the
...
or
~
button
adjust
the
pause
sound
level.
~
VCVA
':;ve I
~
The
VCVA
level
can
be
set
to
any
of
15
different values.
The
higher
the
value,
the
more
sensitive the recorder
to
sounds.
At
the
highest value,
even
the
faintest sound will activate recording.The
VCVA
pause sound
level
can
be
adjusted according
to
the
ambient (background) noise.
® VCVALevel
@ Start level (moves
to
the
righVleft according
to
the
set
level)
When
the
microphone senses that sounds have reached a preset threshold
volume level,
the
built-in Variable Control Voice Actuator
(VCVA)
starts
recording automatically, and stops when the volume drops below the
threshold level.The
VCVA
feature extends recording time
and
conserves
memory
by
stopping recording during silent
periods,
which
helps
the
playback
to
be
more
efficient.
____________
.,.4_-'
..-
_
®
•
The
record/play indicator light
is
lit during recording.
When
the
recorder is
in
Standby mode,
the
record/play indicator light flashes
and
mm flashes
on
the
display.
•
The
start/stop actuation
level
also varies depending
on
the
selected microphone sensitivity
mode.
• If
the
starting level
is
not
adjusted within 2 seconds,
the
display
will
return to
the
previous.
..
Set
the
LowCut Filter (LowCut)
'
..
'
Iff·
Rec
Mode
')H
D
Complete
the
menu
mode
setting. (If pressed while
the
setting
screen
is displayed, the item being
selected
will
not
be set.)
Press
the
~
or
~
to
select the menu
item, and press
@button.
Go
to the setting screen of
the
selected
menu
item.
•
To
set the
submenu,
select
the
"Sub
Menu"
from
the
mainmenu
screen.
And
select
and
set
the
menu
item from the
submenu
screen in
the
same
manner.
Press and hold
the
0 (MENU)
button
for
1
second
or
longer while
the
recorder
is
stopped.
G)(STOP)
or
o(REC)
2
•••
..
Basic Operation
of
the
Menu Mode
1
Guide
Icon:
Tells you
the
next
button to
use
by
flashing.
® • :Use (D.
(Goes
to
the
next
screen.)
@
~
or
~
:
Use'"
or~.
(Changes
the
item.)
3
4
Press the
~
or
~
to
select the setting
item, and press
@button.
To
go
to
the
main
menu
screen
after
the
submenu
setting, select "Main
Menu"
from the
submenu
screen.
Press the 0 (STOP) button
to
exit
the
menu mode.
~~
(
....
'
~
Tim~
&
Date
'»I
® T T
Guide icon
'STI
HQ
...
,
Iff,
Stereo
HIl
,iji
The
recorder
has
a LowCut Filter function
to
minimize low-frequency sounds
and
record voices more clearly. This function
can
reduce noise
from
air
conditioners, projectors
and
other similar noises.
• Set the Voice Filter (Voice Filter)
T~e
recorder
has
a
Voice
Filter Function to cut
low
and
high frequency tones
during normal, fast, or slow playback,
and
enable clear audio playback.
LowCut Filter indicator
U
'ST'
HQ
~
",Ml_b
X
2'
112:
05.355
OOmOO5
Voice Filter indicator
~
STI
HQ
~
",
M1
&1'Bb
X
:J
I
'_ 1/2:
05.355
OOmo05
-8-
-9-
 Loading...