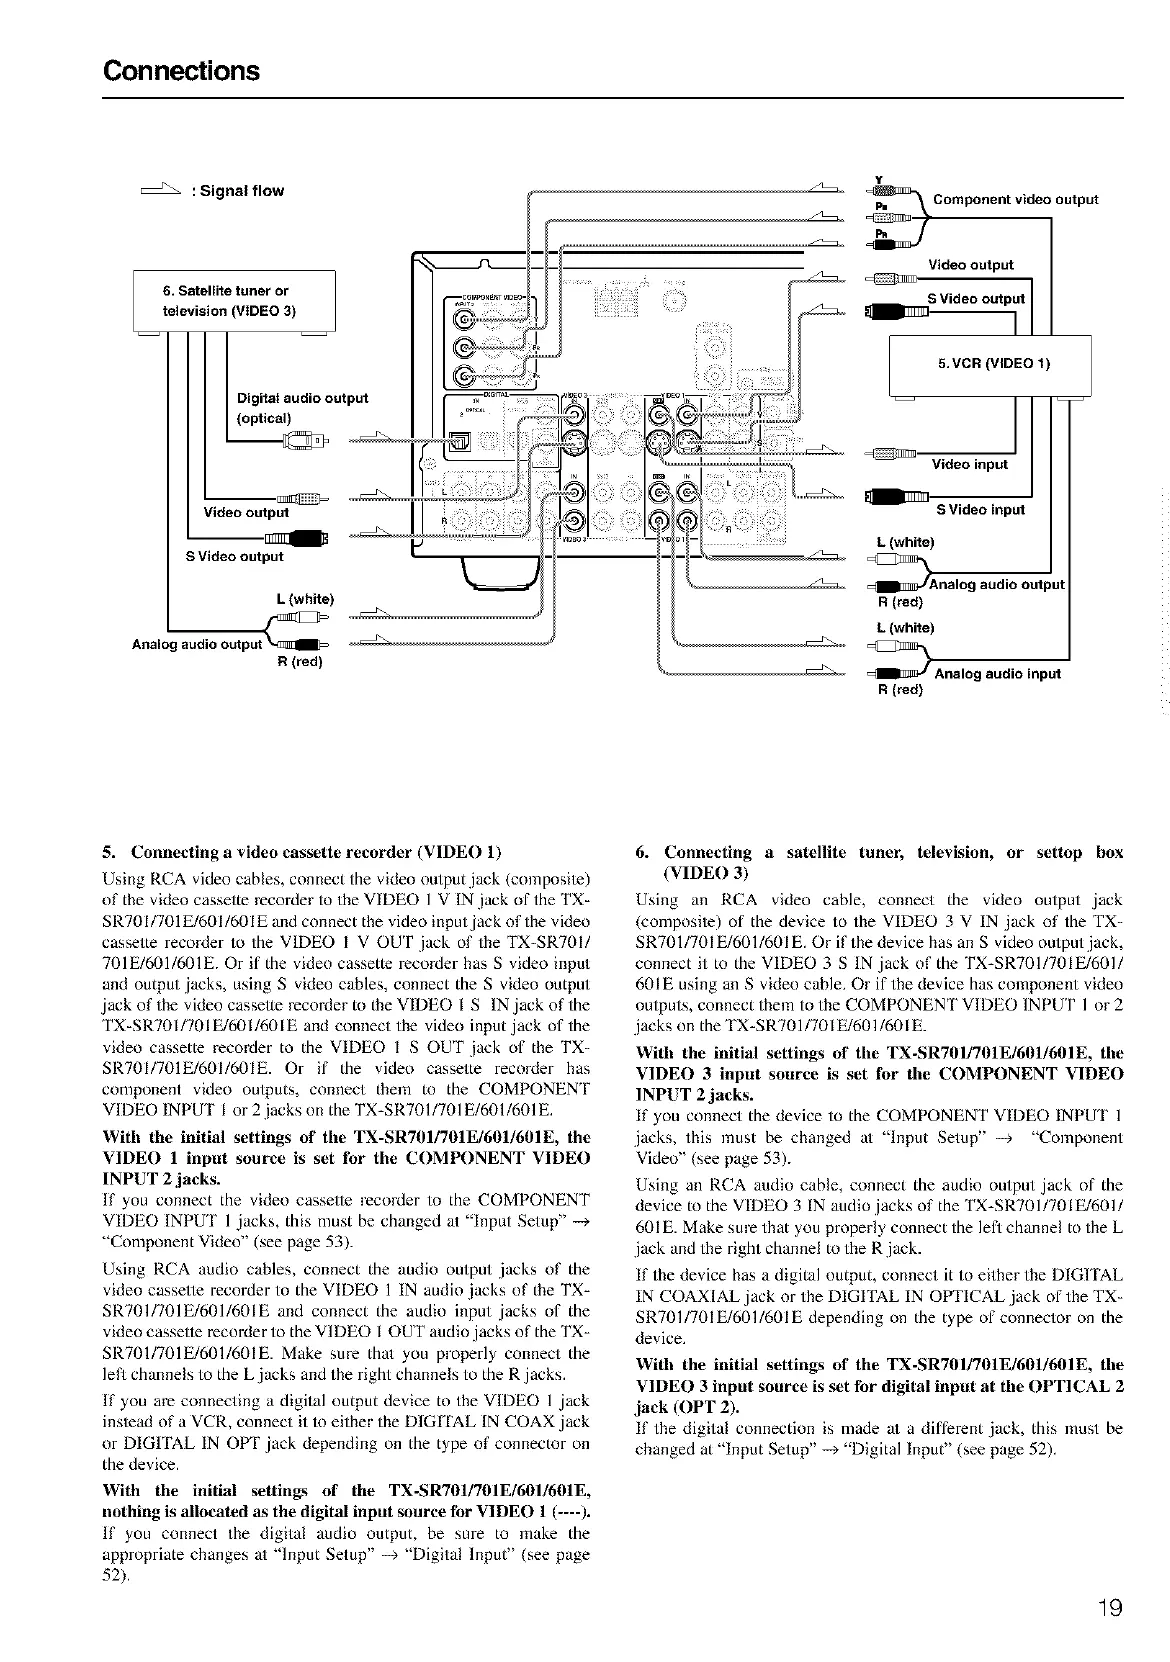
Connections
Y
: Signal flow _ Component video output
/
Video output
6. Satellite tuner or o_ _ _.
-- S Video output
television (VIDEO 3) .... I
I ll_I _ _I
- - I Il®®J II .vo,(V,DEO,)
I I I ; II
Digital audio output I I f_;-_"_°_ r-=_°E°_,;_- I _-- -
optica, I I I f
_ll Illllll I
I Vldeooutput II I ....... -- SVideoinput
(wh.e)
SVldeooutput V Ana,ogaudioouJut
L (white) R (red)
p'--_'_ut_ _ _L (white)
Analog audio out
R (red) _ _ Analog audio input
R (red)
5. Connecting a video cassette recorder (VIDE() 1)
Using RCA video cables, connect the video output,jack (composile)
of the video cassette recorder to the VIDEO 1 V IN,jack of the TX-
SR701/701 E/601/601E and connect the video input jack of the video
cassette recoMer to the VIDEO I V OUT ,jack of the TX-SR701/
701E/601/601E. Or if the video cassette recorder has S video input
and output jacks, using S video cables, connect the S video output
,jack of the video cassette recoMer to the VIDEO I S IN,jack of the
TX-SRT01/701E/601/601E and connect the video input ,jack of the
video cassette recorder to the VIDEO I S OUT ,jack of the TX-
SR701/701E/601/601E. Or if the video cassette recoMer has
component video ouiputs, connect them to the COMPONENT
VIDEO INPUT I or 2 jacks on the TX-SR701/701E/601/601E.
With the initial settings of the TX-SR701/7OIE/601/601E, the
VIDE() 1 input source is set for the COMPONENT VIDEO
INPUT 2 jacks.
If you connect the video cassette recorder to the COMPONENT
VIDEO INPUT 1 ,jacks, this must be changed at "Input Setup" -_
"Component Video" (see page 53).
Using RCA audio cables, connect the audio output jacks of the
video cassette recorder to the VIDEO 1 IN audio,jacks of the TX-
SRT01/701E/601/601E and connect the audio input jacks of the
video cassette recoMer to the VIDEO I OUT audio jacks of the TX-
SRT01/701E/601/601E. Make sure thai you properly connect the
left channels to the L,jacks and the right channels to the R,jacks.
If you are connecting a digital output device to the VIDEO 1 ,jack
inslead of a VCR, connect it m either the DIGITAL IN COAX,jack
or DIGITAL IN OgF,jack depending on the type of connector on
the device.
With the initial settings of the TX-SR701/7OIE/601/601E,
nothing is allocated as the digital input source for VIDE() 1 (----).
If you connect the digital audio output, be sure to make the
appropriate changes at "lnput Setup" -_ "Digital lnput" (see page
52).
6. Connecting a satellite tuner, television, or settop hox
(VIDE() 3)
Using an RCA video cable, connect the video output ,jack
(composile) of the device to the VIDEO 3 V IN ,jack of the TX-
SRT01/701E/601/601E. Or if the device has an S video output jack,
connect it to the VIDEO 3 S IN ,jack of the TX-SRT01/701E/601/
601E using an S video cable. Or if the device has component video
outputs, connect them to the COMPONENT VIDEO INPUT 1 or 2
jacks on the TX-SRT01/701E/601/601E.
With the initial settings of the TX-SR7OI/701E/601/6OIE, the
VIDEO 3 input source is set for the COMPONENT VIDE()
INPUT 2 jacks.
If you connect the device to the COMPONENT VIDEO INPUT 1
,jacks, this must be changed at "Input Setup" --_ "Component
Video" (see page 53).
Using an RCA audio cable, connect the audio output ,jack of the
device to the VIDEO 3 IN audio,jacks of the TX-SR701/701E/601/
601E. Make sure that you properly connect the left channel to the L
,jack and the right channel to the R,jack.
If the device has a digital output, connect it to either the DIGITAL
IN COAXIAL,jack or the DIGITAL IN OPTICAL,jack of the TX-
SR701/701E/601/601E depending on the type of connector on the
device.
With the initial settings of the TX-SR7OII7OIEI6OI/6OIE, the
VIDEO 3 input source is _t tbr digital input at the OPTICAL 2
jack (OPT 2).
If the digital connection is made a/a different ,jack, this must be
changed at "Input Setup" --9 "Digital Input" (see page 52).
19