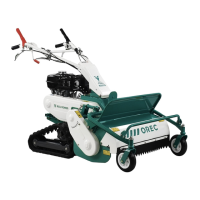
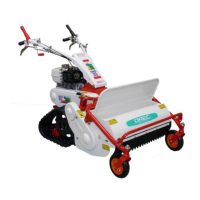
This document serves as an instruction manual for the OREC FL500 series lawn mower, specifically covering models FL500BC and FL500BC-Hi. It provides essential information for safe operation, maintenance, and troubleshooting.
Function Description
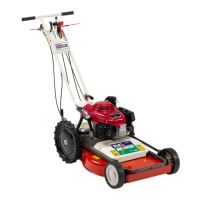
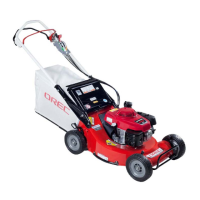
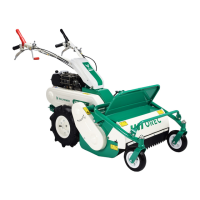
The OREC FL500 is a walk-behind rotary lawn mower designed for cutting grass. It is intended for efficient and safe work when operated according to the instructions provided in this manual. The machine is not designed to transport other tools or materials that might cause damage or injury, nor is it to be used to carry persons.
Important Technical Specifications
The manual details the characteristics of two models: FL500BC and FL500BC-Hi.
Common Specifications:
- Cutting width: 500 mm
- Height of cut: 20-80 mm
- Weight: 68 kg
- Fuel tank capacity: 1.4 liters
- Blade transmission: Belt
- Overall width: 580 mm
- Engine: HONDA GXV160
- Transmission: Belts
- Forward speed: (1) 1.5 km/h, (2) 2.5 km/h, (3) 4.0 km/h
- Reverse speed: 1.7 km/h
- Engine power (EC Conformity): 3.5 kW
Model-Specific Specifications:
- FL500BC Blade speed: 2268 rpm
- FL500BC-Hi Blade speed: 2968 rpm
EC Conformity Declaration:
- Measured acoustic power level: 93.55 dB(A)
- Granted acoustic power level: 96 dB(A)
- Acoustic pressure level at operator's ears: 81.3 dB(A)
Measurement of Vibrations (Handlebar):
- 100mm from external side of handlebar (Left side): 2.42 m/s²
- 100mm from external side of handlebar (Right side): 2.24 m/s²
Usage Features
The OREC FL500 mower is equipped with several controls for operation:
- Driving lever: Pushing it forward engages movement; releasing it stops the machine.
- Speed lever: Allows selection of three forward speeds (1.5, 2.5, 4.0 km/h) and one reverse speed (1.7 km/h). Speed should not be changed while driving; the travel lever must be released (OFF) first.
- Differential lock lever: Pushing it forward engages the rear wheels together for slipping conditions. It is crucial never to turn the machine with the differential locked.
- Throttle lever and Choke lever: The choke is used for starting a cold engine. Once started, it should be released. The throttle lever adjusts engine speed (HI for increased speed, LO for idle rpm). The mower should always be operated at full engine speed.
- Cutting blade clutch lever: This lever engages the blade for mowing. It requires a two-action push, then pulling the lever rearward to engage the blade. Releasing it stops the blade. The engine should never be started or stopped with the blade engaged.
- Fuel cock: Controls the fuel supply. It is closed when pushed rearward and open when pushed forward.
- Height of cut control: A crank-lever allows adjustment of the cutting height from 20-80 mm. Turning clockwise increases height, anti-clockwise decreases it. This adjustment must always be performed with the engine off and the sparking plug cover unplugged. Cutting at low positions increases power demand and the risk of thrown objects.
Starting the Engine:
- Turn the fuel cock "ON".
- Ensure cutting blade and travel lever are disengaged.
- Pull the choke lever if the engine is cold, or push the throttle lever halfway if the engine is hot.
- Pull the starter rope.
- Once the engine starts, push back the choke lever.
- Select a speed ratio and begin mowing.
Mowing:
- It is recommended to mow frequently rather than cutting a large quantity of grass in one operation.
- Avoid working on slopes exceeding 15° due to danger.
- Engage the cutting blade control lever and travel lever slowly, increasing engine speed to maximum before entering the grass.
- The optimal cutting speed varies with grass quantity and density, typically between 2.5 and 6 km/h. Tall grass requires slower cutting, while low grass can be cut faster.
- The mowing path must be cleared of foreign objects (stones, wood, cans, bottles, steel pieces) to prevent injury from thrown objects.
Stopping the Machine:
- Release the driving lever and blade clutch lever.
- Pull the throttle lever backward to stop the engine.
- Close the fuel cock.
- Lock the parking brake lever.
- Never park the machine on slopes; always stop it on a level, flat surface.
Maintenance Features
Regular maintenance is crucial for the machine's longevity and safe operation. Some operations are user-performed, while others require a dealer.
Daily Maintenance (Before Mowing):
- Fuel: Check the tank level and ensure the plug is fully closed with no leaks. Use good quality unleaded gasoline. When refueling, ensure the fuel tank is closed, wipe spillages, and keep away from fire, electric sparks, and cigarettes.
- Safety stickers: Verify they are in place and in good condition; replace if worn or missing.
- Blade and blade holder condition: Always wear gloves when handling blades. Check rotary blades for good condition; replace if worn, bent, or cracked. Ensure hexagonal screws and washers are correctly tightened. Sharpen blades to a 30-40° angle, maintaining a 0.4-0.6 mm sharp edge and 30 mm width.
- Air filter: Dismantle by removing wing nuts. Blow the cartridge with low air pressure from inside to outside (opposite to normal airflow). Replace the cartridge if too dusty or after five cleanings. Clean the foam with water and soap, dry it, and lightly oil with engine oil before reassembling.
Monthly Maintenance:
- Engine oil level: Refer to the engine manual.
- Driving wire adjustment: When the driving lever is pulled, there should be a 20-30 mm distance. Adjust the tension of the change wire by loosening/screwing the idler adjustment nut until the distance is correct.
- Blade wire adjustment: The blade lever should have 3-8 mm of play. Adjust the tension of the blade wire by loosening/adjusting the tension adjustment nut until the play is correct.
- Change wire: If the machine does not stop when the driving lever is released, adjust the tension of the change wire by unscrewing/tightening the tension adjusting nut.
- Differential lock wire: Tighten the wire if the differential is not engaged, or slacken it if the differential lock is not adjustable. This involves loosening/tightening the tensioner and lock nut.
- Belts adjustment:
- Transmission belt: Check for cracks and wear; replace if necessary. A loose belt slips and wears quickly, while a too-tight belt wears bearings.
- Blade belt: With the engine stopped and sparking cover disconnected, engage the blade lever. Push the belt with a finger; it should move 10-12 mm. Adjust the tension wire near the lever if needed. Ensure belt guides are 4-6 mm from the tightened belt.
- Travel belt: With the engine stopped and sparking cover disconnected, unscrew transmission cover bolts. Engage the travel lever. Push the belt with a finger; it should move 10-12 mm. Adjust the tension wire near the lever if needed. Ensure belt guides are 3-5 mm from the tightened belt.
- Tightening of bolt and nuts: Check according to the provided torque chart, as vibrations can loosen them.
- Engine: Refer to the engine manual.
- Protection: Ensure rubber protections are in good condition and replace immediately if damaged.
Annual Maintenance:
- Change engine oil: Drain oil early in the season or once a year, preferably when the engine is hot. Unscrew the drain plug and oil filler cap. Replace the drain plug after all old oil is out. Top up with 0.65 L semi-synthetic SAE 10W30 or API SL class oil. Check the oil level (between 1 and 2 on the dipstick). Do not discard used oil; bring it to a recycling center.
- Oil replacement frequency: First replacement after 20 hours; subsequent replacements every 100 hours or annually, whichever comes first.
Storage:
- Thoroughly clean the machine.
- Use touch-up paint to prevent rust.
- Check for worn or damaged parts and install new ones as required.
- Perform normal maintenance according to the chart.
- Store the machine in a dry, protected area.
- Remove the sparking ignition wire from the sparking plug.
Transport:
- Ensure the cutting rotor is disengaged.
- Ensure the sparking plug cover is disconnected.
- Ensure the fuel cock is closed.
- Be cautious of hot surfaces, especially around the engine.
The manual emphasizes the use of genuine OREC parts to ensure correct and safe operation and to maintain warranty validity. It also provides a breakdown of common problems and their solutions, along with a tightening torque chart for various screw diameters.