Quick Start
During the procedure described below, you will connect the Power cable, the Multi I/O
cable, and the Ethernet cable to the unit. These cables are included in the Evaluation kit. If
you plan to use your own cables, some of these instructions may not apply.
The step-by-step instructions below outline the VersaSync installation and configuration
process:
1.
Install VersaSync in the designated vehicle:
Choose a mounting location within reach of your antenna and networking
cables
Optionally, ground the unit by connecting the DC negative terminals to the
chassis of the unit, and to the vehicle metallic structure.
The mounting plate should be in direct contact with the unit base plate, and
the mounting surface is even and heat conductive.
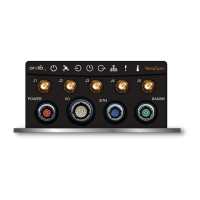
2.
Connect the power supply. The unit will power up, and the ON/OFF status LED
will pulsate.
Requirement Action Evaluation kit cable
Power up Connect 12 V
DC
to the
power connector.
Attach a cable and apply 12 V
DC
to the plug labeled
"Main" (CA08R-CRPB-0002)
Caution: If your unit does not power up, there may be a problem with
your cables. If this is your first installation using your cables, check
the polarity of the wires and confirm that the unit will power up nor-
mally before proceeding with these steps or making any other con-
nections.
3.
Install the GNSS antenna(s). Follow your antenna manufacturer's instructions.
4.
Wire the antenna cables and interface cables. (Most customers will require the
Multi I/O and Ethernet cables for these connections.)
USB: Connect the Multi I/O connector to the VersaSync unit. If you are using
the Evaluation Kit, connect the Multi I/O USB output to a PC. Install a ter-
minal emulator program on the PC (e.g., TeraTerm
®
or PuTTY
®
).
Ethernet: Connect the Ethernet cable to the ETH port of the unit. If you are
using the Evaluation Kit, connect at least one of the two I/O cable Ethernet
VersaSync Getting Started Guide Rev. 8 13