24 Part Number 550-110-772/0816
OSB
Series 2 Oil-Fired Steam Boilers – Boiler Manual
11 Replacement parts continued
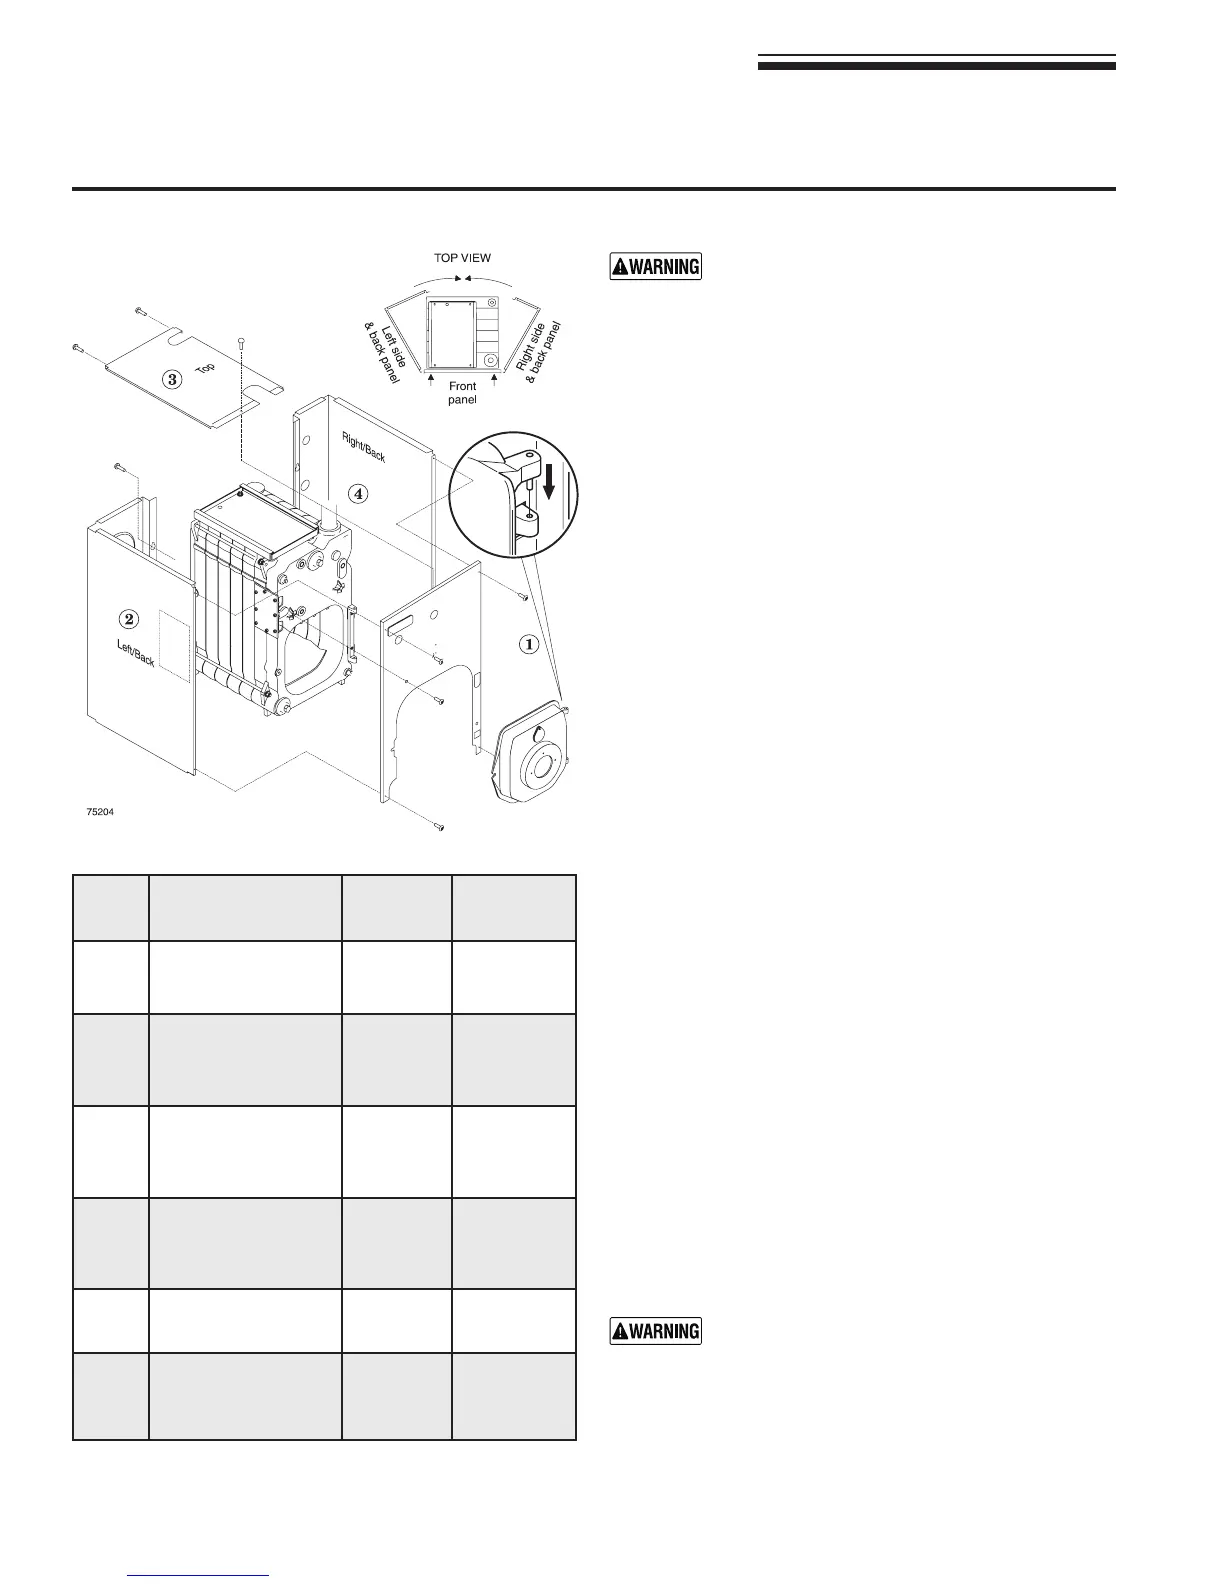
Figure 16 Jacket parts and replacement instructions
The boiler contains ceramic fiber and fiberglass
materials.Usecarewhenhandlingthesematerials
per instructions on page 28 of this manual. Failure
to comply could result in severe personal injury.
Before installing jacket:
Before installing jacket:
1. Remove the following knockouts:
• Steamreturnknockout(lowerleftbackpanel).
• Reliefvalveknockout(upperrightbackpanel).
• Rectangular tankless heater and tankless control
knockouts (left side panel), if tankless heater is to be
installed.
• Remaining knockout(right back panel) if indirect-red
water heater is to be installed.
2. Makesureallunusedtappingsareplugged.
3. These parts may be on boiler:
• Supplypiping
• Drainvalve
• Tanklessheater
4. These parts must be off boiler:
• Breechingconnection
• Steamorwatertrimpartsandpiping
• Tanklessheatercontrolandpiping
• Returnpiping
• Steamorwaterreliefvalveandpiping
5. Remove burner mounting door by removing locking nut and
lifting door off hinge. Do not remove hinge.
To install jacket:
1. Installjacketfrontpaneltofrontsection,makingsureburner
door hinge lugs extend through holes in lowerjacket leg.
Securewithtwo(2)3/8”x1/2”blackmachinescrews.
2. Right and left side pieces are shipped as straight pieces.
Before installing, bend about 90° at perforation as shown, to
form sides and back panels.
a. Securesidepanelstofrontpanelwithfour(4)sheetmetal
screws.
b. Tosecurebackpanels,usingtwo(2)1/4”x1/2”self-tapping
screws:
1)Startupperscrewinboilersection.Donottighten.
2)Slipkeyholeopeninginbackpanelsbehindscrew.
3)Installlowerscrewandtightenbothscrews.
c. Installtoppanelandsecurewithtwo(2)sheetmetal
screws.
3. Reinstall burner mounting door and secure locking nut on
stud, making sure door is secured gas-tight.
Gas-tightsealmustbeobtainedatdoortoprevent
possibleue gas leakage and carbon monoxide
emissions, leading to severe personal injury or death.
Item
number
Description Boiler
model
number
Part number
1
Jacket panel, front
All 426-722-005WT
2
Jacket panel, left side and
back
OSB-3
OSB-4
OSB-5
OSB-6
426-722-227WT
426-722-229WT
426-722-231WT
426-722-233WT
3
Standard Jacket panel,
top for back outlet
OSB-3
OSB-4
OSB-5
OSB-6
426-722-015WT
426-722-017WT
426-722-019WT
426-722-021WT
4
Jacket panel, right side
and back
OSB-3
OSB-4
OSB-5
OSB-6
426-722-037WT
426-722-039WT
426-722-041WT
426-722-043WT
Jacket hardware kit
(screws for assembly)
All 386-700-845WT
Optional Top Vent Service
Kit
(includes jacket top, jacket cover,
collector hood, vent cover and
vent cover strap)
OSB-3
OSB-4
OSB-5
OSB-6
386-700-200WT
386-700-201WT
386-700-202WT
386-700-203WT