25
3
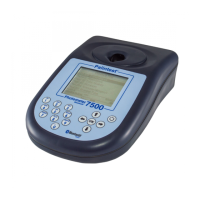
Photometer 7500 BT
5 Calibration curves relate transmission/
absorbance to concentration to provide result
data but not all calibration ranges are linear.
Frequently at higher concentrations the curve
‘flattens’ leading to higher potential variability
in results. If greater accuracy is required than
can be achieved on neat samples then dilution
can be used to improve performance.
6 Ensure the photometer cuvette is clean, has
no droplets on the outside and not excessively
scratched. Good technique is to wipe the outside
surface of the cuvette prior to inserting into
the optical chamber to prevent contamination
of the optical system.
7 Always use good quality, genuine Palintest
cuvettes. Use the orientation mark to ensure
repeatable positioning of the cuvette.
8 Maintain the cleanliness of the optical chamber
by only inserting clean cuvettes. If the chamber
becomes fouled or sample is spilled the base
can be removed for cleaning access. Clean the
optical chamber with a soft cloth. Do not use
abrasive chemicals or scouring agents.
9 Always use the light cap provided to prevent
ambient light affecting results. This is especially
relevant when operating in strong sunlight or
other light conditions.
10 Ensure your Photometer 7500 Bluetooth is
operating effectively by using Palintest Check
Standards and the Check Standard Mode (see
Section 3.7 Calibration/Validation) and having the
photometer serviced and calibrated at regular
intervals. Calibration is recommended at 12
month intervals for normal usage and can be
provided by your local Palintest distributor.
3.9 Troubleshooting
The Photometer 7500 Bluetooth features self-
diagnostic software and hardware to optimise
performance and battery life. The Info Panel
indicates the status of the Photometer 7500
Bluetooth and any specific fault conditions are
defined and displayed on screen.
Optical Errors
I have an Error 9 message
Error 9 is caused by the blank cuvette being too
dark to allow the blanking step to be carried out.
Check that the correct cuvette is being used i.e. ensure
the sample cuvette is not being used for blanking.
If the sample is too highly coloured or contains
significant solids, dilute and repeat the blanking step.
If the problem persists and the blank cuvette is not
the issue, clean the optical chamber by removing
the access cover and cleaning with a soft cloth.
Do not use corrosive or abrasive chemicals.
I have an Error 7 message
Error 7 is caused by too much ambient light
reaching the detector. Use the light cover
provided with the instrument.
Check Standard Issues
How do I maintain my Check Standards?
Check Standards are manufactured to precise
values/tolerances, certified against traceable
reference materials and provided in sealed
cuvettes. Do not decant or remove the sealed
cap from the Check Standard.
Ensure the Check Standard cuvettes are clean
and dry using lint-free cloths before inserting
into the optical chamber.
Insert the Check Standard aligning the orientation
arrow towards the front of the optical chamber.
Values assigned to calibration standards are
defined at 20-25°C. Extremely high or low
ambient temperatures can affect Check Standard
results so ensure standards are at the defined
temperature to effectively validate.
Check Standards have a two year shelf-life, after
which the colours will no longer be valid. Please
dispose of the expired standards after this period
according to the MSDS.
My Check Standard validation has failed
Photometers may fail the Check Standard validation
step due to the requirement for service/calibration.
Contact your local Palintest partner for service
and support.
Ensure the Check Standards are inserted correctly,
using the orientation mark to align and inserted
fully. Use the light cap to prevent any ambient
light interference.
Service/calibration is recommended at annual
intervals in normal operation.
 Loading...