Do you have a question about the Panasonic Advidia A34 and is the answer not in the manual?
Details FCC compliance rules and limits for digital devices regarding radio frequency interference.
Specifies the two conditions under which the device must operate to comply with FCC rules.
Confirms product compliance with harmonized European standards and directives, including safety and EMC.
Highlights potential risks of serious injury or death if safety warnings are not followed.
Details potential risks of injury or equipment damage if safety cautions are not observed.
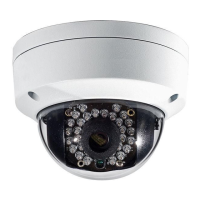
Lists essential pre-installation checks, including package contents and power status.
Guides users through drilling holes for cables and mounting screws based on a template.
Instructions for detaching the camera's bubble and connecting necessary cables.
Steps for fixing the mounting base and adjusting the camera's 3-axis surveillance angles.
Final steps to reattach the protective bubble and ensure the camera is securely installed.
Explains LAN connection needs and outlines initial configuration steps using a finder utility.
Using the Advidia Camera Finder to automatically search for and identify network cameras.
Steps to select cameras and modify their login credentials and network configuration details.
Accessing Login Manager to set credentials and Edit Table to change IP addresses.
Details on default IPs, credentials, and configuring the gateway for network access.
Lists necessary hardware and software specifications for accessing the camera via web browser.
Basic steps to open a web browser, enter the camera's IP, and log in.
Description of login screen and instructions for installing the essential browser plug-in.
Visual guide for downloading and step-by-step process for installing the web components plug-in.
Completing the plug-in installation and re-accessing the camera via the web browser.
| Night Vision | Yes |
|---|---|
| Ingress Protection | IP67 |
| Sensor Type | CMOS |
| Lens | 2.8mm |
| IR Range | Up to 30m |
| Video Compression | H.264 |
| Power Supply | DC 12V |
| Day/Night | IR cut filter with auto switch |
| Network Interface | RJ45 |
| Audio | No |