9
CABINET INSTALLATION
INSTALLATION DU BOÎTIER
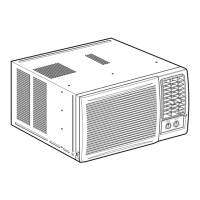
• Expand the expandable panel fully into the grooves of the
window frame, secure the expandable panel left and right
and top mounting frame to the bottom of the window
sash using 6 type A screws and 2 type C screws.
• Secure the cabinet using 2 type A screws.
• Cut the window sash foam seal to the proper size and
seal the opening between the top of the inside window
sash and the outside window sash.
Note : If a gap exists between the unit and window sash,
you may use the sealer supplied with the installation
kit for a better seal.
Window sash sealing ribbon
Bande d’étanchéité du cadre
de la fenêtre
1
Cut the “Sealing Ribbon” to the proper length, and attach it along
the bottom edge of the bottom window sash.
1
Coupez la bande d’étanchéité à la longueur voulue, et la fixer tout
au long du bord inférieur du cadre de la fenêtre.
3
Secure the cabinet using screws.
3
Fixer ler boîtier en utilisant les vis.
Type A screw
Vis Type A
Window sill
Appuie de
fenêtre
Type A screws
Vis Type A
Expandable panel
Panneau extensible
Type A screws
Vis Type A
Type C screws
Vis Type C
Inside of sash
Intérieur du cadre
Top bracket
Support supérieur
Sealing ribbon
Bande d’étanchéité
Window sash
Cadre de la fenêtre
Outside of sash
Extérieur du cadre
•Étendez complètement le panneau extensible dans les rainures du
cadre de la fenêtre, fixez le panneau extensible à gauche et à droite et
montez la partie supérieure du cadre sur le rebord de la fenêtre en
utilisant 6 vis de type A et 2 vis de type C.
• Consolidez le boîtier en utilisant les vis à bois de type A.
• Coupez la mousse d’étanchéité du cadre de la fenêtre à la longueur
voulue et joignez l’ouverture entre la partie supérieure de l’intérieur
et de l’extérieur du cadre de la fenêtre.
Note : Si vous constatez un vide entre l’appareil et le cadre de la fenêtre,
vous pouvez utiliser le mastic fourni avec la trousse d’outillage.
CHASSIS INSTALLATION INTO THE CABINET
MONTAGE DU CHÂSSIS DANS LE BOÎTIER
1
Slide the chassis into the cabinet
1
Glisser ler châssis dans le boîtier
2
To prevent condensed water from dripping inside, the cabinet should
be installed level or very slightly tilted to the outside.
2
Pour éviter l’égouttement de I’eau condensée à l’intérieur, le boîtier
devrait être installé de niveau ou légèrement penché vers I’extérieur.
9
 Loading...