7
Exposed type
3
*It is also possible to mount in the order
2
→
1
→
3
.
Screw
(Supplied)
Claw (2 locations)
Claw (2 locations)
1
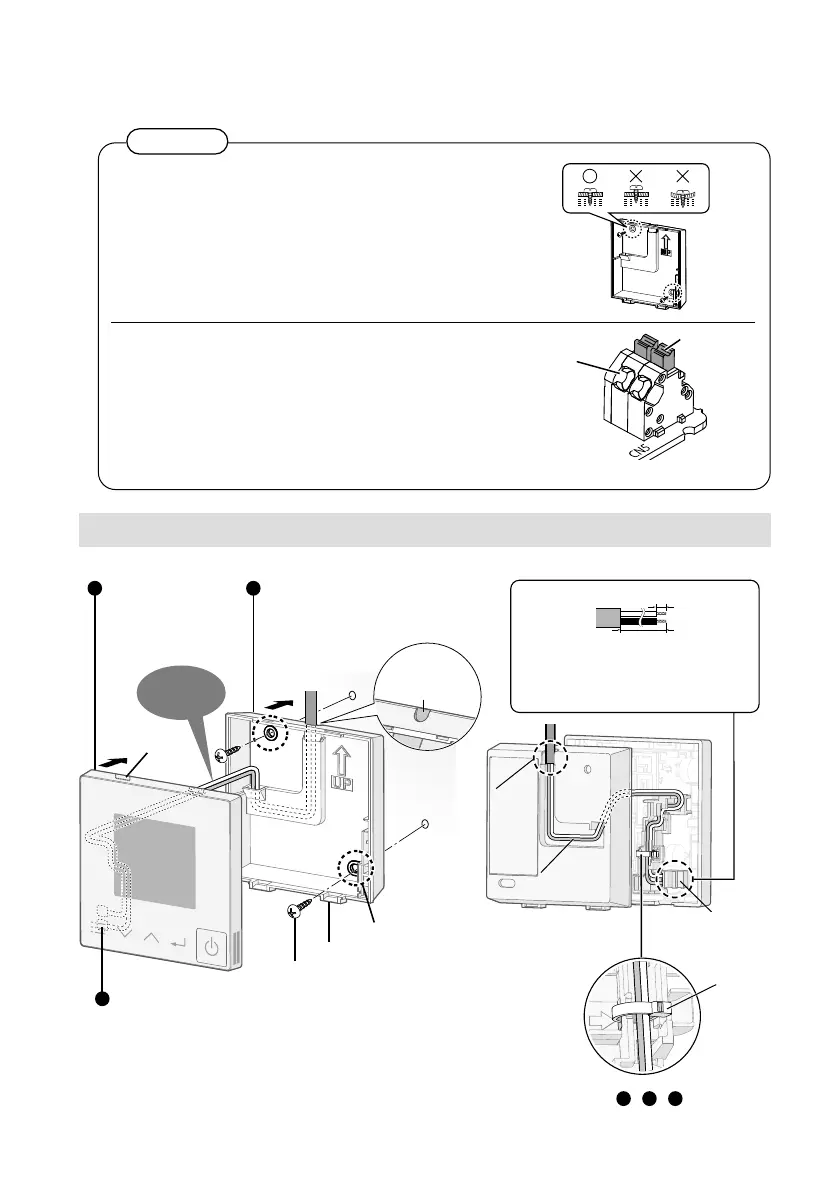
Mount the bottom case to the wall.
● Pass the wire through the wiring
hole in the bottom case and lay the
wire out along the groove.
Mount the top case.
●
Align the claws of the top
case and then align the
claws of the bottom case.
Cut here with
a nipper and
remove the burr
with a file.
Connect the remote control wiring.
• Be sure not to allow unnecessary wires to remain
in the remote controller case when wiring. Be
careful not to allow wires to be in contact with
parts on the PCB. For connection method, refer
to
“
Connection to the remote controller terminal
board
”
in
“
Attention
”
.
Avoid the
wire being
caught.
Hole for screw
Clamper
(supplied)
•
Insert the clamper from the
position indicated by the arrow,
as shown in the diagram at right.
•
Put the locking part of the
clamper in the channel as
indicated by the arrow.
•
If you lock at the top, it may not
be possible to close the bottom
case.
Remove the coating. Approx. 9 mm
Remove the sheath. Approx. 130 mm
●Make sure the wiring connection is in the
correct direction.
●
There will be a slight diff erence in length due
to the wiring diameter, so make adjustments
on site when performing the installation.
Remote controller
terminal board
Push the sheath
in to the back as
shown on the
illustration.
Insert the wire properly
into the channel on the
bottom case, and make
sure the wire is not
pinched when the case
is attached to the wall.
2 Mount to the wall.
There are 2 types of wall-mounting methods: Exposed type and Embedded type.
Mounting the bottom case
Tighten the screws securely until the screw heads touch the bottom
case.
(Otherwise, loose screw heads may hit the PCB and cause
malfunction when mounting the top case.)
Do not over-tighten the screws.
(The bottom case may be deformed, resulting in the unit becoming
detached from the surface it is fixed to.)
Connection to the remote controller terminal board
Depress the push button using a round bar or fi nger, insert the
remote control wiring securely from the wiring insertion slot and
release the push button.
Pull the remote control wiring lightly, and confi rm it is secured.
There is the danger of shorting if copper wire is exposed. Make sure
the wire is properly inserted.
Insertion slot
Push button
Remote controller terminal board
Attention
A protective fi lm is attached on the Control panel.
2
 Loading...