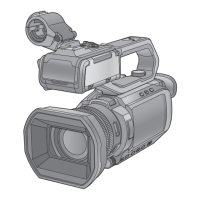
Chapter 2 Description of Parts — Handle unit ([X2000] supplied, [X1500] optional: VW-HU1)
- 24 -
Handle unit ([X2000] supplied, [X1500] optional: VW-HU1)
1
Handle
2
Microphone holder mounting section (l 33)
Attaches the supplied microphone holder with the microphone holder
mounting screws.
3
Microphone holder (l 33, 35)
Secures the external microphone in place.
4
Buckle (l 33, 35)
Used to open and close the microphone holder.
5
<INPUT 1> terminal (XLR, 3-pin) (l 35, 125)
Connects an audio equipment or an external microphone.
6
<INPUT 2> terminal (XLR, 3-pin) (l 35, 125)
Connects an audio equipment or an external microphone.
7
Microphone cable clamp (l 35)
Fixes the external microphone cable.
8
<INPUT1> switch (l 126)
Switches audio input signals connected to the <INPUT 1> terminal.
<LINE>: Select when audio equipment is connected by the line input.
<MIC>: Select when the external microphone is connected.
<i48V>: Select when the external microphone is connected and the
microphone needs a power supply.
9
CH1 SELECT switch (l 125)
Selects the audio to be recorded on audio channel 1.
<INT/MIC (L)>: Records left audio from the built-in microphone or
<MIC> terminal.
<INPUT1>: Records input signals from the <INPUT 1> terminal.
10
CH2 SELECT switch (l 125)
Selects the audio to be recorded on audio channel 2.
<INT/MIC (R)>: Records right audio from the built-in microphone or
<MIC> terminal.
<INPUT1>: Records input signals from the <INPUT 1> terminal.
<INPUT2>: Records input signals from the <INPUT 2> terminal.
11
<INPUT2> switch (l 126)
Switches audio input signals connected to the <INPUT 2> terminal.
<LINE>: Select when audio equipment is connected by the line input.
<MIC>: Select when the external microphone is connected.
<i48V>: Select when the external microphone is connected and the
microphone needs a power supply.
12
<AUDIO LEVEL CH2> dial (l 126)
Adjust the recording level of audio channel 2.
13
<CH2> switch (l 126)
Selects how the recording level for audio channel 2 is adjusted.
<AUTO>: Adjusted automatically.
<MANU>: Adjusted manually with the <AUDIO LEVEL CH2> dial.
14
<CH1> switch (l 126)
Selects how the recording level for audio channel 1 is adjusted.
<AUTO>: Adjusted automatically.
<MANU>: Adjusted manually with the <AUDIO LEVEL CH1> dial.
15
<AUDIO LEVEL CH1> dial (l 126)
Adjust the recording level of audio channel 1.
16
Handle unit mounting screw (l 33)
Secures the handle unit to the main unit.
A With a microphone holder attached
8
15 1214 13
1110
16
9
6 5
7
1
2
3
4